Overview
EYELAH is a desktop application specifically programmed for Freshmen staying on NUS Campus. It aims to ease their lives at halls/residential colleges by providing them with an application to split bills easily and help them track their diet. The user interacts with it using a CLI and it is programmed using JAVA 11.
Summary of contributions
-
Major enhancement:
-
Integrating 2 main features of EYLAH by common generic class. (Pull request #140, #232, #357 #367)
-
What it does:
Ensure both of the features integrated in the main application. -
Justification:
The integration can help to reduce the duplicate code in theEYLAHwhich cased by the features done by different sub group. -
Highlights:
During the implementation, I faced a lot of difficulty as we working on the existingAddressBook Level-3, the code base given does not show how to integrate 2 different features. I have decided to modify some common use class to generic version in order can be implemented by both features. -
Credits:
N.A.
-
-
Added the expense splitter storage component to allowed the application to automatically save the Receipt in local file. (Pull request #197)
-
What it does:
Allow EYLAH to save the receipt details into a local files after execution of each command. -
Justification:
This will allow the user to be able to view the receipt details even they accidentally close the application or the application crashing. The receipt details will store in the local file after each command to ensure the updated data in the local storage. -
Highlights:
The structure of the receipt storage is much more complicated from the originalAddressBook Level-3storage. So when I implementing this storage, I am required to understand how the Json file store the value. The receipt storage has much more complicated structure compare to other storage structure. It contains nested json structure to store the different entry of item and person involved. -
Credits:
N.A.
-
-
-
Minor enhancement:
-
Create
ExitCommandandBackCommandfor the application (Pull request #357)-
What it does:
Allows user to go back to main menu when in either one of the feature mode and exit the application at any point of time. -
Justification:
The user now have the option to go back main menu if want to use another feature. They also able to exit the application through the command instead of close the app through the mouse curser to click the exit button. -
Highlights:
TheExitCommandin the main menu handle differently as it directly handle byEylah.javainstead of going through theModelManager#execute()to create theExitCommandobject. -
Credits:
N.A.
-
-
-
Code contributed:[Functional code and Test Code]
-
Other contributions:
-
Project management:
-
In charge of project repository management and ensure the weekly task achievement.
-
Participated in planning the project timeline for EYLAH.
-
-
Enhancements to existing features:
-
Adapted the given Address Book Storage into EYLAH’s Storage.
-
-
Documentation:
-
Community:
-
Contributions to the User Guide
Given below are sections I contributed to the User Guide. They showcase my ability to write documentation targeting end-users. |
Display the available commands : help
In this section, you will learn more about help command, how to use it
and the expected outcome after using the help command.
Summary of Help Command:
help You can use the help command, if you are uncertain, to see the list of available commands.
This command can be used everywhere in the application.
How to use the Help Command:
Format:
help
Valid Example:
help
Expected outcome:
Main Menu:
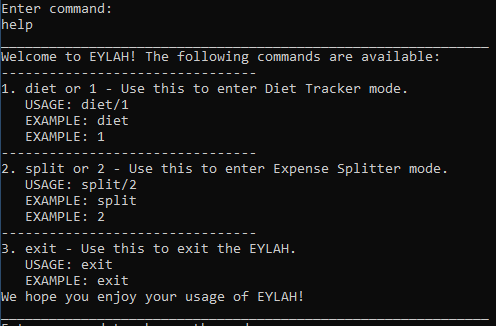
Diet Tracker Mode:
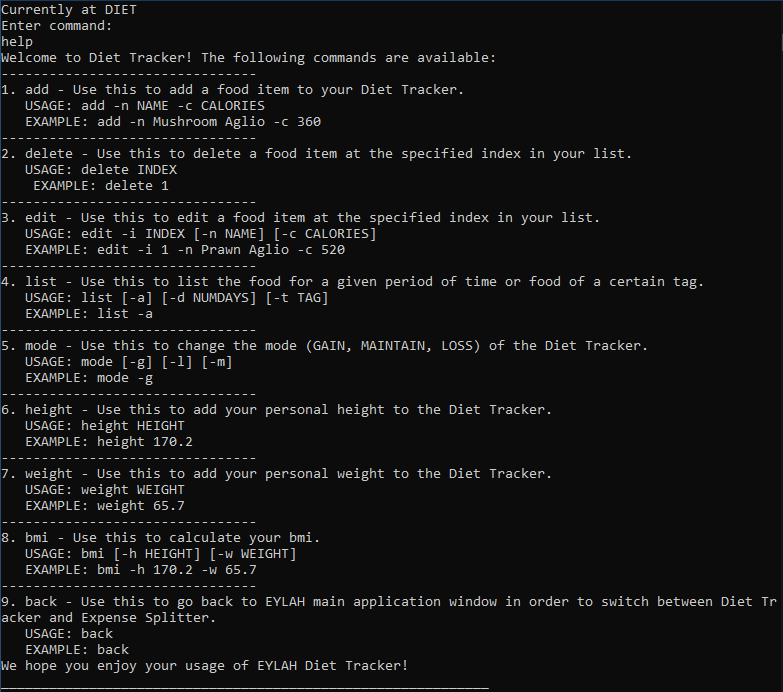
Expense Splitter Mode:
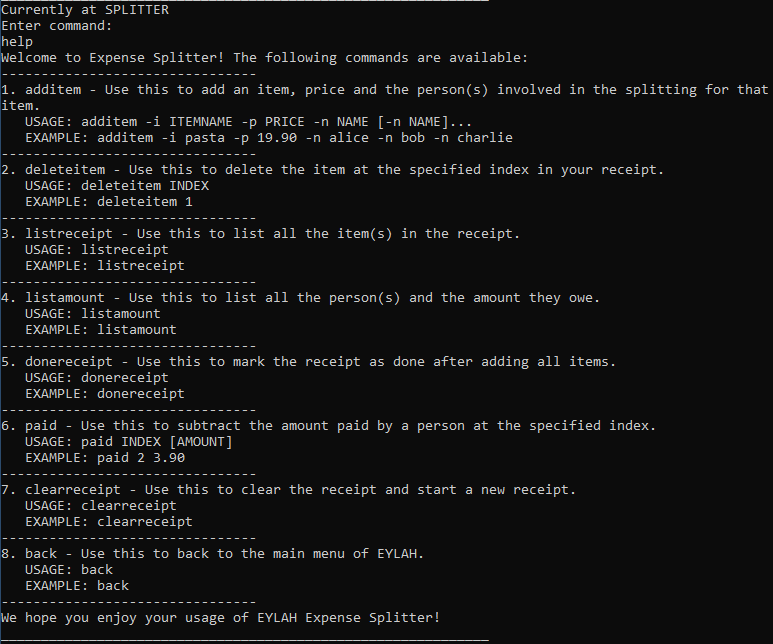
Additional notes and tips
|
Help in main menu and different mode will give different help information. |
Mark receipt as done donereceipt
In this section, you will learn more about the donereceipt command, how to use it
and the expected outcome after using the donereceipt command.
Summary of Done Receipt Command: donereceipt *marks the receipt as done when you have completed entering
all the items.
How to use the Done Receipt Command:
Format:
donereceipt
Example:
donereceipt
Expected outcome:

|
Exiting Expense Splitter to go back to main menu back
In this section, you will learn more about the back command, how to use it
and the expected outcome after using the back command.
Summary of Back Command:
back allows you to exits Expense Splitter mode to go back to main menu of the application.
How to use the Back Command:
Format:
back
Valid Example:
back
Expected outcome:

Exiting the Application : exit
In this section, you will learn more about exit command, how to use it
and the expected outcome after using the exit command.
Summary of Exit Command:
exit You can use this command everywhere in the application to exit.
How to use the Exit Command:
Format:
exit
Valid Example:
exit
Expected outcome:

Contributions to the Developer Guide
Given below are sections I contributed to the Developer Guide. They showcase my ability to write technical documentation and the technical depth of my contributions to the project. |
Architecture
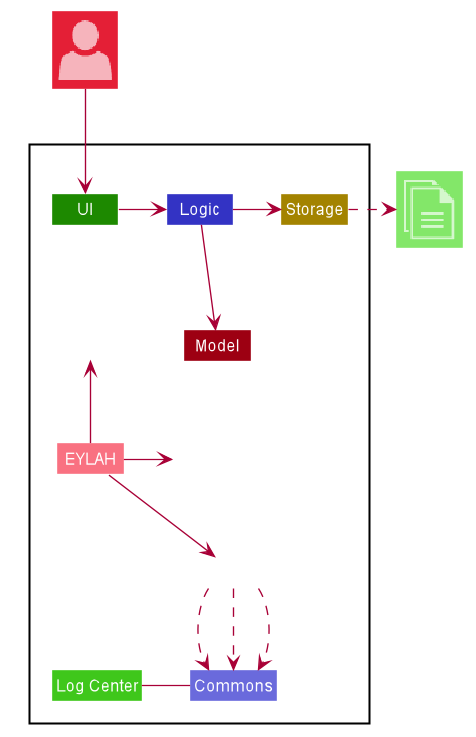
The Architecture Diagram given above explains the high-level design of the application. Given below is a quick overview of each component.
The .puml files used to create diagrams in this document can be found in the diagrams folder.
Refer to the Using PlantUML guide to learn how to create and edit diagrams.
|
EYLAH contains the main class for the application. It is responsible for,
-
At app launch: Initializes the components in the correct sequence, and connects them up with each other.
-
At shut down: Shuts down the components and invokes cleanup method where necessary.
Commons represents a collection of classes used by multiple other components.
The following class plays an important role at the architecture level:
-
LogsCenter: Used by many classes to write log messages to the App’s log file.
The rest of the App consists of four components.
Each of the four components
-
Defines its API in an
interfacewith the same name as the Component. -
Exposes its functionality using a
{Component Name}Managerclass.
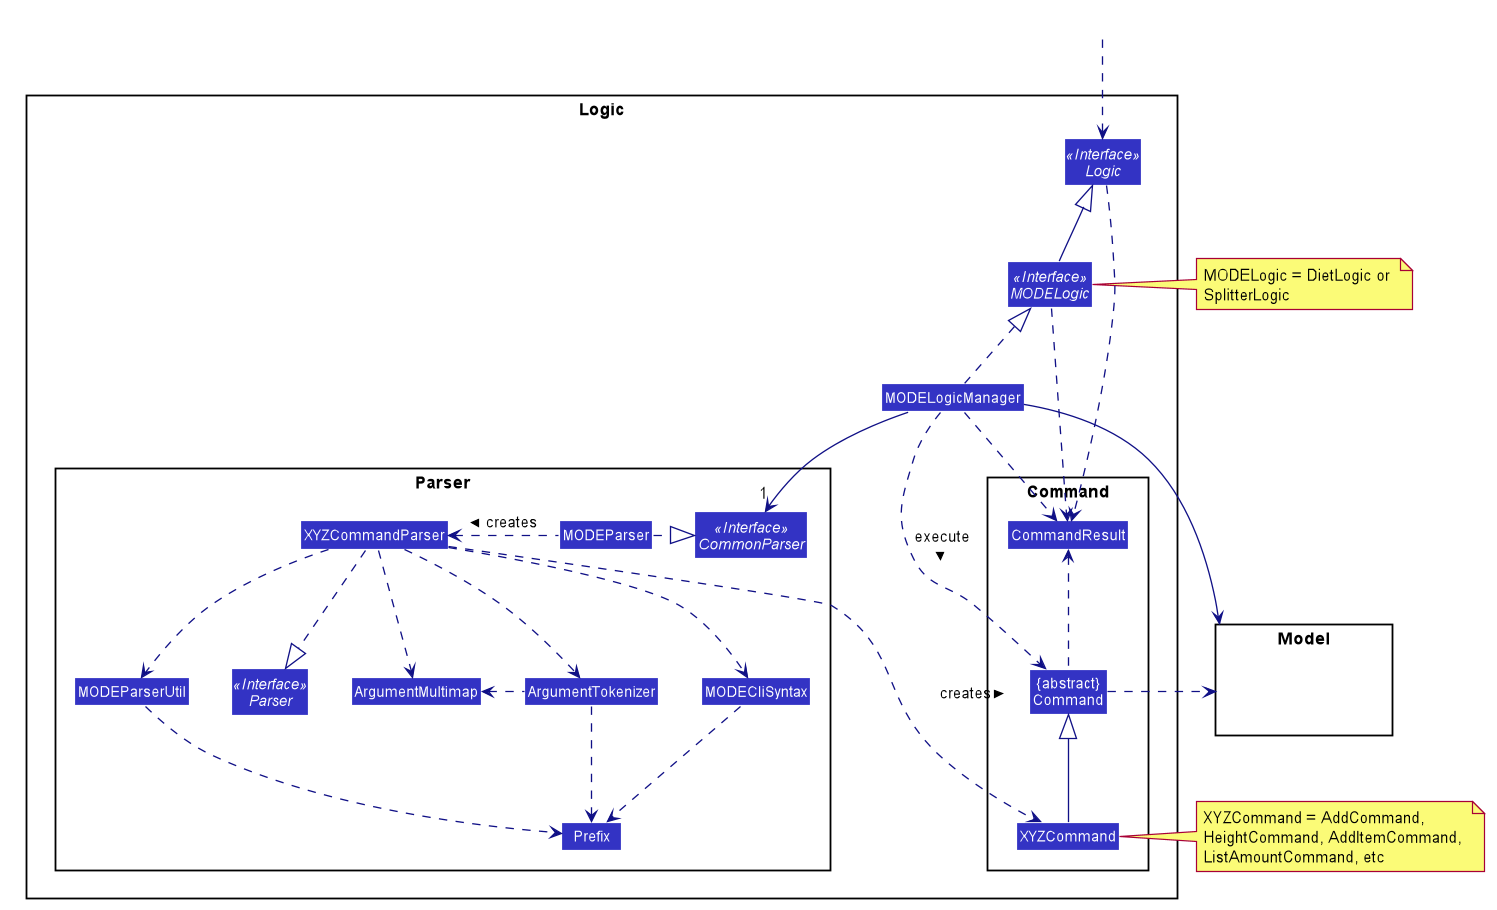
For example, the Logic component (see the class diagram given below) defines it’s API in the Logic.java interface and MODELogic.java interface and exposes its functionality using the MODELogicManager.java class.
How the architecture components interact with each other
The Sequence Diagram below shows how the components interact with each other for the scenario where the user issues the command deleteitem 1.
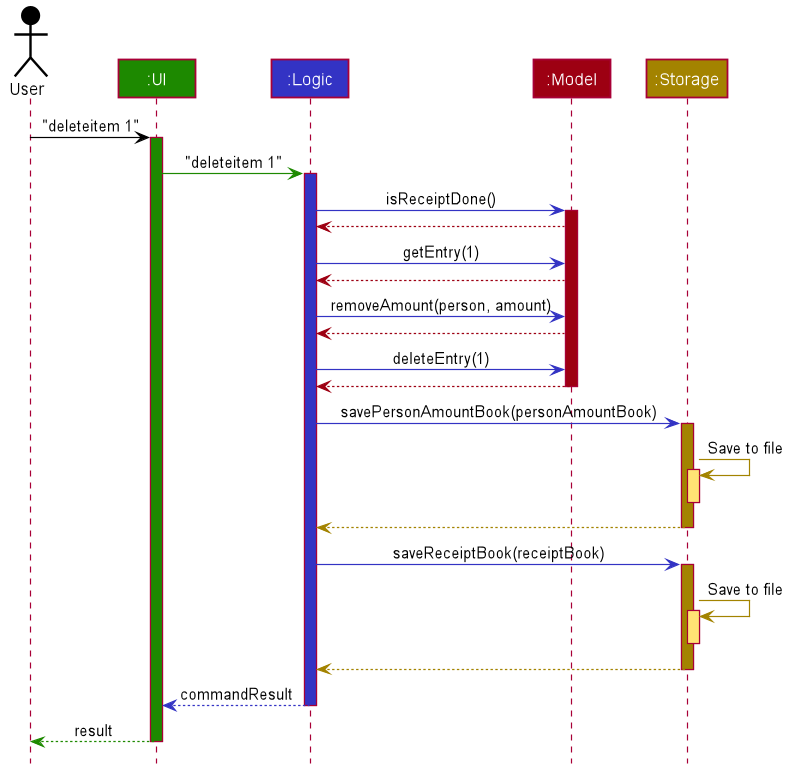
deleteitem 1 commandUI component
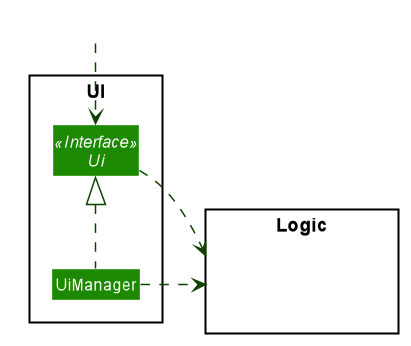
API : Ui.java
Th UI Component mainly deals with interactions with the user. It also plays a part in the initialisation of the program
printing the logo, welcome message and main menu page to user. This component only has 2 classes, Ui.java and UiManager.java.
The UI component,
-
Reading the user input.
-
Displaying the result messages to the user.
Logic component
The Logic Component deals with the logic flows of the App. In each feature mode, the components to deal with the logic
flow are different. In Diet Tracker mode, DietLogic.java and DietLogicManager.java are used to handle the logic operation of the APP.
In Expense Splitter mode, SplitterLogic.java and SplitterLogicManager.java are used to handle the logic operation.
|
-
MODELogicuses theMODEParserclass to parse the user command. -
This results in a
Commandobject which is executed by theMODELogicManager. -
The command execution can affect the
Model(e.g. deleting AN entry). -
The result of the command execution is encapsulated as a
CommandResultobject which is passed back to theUi. -
In addition, the
CommandResultobject can also instruct theEylah.javaapplication to perform certain actions, such as to go back to main menu or exit the App.
Given below is the Sequence Diagram for interactions within the Logic Component for the execute("deleteitem 1") API call.

deleteitem 1 Command in Expense Splitter mode
The lifeline for DeleteItemCommandParser should end at the destroy marker (X) but due to a limitation of PlantUML, the lifeline reaches the end of diagram.
|
Model component
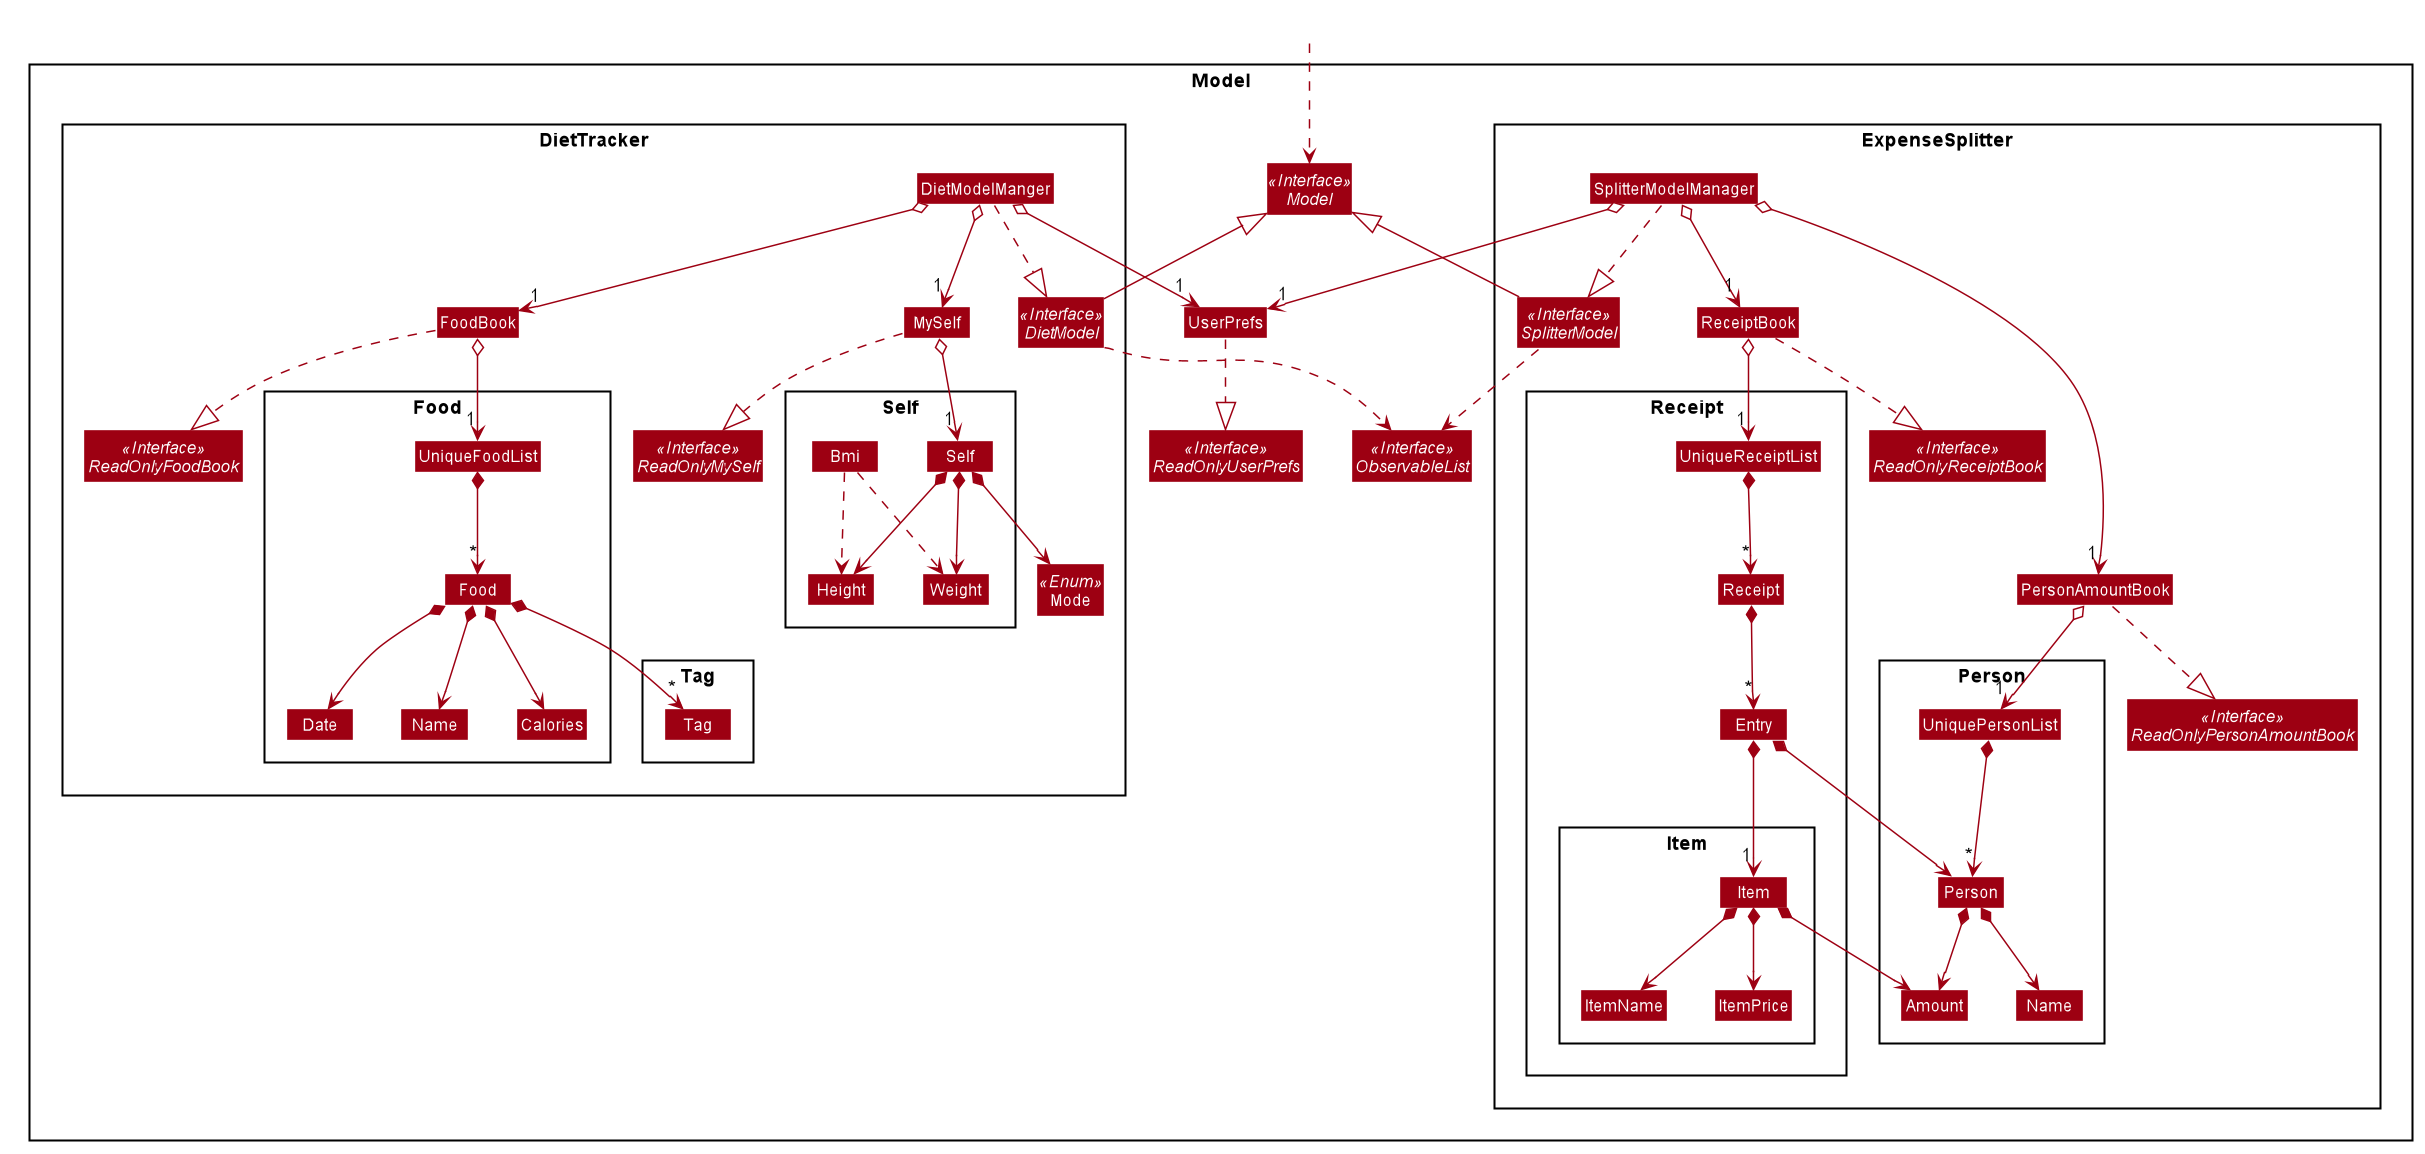
The Model Component deals with the modeling of the object.
|
|
The MODEModel,
-
stores a
UserPrefobject that represents the user’s preferences. -
stores the PersonAmountBook and ReceiptBook data in
Expense Splittermode. -
stores the FoodBook and Myself data in
Diet Trackermode. -
does not depend on any of the other three components.
Storage component

The Storage Component deals with the operations to write and read from the local files.
|
|
The MODEStorage component,
-
can save
UserPrefobjects in json format and read it back. -
can save the PersonAmountBook and ReceiptBook data in json format and read it back in
Expense Splittermode. -
can save the FoodBook and MySelf data in json format and read it back in
Diet Trackermode.
Common classes
Classes used by multiple components are in the seedu.eylah.commons package.
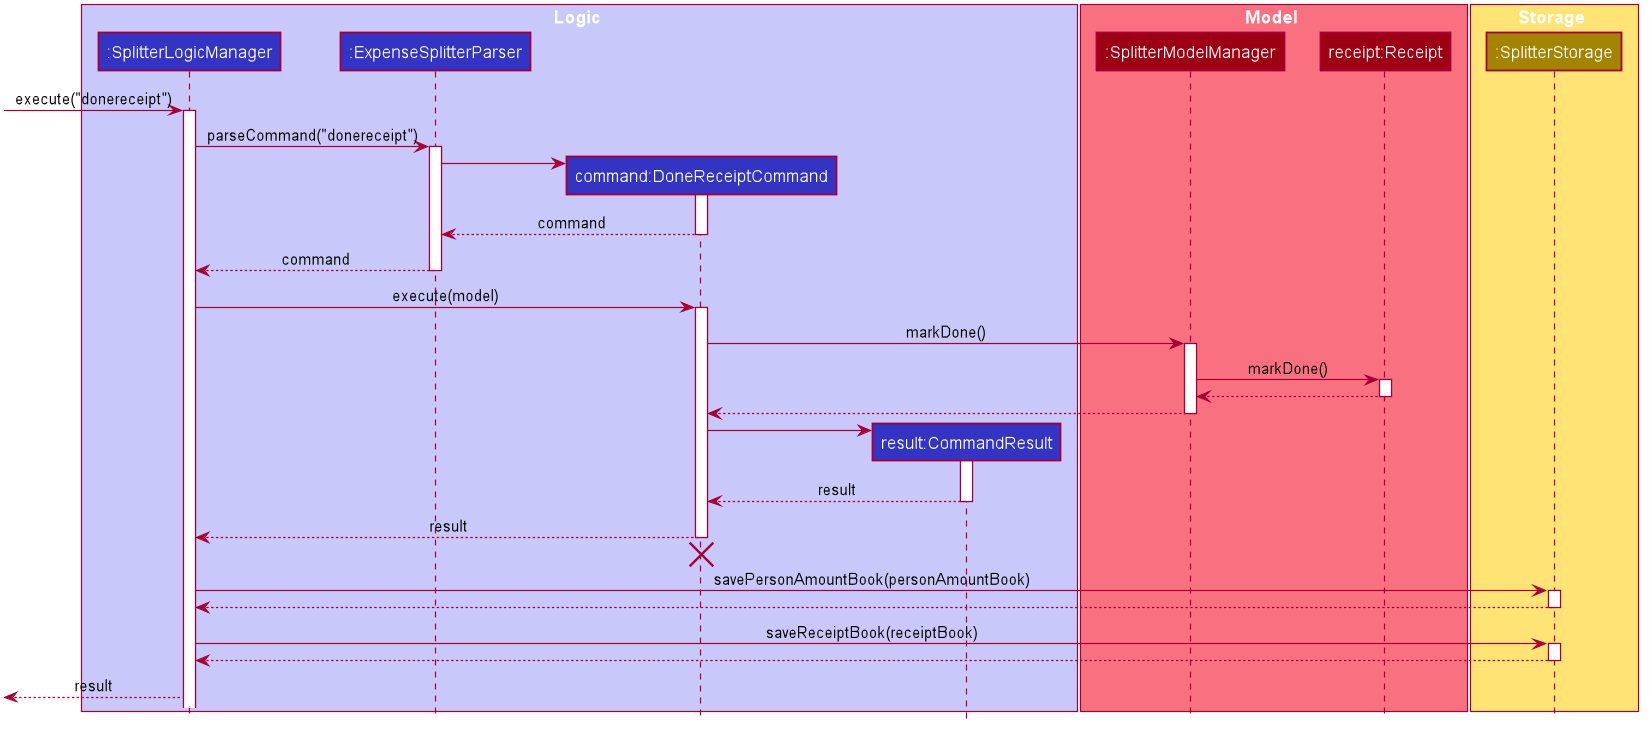
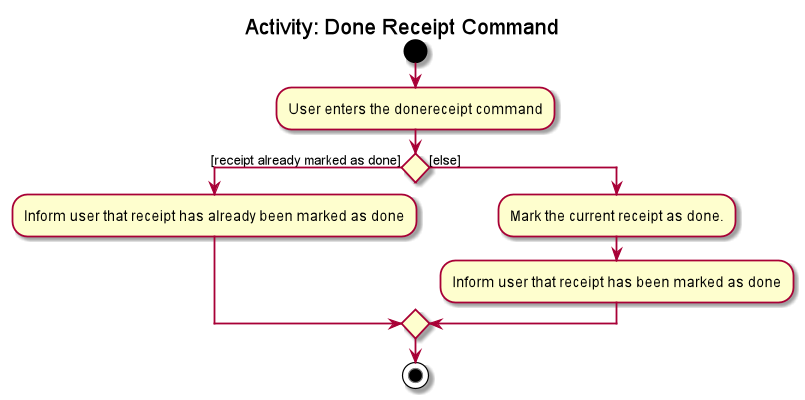
Done Receipt Command
In this section, we will learn more about how the donereceipt command is implemented.
What is the Done Receipt Command
The donereceipt command allows user to finalize the entries in the receipt. After this command is executed, the
entries in the receipt are immutable.
The donereceipt command was implemented as a DoneReceiptCommand in the expensespliter/logic package.
The donereceipt has the following input format:
donereceipt
|
The receipt will not be editable after this command is executed thus ensuring all entries are inputted correctly.
The User can use |
The following activity diagram illustrates what happens when a user executes donereceipt command:
Structure of Done Receipt Command
In this section, you will learn more about the relationships between objects related to the donereceipt command.
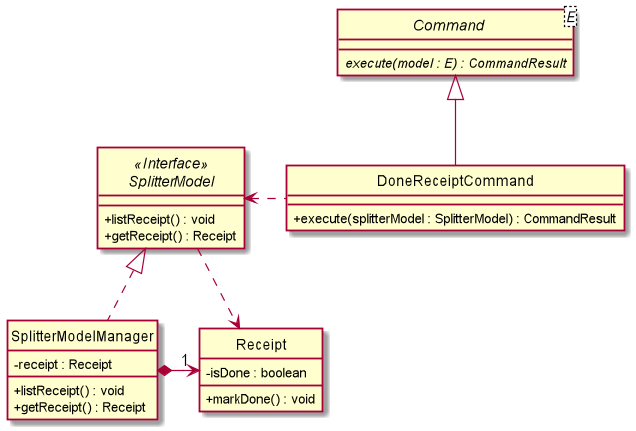
The above class diagram shows the structure of the DoneReceiptCommand and its associated classes and
interfaces. Some methods and fields are left out because they are not of concern in DoneReceiptCommand.
Implementation of Done Receipt Command
The following is a detailed explanation of the operations DoneReceiptCommand performs.
-
The
DoneReceiptCommand#execute(SplitterModel splitterModel)method is executed. -
The
SplitterModel#getReceipt()method is executed and get the currentReceipt. -
Then
Receipt#markDone()method is called. -
This will invoke the boolean
Receipt#isDonevariable changed to true.
Sequence Diagram for Done Receipt Command
The following sequence diagram summarizes what happens during the execution of donereceipt command.