By: AY1920S2-CS2103T-W13-1 Since: Feb 2020
- 1. Introduction
- 2. Getting Started
- 3. Features
- 3.1. Display the available commands :
help - 3.2. Diet Tracker :
diet- 3.2.1. Dieting Mode
mode - 3.2.2. Storing Height
height - 3.2.3. Storing Weight
weight - 3.2.4. Showing your Metrics
metrics - 3.2.5. Calculating Body Mass Index (BMI)
bmi - 3.2.6. Adding food
add - 3.2.7. Listing items
list - 3.2.8. Deleting a Food Item
delete - 3.2.9. Editing a Food Item
edit - 3.2.10. Exiting Diet Tracker to go back to main menu
back
- 3.2.1. Dieting Mode
- 3.3. Expense Splitter :
split- 3.3.1. Adding an item:
additem - 3.3.2. Deleting an item:
deleteitem - 3.3.3. Listing the current receipt:
listreceipt - 3.3.4. Listing amounts owed by each person:
listamount - 3.3.5. Mark receipt as done
donereceipt - 3.3.6. Paying money:
paid - 3.3.7. Clears the receipt
clearreceipt - 3.3.8. Exiting Expense Splitter to go back to main menu
back
- 3.3.1. Adding an item:
- 3.4. Exiting the Application :
exit - 3.5. Saving the data
- 3.1. Display the available commands :
- 4. FAQ
- 5. Command Summary
- 6. Glossary
- 7. Appendix: Simple activity diagram to aid you with using Expense Splitter
1. Introduction
This user guide provides in-depth documentation on the EYLAH desktop application. It comprises of 7 main portions, the introduction, getting started, features, FAQ, command summary, glossary and appendix.
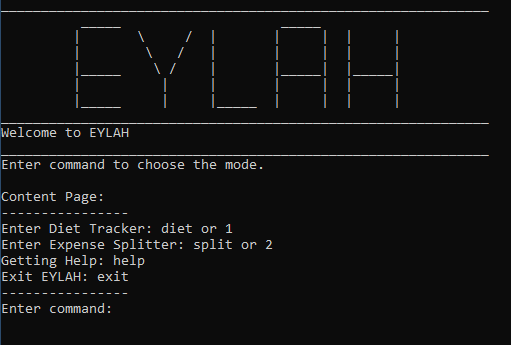
Hello there! Welcome to EYLAH’s User Guide.
Are you someone who lives in Temasek Hall in the National University of Singapore (NUS) and has supper frequently with your hall mates? Do experience splitting headaches when splitting large bills amongst a large group of friends? Have you ever wished for a quick and easy way to manage your calorie intake? Or wished for a Command Line Interface (CLI) application that can solve the above mentioned issues?
If you answered "YES!" to any of the above questions, Ease Your Life At Halls (EYLAH) is a revolutionary new super-application that developed just for you that will make your lives at halls much easier!
EYLAH is an Expense Splitter and Diet Tracker rolled into one, for Temasek Hall residents who prefer to use a desktop app to solve issues. More importantly, EYLAH is optimized for residents who prefer to work with a Command Line Interface (CLI).
EYLAH can solve your problems in halls by tracking your diet after those unhealthy suppers and splitting the cost after each outing or late-night party session with a few keystrokes of your keyboard. Interested? Jump to Section 2, “Getting Started” to get started. Let’s go!
Hope you have a pleasant experience using EYLAH!
1.1. Purpose
-
This documentation serves as an introduction to the features and proper usage of EYLAH, and is made to aid you in using the application to improve your lives in Temasek Hall.
1.2. Tips on reading the User Guide
We encourage you to read EYLAH’s User Guide from top to bottom.
While reading the User Guide you may encounter some symbols. These symbols are used to highlight crucial information or tips and in this portion we will be explaining the symbols and what they stand for.
These symbols include:
|
This block of text with a blue exclamation mark indicates additional notes and information that you should consider to prevent unexpected behaviour you are using EYLAH. |
|
This block of text with a yellow light bulb indicates additional tips that will help you when using EYLAH. |
|
This block of text with a warning sign indicates warnings, information you should take extreme note of. |
Enter - This symbol indicates the enter button on the keyboard.
markup - A grey highlight (known as a mark-up) indicates a command that can be inputted into EYLAH.
[-c Calories] - For some commands there are optional fields. Keywords placed in square brackets are optional fields.
(e.g: edit INDEX [-n NAME] [-c CALORIES] )
Lastly, blue underline words like this will lead you to other portions of the User Guide or to an external website.
2. Getting Started
Need help setting up EYLAH? Simply follow the steps below to get started in no time!
-
Ensure you have
Java 11or above installed in your Computer. -
Download the latest
EYLAH.jarhere. -
Copy the file to the folder you want to use as the home folder for EYLAH.
-
Navigate to the folder in terminal and to run the jar file type
java -jar EYLAH.jar. -
Type the command in the command box and press Enter to execute it.
e.g. typinghelpand pressing Enter will show you the commands you can type. -
Some example commands you can try:
-
1ordiet: enters the Diet Tracker component of EYLAH. -
2orsplit: enters the Expense Splitter component of EYLAH. -
help: shows the list of commands you can execute at each page. -
exit: exits the app
-
-
Refer to Section 3, “Features” for details of each command.
3. Features
In this section, you can find all the commands of EYLAH and some tips and trick you can use to improve your user experience while using EYLAH.
Diet Tracker |
Expense Splitter |
Command Format
-
Words in
UPPER_CASEare the parameters supplied by the user, e.g: inadditem -i ITEMNAME -p ITEMPRICE -n NAME,ITEMNAME,ITEMPRICEandNAMEare parameters which can decided by the user, e.g:additem -i pizza -p 19.90 -n charlotte. -
Items in square brackets are optional, e.g:
paid INDEX [AMOUNT]can be used aspaid 1or aspaid 1 3.90. -
Parameters with
… after them can be used multiple times including zero times, e.g:[-n NAME]…can be used as-n Charlotte,-n Alice -n Bobetc.
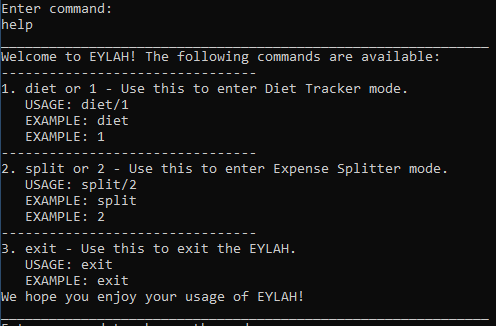
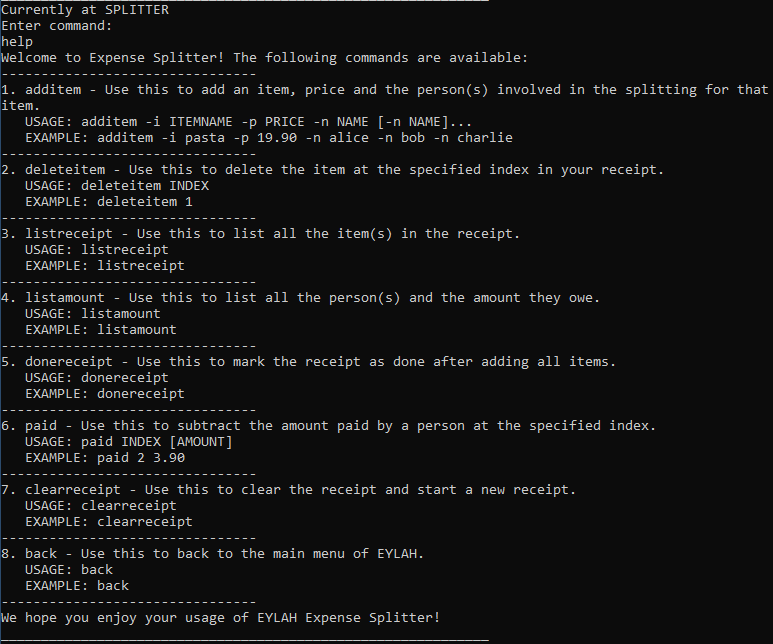
3.1. Display the available commands : help
In this section, you will learn more about help command, how to use it
and the expected outcome after using the help command.
Summary of Help Command:
help You can use the help command, if you are uncertain, to see the list of available commands.
This command can be used everywhere in the application.
How to use the Help Command:
Format:
help
Valid Example:
help
Expected outcome:
Main Menu:
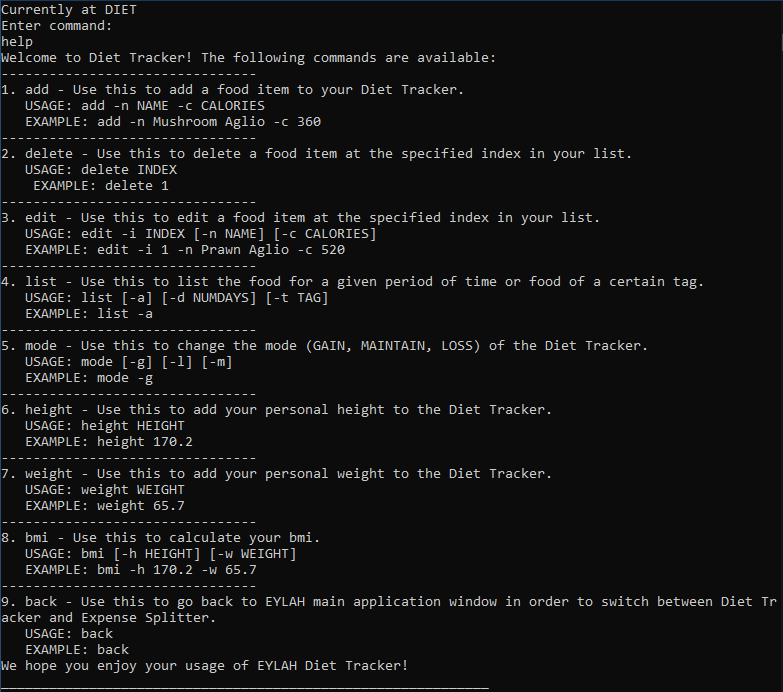
Diet Tracker Mode:
Expense Splitter Mode:
Additional notes and tips
|
Help in main menu and different mode will give different help information. |
3.2. Diet Tracker : diet
Using a Dieting App has never been easier! You can easily achieve the functionalities of a standard Dieting App with Diet Tracker.
Diet Tracker will help you achieve your ideal weight and body mass!
You can store all your food intake everyday and calculate useful information.
3.2.1. Dieting Mode mode
In this section, you will learn more about the mode command, how to use it
and the expected outcome after using the
mode command.
Summary of Mode Command:
mode You can set your desired dieting goal with the different modes that set a limit on your daily
calorie intake. The calorie limits are calculated based on that of an average human. Your daily calories intake status
can be monitored with the list command.
Switch the dieting mode, based on the following modes:
-
Lose Weight (-l) (2000 calorie limit)
-
Gain Weight (-g) (3000 calorie limit)
-
Maintain (-m) (2500 calorie limit)
How to use the Mode Command:
Format:
mode [-l] [-g] [-m]
Valid Example:
mode -l
| You must only input EXACTLY ONE mode per mode command. |
Expected outcome:
Additional notes and tips
|
The default mode is MAINTAIN if you have not set your mode. |
|
3.2.2. Storing Height height
In this section, you will learn more about the height command, how to use it
and the expected outcome after using the
height command.
Summary of Height Command:
height You can use this command to save your Height to the Diet Tracker.
How to use the Height Command:
Format:
height HEIGHT
Valid Example:
height 170.2
Expected outcome:
Additional notes and tips
|
Height in centimetres (cm). Decimal places are accepted. I.e. |
|
Check your stored height with |
3.2.3. Storing Weight weight
In this section, you will learn more about the weight command, how to use it
and the expected outcome after using the
weight command.
Summary of Weight Command:
weight You can use this command to save your Weight to the Diet Tracker.
How to use the Weight Command:
Format:
weight WEIGHT
Valid Example:
weight 65.7
Expected outcome:
Additional notes and tips
|
Weight in kilograms (kg). Decimal places are accepted. I.e. |
|
Check your stored weight with |
3.2.4. Showing your Metrics metrics
In this section, you will learn more about the metrics command, how to use it
and the expected outcome after using the
metrics command.
Summary of Metrics Command:
metrics You can print out your individual metrics (Height, Weight and Mode) to check them.
It will display the following data:
-
Your height
-
Your weight
-
Your chosen Dieting Mode
How to use the Metrics Command:
Format:
metrics
Valid Example:
metrics
Expected outcome:
Additional notes and tips
|
Diet Tracker will prompt you if you did not have any previously stored Height, Weight. |
|
Use this to check whether you have previously stored a Height, a Weight, or have chosen your Dieting Mode already. |
3.2.5. Calculating Body Mass Index (BMI) bmi
In this section, you will learn more about the bmi command, how to use it
and the expected outcome after using the
bmi command.
Summary of Bmi Command:
bmi You can calculate your BMI either through an input height and weight or your previously stored Height and Weight.
It will display the following data:
-
BMI value
How to use the Bmi Command:
Format:
bmi [-h HEIGHT] [-w WEIGHT]
Valid Examples:
-
height 172
weight 65
bmi
Change your height and your weight to your current measurements before calculating your BMI. BMI is calculated based off the stored height and weight in this instance. -
height 173.5
bmi -w 59.9
Change your height to your current measurements before calculating you BMI. BMI is calculated based off the stored height and input weight in this instance. -
bmi -h 172 -w 65.5
Calculate BMI based on the input height and weight values.
Expected outcome:
Additional tips
|
If you are unsure whether you have already input your height and weight, you may |
3.2.6. Adding food add
In this section, you will learn more about the add command, how to use it
and the expected outcome after using the
add command.
Summary of Add Command:
add You can use this command to add a food to the list.
How to use the Add Command:
Format:
add -n NAME -c CALORIES [-t TAG]…
Valid Example:
add -n Fishball Noodles -c 383 -t favourite -t noodles
Expected outcome:
Additional notes
|
3.2.7. Listing items list
In this section, you will learn more about the list command, how to use it
and the expected outcome after using the
list command.
Summary of List Command:
list You can use this function to list out the different foods that you have consumed and their total calories.
Different listing modes allow you to watch your overall diet during the period, or how much you can/should eat based
on your daily intake.
Displays different data based on the below flags:
-
Food consumed for the day (NO FLAG)
-
All food ever consumed (-a)
-
Food consumed for the past number of days (-d)
-
All food with the given tag (-t)
How to use the List Command:
Format:
list [-a] [-d NUMDAYS] [-t TAGNAME]
Valid Examples:
list
list -a
list -d 3
list -t healthy
Expected outcome:
Additional notes
|
3.2.8. Deleting a Food Item delete
In this section, you will learn more about the delete command, how to use it
and the expected outcome after using the
delete command.
Summary of Delete Command:
delete You can delete a food item based on the previous list of Foods that you have listed.
How to use the Delete Command:
Format:
delete INDEX
Valid Example:
list
delete 2
Deletes the 2nd row of food data from today’s list of food.
You MUST use list to check the list of items to identify a target to edit. This would ensure that you get the
correct index of the item.
|
Expected outcome:
Additional notes and tips
|
You can list based on time period or tags to find the item that you want to delete. |
3.2.9. Editing a Food Item edit
In this section, you will learn more about the edit command, how to use it
and the expected outcome after using the
edit command.
Summary of Edit Command:
edit You can edit either the Food name, or the calories of the food at the specified index.
How to use the Edit Command:
Format:
edit -i INDEX [-n NAME] [-c CALORIES]
Valid Example:
edit -i 2 -n Chicken Rice -c 585
Edits the name of the food item at index 2 to be 'Chicken Rice' and the calories to be '585'.
You MUST use list to check the list of items to identify a target to edit. This would ensure that you get the
correct index of the item.
|
Expected outcome:
Additional notes and tips
|
You can list based on time period or tags to find the item that you want to edit. |
3.2.10. Exiting Diet Tracker to go back to main menu back
In this section, you will learn more about the back command, how to use it
and the expected outcome after using the back command.
Summary of Back Command:
back allows you to exits Diet Tracker mode to go back to main menu of the application.
How to use the Back Command:
Format:
back
Valid Example:
back
Expected outcome:
3.3. Expense Splitter : split
Getting a headache from splitting that ever-so-complicated bill?
With EYLAH, splitting a large receipt with friends has never been easier! All you have to do is add the item, it’s price and the names involved in splitting that item and EYLAH will calculate the rest for you!
We have drawn some diagrams to help you visualize how Expense Splitter works, click here to find out more!
Here are some of the prefixes used:
Prefix |
Representation |
-i |
Item Name |
-p |
Item Price |
-n |
Name of Person |
3.3.1. Adding an item: additem
In this section, you will learn more about the additem command, how to use it
and the expected outcome after using the additem command.
Summary of Add Item Command:
additem allows you to add an item, it’s price and the persons involved in sharing the cost of that item.
How to use the Add Item Command:
Format:
additem -i ITEMNAME -p PRICE -n NAME
additem -i ITEMNAME -p PRICE -n NAME [-n NAME]…
Valid Example:
additem -i pizza -p 30 -n bob
additem -i pasta -p 19.90 -n alice -n bob -n charlie
Expected outcome:

|
3.3.2. Deleting an item: deleteitem
In this section, you will learn more about the deleteitem command, how to use it
and the expected outcome after using the deleteitem command.
Summary of Delete Item Command:
deleteitem allows you to delete an item from the receipt.
How to use the Delete Item Command:
Format:
deleteitem INDEX
Valid Example:
deleteitem 3
Expected outcome:
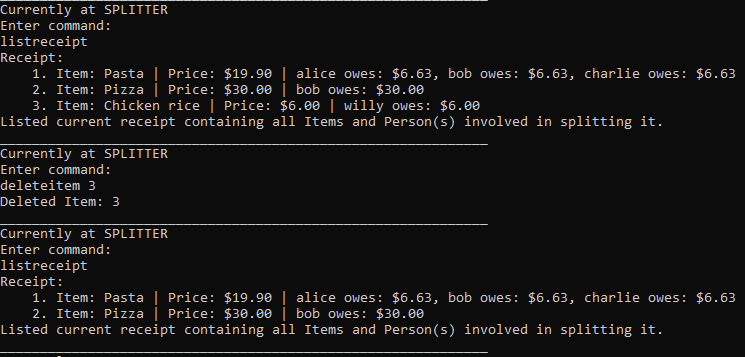
Use listreceipt to view your item indices before deletion.
'''
|
3.3.3. Listing the current receipt: listreceipt
In this section, you will learn more about the listreceipt command, how to use it
and the expected outcome after using the
listreceipt command.
Summary of List Receipt Command:
listreceipt shows you all the entries in your current receipt.
How to use the List Receipt Command:
Format:
listreceipt
Valid Example:
listreceipt
Expected outcome:

Additional notes and tips
| Each entry in the receipt has the item’s name, price and person(s) who is splitting that item with you thus you do not have to remember who you split this item with! |
Use listreceipt command to find the index of the item in the receipt. The index is useful for commands
such as deleteitem where you have to pass in the index of item to be deleted.
|
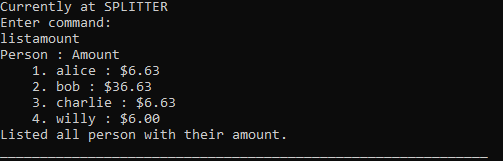
3.3.4. Listing amounts owed by each person: listamount
In this section, you will learn more about the listamount command, how to use it
and the expected outcome after using the
listamount command.
Summary of List Amount Command: listamount shows you how much each Person owes you.
How to use the List Amount Command:
Format:
listamount
Valid example:
listamount
Expected outcome:
Additional notes and tips
|
Use listamount command to find the index of the person who paid you. The index is useful for commands
such as paid.
|
3.3.5. Mark receipt as done donereceipt
In this section, you will learn more about the donereceipt command, how to use it
and the expected outcome after using the donereceipt command.
Summary of Done Receipt Command: donereceipt *marks the receipt as done when you have completed entering
all the items.
How to use the Done Receipt Command:
Format:
donereceipt
Example:
donereceipt
Expected outcome:

|
3.3.6. Paying money: paid
In this section, you will learn more about the paid command, how to use it and the
expected outcome after using the
paid command.
Summary of Paid Command: paid subtracts the amount of money a Person owes you.
How to use the Paid Command:
Format:
paid INDEX [AMOUNT]
|
Valid examples:
paid 2 - This commmand means that the Person at index 2 has paid you the full amount they owe you.
paid 3 3.90 - This command means that the Perosn at index 3 has paid you $3.90.
Expected outcome:

Additional notes and tips
|
Use listamount command to find the index of the person who paid you.
|
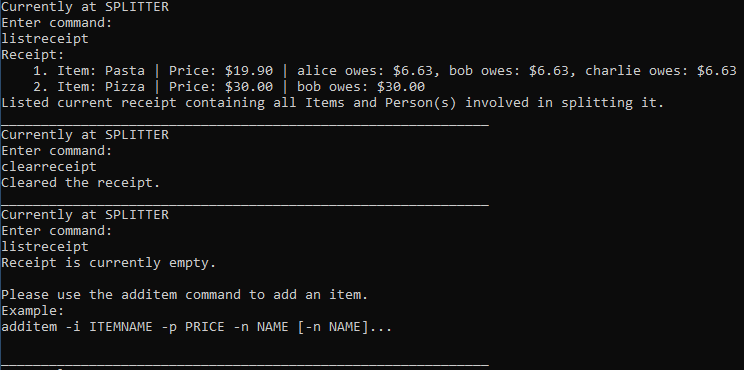
3.3.7. Clears the receipt clearreceipt
In this section, you will learn more about the clearreceipt command, how to use it
and the expected outcome after using the clearreceipt command.
Summary of Clear Receipt Command:
clearreceipt allows you to remove all items from the receipt and start with a clean receipt.
How to use the Clear Receipt Command:
Format:
clearreceipt
Valid Example:
clearreceipt
Expected outcome:
|
|
3.3.8. Exiting Expense Splitter to go back to main menu back
In this section, you will learn more about the back command, how to use it
and the expected outcome after using the back command.
Summary of Back Command:
back allows you to exits Expense Splitter mode to go back to main menu of the application.
How to use the Back Command:
Format:
back
Valid Example:
back
Expected outcome:

3.4. Exiting the Application : exit
In this section, you will learn more about exit command, how to use it
and the expected outcome after using the exit command.
Summary of Exit Command:
exit You can use this command everywhere in the application to exit.
How to use the Exit Command:
Format:
exit
Valid Example:
exit
Expected outcome:

3.5. Saving the data
In this section, you will learn more about the saving mechanism of EYLAH.
EYLAH will automatically help you store any information that you have inputted into the hard disk.
You do not need to save manually.
4. FAQ
Q: How do I transfer my data to another Computer?
A: Install the app in the other computer and overwrite the empty data file it creates with the file that contains the data of your previous EYLAH folder.
5. Command Summary
In this section, you can find out more about the commands supported by EYLAH, as well as their respective format and example.
If you would like to know more about a specific command, simply click on the provided links in the table below and you will be brought to the respective command.
5.1. For Diet Tracker
| Command | Format | Example |
|---|---|---|
|
|
|
|
|
|
|
|
|
|
|
|
|
|
|
|
|
|
|
|
|
|
|
|
|
|
|
|
|
|
|
|
|
|
|
5.2. For Expense Splitter
| Command | Format | Example |
|---|---|---|
|
|
|
|
|
|
|
|
|
|
|
|
|
|
|
|
|
|
|
|
|
|
|
|
|
|
|
|
|
6. Glossary
| Term | Explanation | Examples |
|---|---|---|
Temasek Hall |
This refers the one of the Halls of Residences in the National University of Singapore |
|
Halls of Residences |
This refers to student accommodation on campus |
|
NUS |
This is the short form of National University of Singapore. |
|
SOC or SoC |
This is the short form for School of Computing. |
|
CLI |
This is the short form for Command Line Interface. It processes commands to TA-Tracker in the form of lines of text |
|
Index |
This refers to the position of an item on a list. |
Index of 1 refers to the first item in a list. |
Activity Diagram |
This refers to the workflow of a software. |
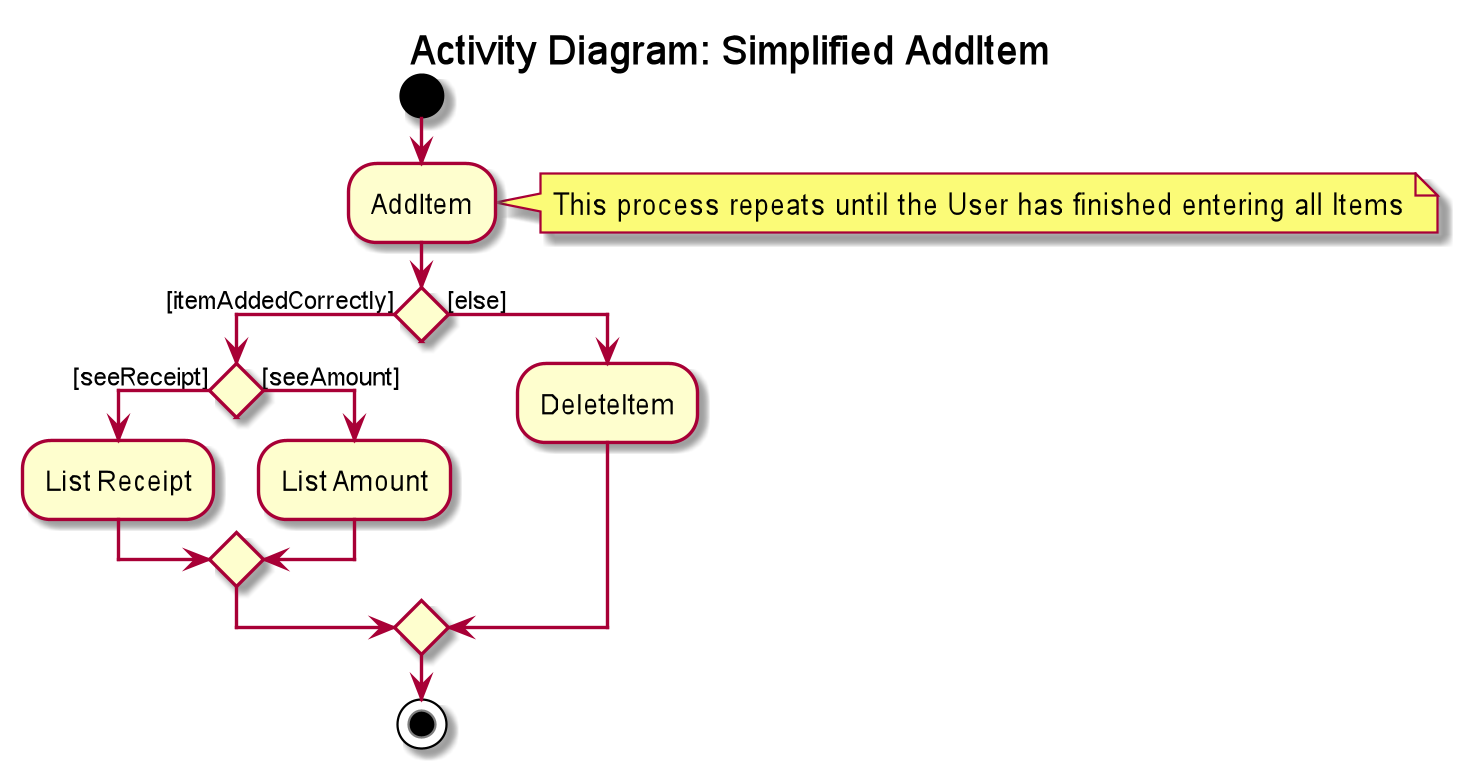
7. Appendix: Simple activity diagram to aid you with using Expense Splitter
This diagram will help you understand the flow of Expense Splitter thus improving your user experience.
The fully blackened circle at the top represents the start point while the circle at the bottom represents the end point.
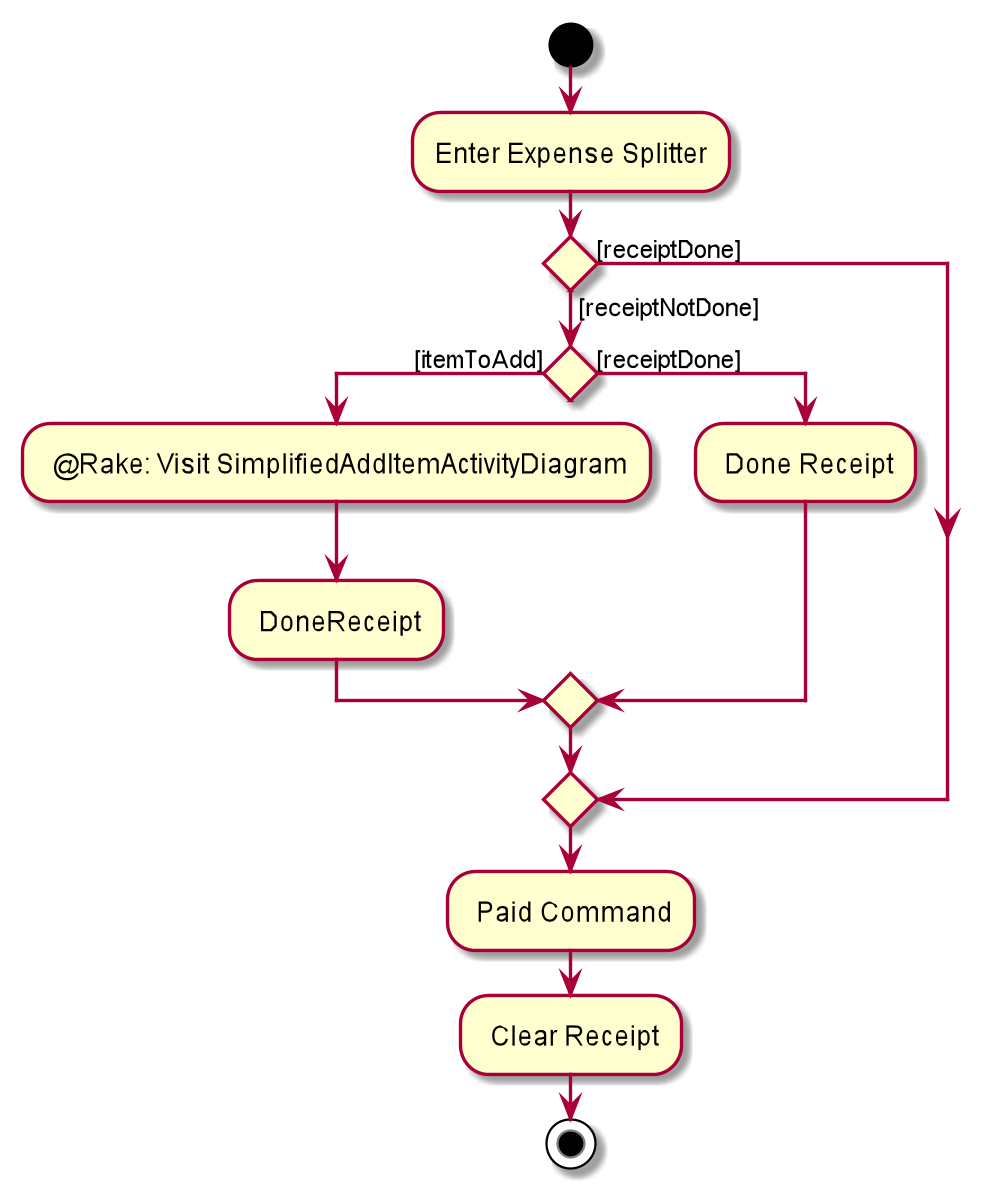
Simplified Add Item Activity Diagram
This diagram below is used in conjunction with the diagram directly above this.