By: AY1920S2-CS2103T-W13-1 Since: Feb 2020 Licence: MIT
- 1. Introduction
- 2. Setting up
- 3. Design
- 4. Implementation
- 5. Documentation
- 6. Testing
- 7. Dev Ops
- Appendix A: Product Scope
- Appendix B: User Stories
- Appendix C: Use Cases
- Appendix D: Non Functional Requirements
- Appendix E: Glossary
- Appendix F: Product Survey
- Appendix G: Instructions for Manual Testing
- G.1. Launch and Shutdown
- G.2. Adding a Food in Diet Tracker
- G.3. Deleting a Food in Diet Tracker
- G.4. Editing a Food in Diet Tracker
- G.5. Set Dieting Mode In Diet Tracker
- G.6. Check User Metrics In Diet Tracker
- G.7. Calculate BMI In Diet Tracker
- G.8. Store Height In Diet Tracker
- G.9. Store Weight In Diet Tracker
- G.10. Add Item In Expense Splitter
- G.11. Delete Item In Expense Splitter
- G.12. List Receipt in Expense Splitter
- G.13. List Amount In Expense Splitter
- G.14. Done Receipt In Expense Splitter
- G.15. Paid Command In Expense Splitter
- G.16. Clear Receipt In Expense Splitter
- G.17. Saving data
- Appendix H: Effort
1. Introduction
1.1. About EYLAH
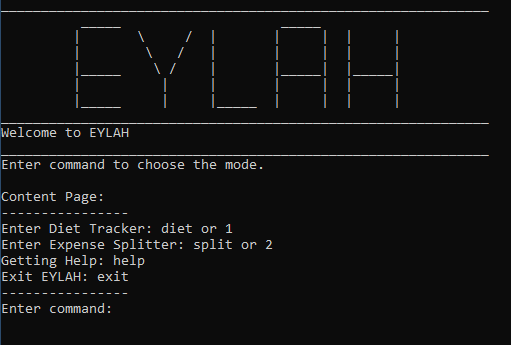
Ease Your Lives At Hall (EYLAH) is a Command Line Interface (CLI) application designed to aid students staying in Temasek Hall within the National University of Singapore with commonly faced problems such as, tracking their diet and splitting a large bill with a group of friends.
Shown below is the CLI of EYLAH.
1.2. About this guide
This documentation serves as an introduction to the architecture and implementation of EYLAH, and is made for developers who wish to maintain, modify or understand the software development behind our application. We adopted the top-down approach; we will first look into high-level architectures before exploring implementation details of each feature.
We encourage you to traverse the full path from the high level design to the implementation details of the feature you are interested for the most complete understanding.
1.3. Tips on reading the Developer Guide
While reading the Developer Guide you may encounter some symbols. These symbols are used to highlight crucial information and in this portion we are explaining (or will be explaining) the symbols and their meaning.
| This block of text with a blue exclamation mark indicates additional notes and information that the user should consider to prevent unexpected behaviour. |
| This block of text with a yellow light bulb indicates additional tips that will help the user when using EYLAH. |
| This symbol indicates warnings. |
markup - A grey highlight (known as a mark-up) indicates keywords, including commands you can type into EYLAH.
2. Setting up
Refer to the guide here.
3. Design
3.1. Architecture
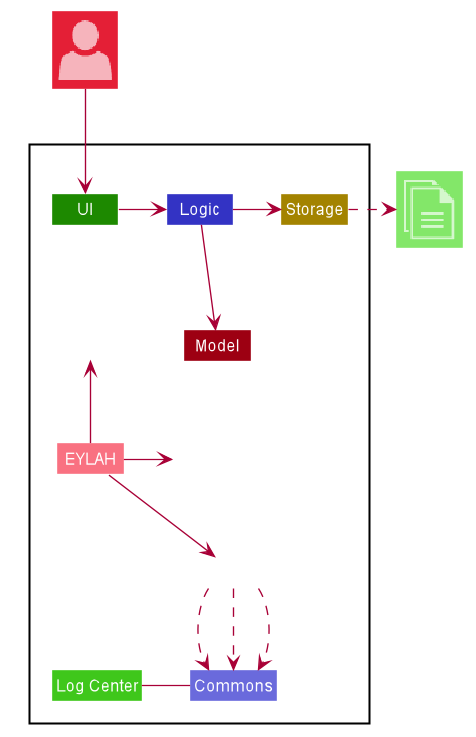
The Architecture Diagram given above explains the high-level design of the application. Given below is a quick overview of each component.
The .puml files used to create diagrams in this document can be found in the diagrams folder.
Refer to the Using PlantUML guide to learn how to create and edit diagrams.
|
EYLAH contains the main class for the application. It is responsible for,
-
At app launch: Initializes the components in the correct sequence, and connects them up with each other.
-
At shut down: Shuts down the components and invokes cleanup method where necessary.
Commons represents a collection of classes used by multiple other components.
The following class plays an important role at the architecture level:
-
LogsCenter: Used by many classes to write log messages to the App’s log file.
The rest of the App consists of four components.
Each of the four components
-
Defines its API in an
interfacewith the same name as the Component. -
Exposes its functionality using a
{Component Name}Managerclass.
For example, the Logic component (see the class diagram given below) defines it’s API in the Logic.java interface and MODELogic.java interface and exposes its functionality using the MODELogicManager.java class.
How the architecture components interact with each other
The Sequence Diagram below shows how the components interact with each other for the scenario where the user issues the command deleteitem 1.
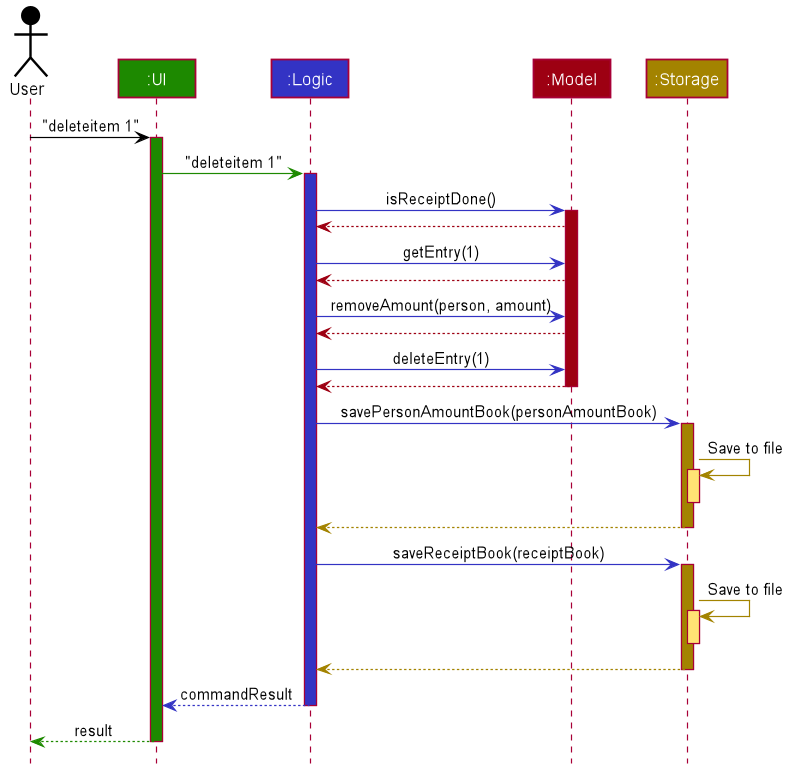
deleteitem 1 command3.2. UI component
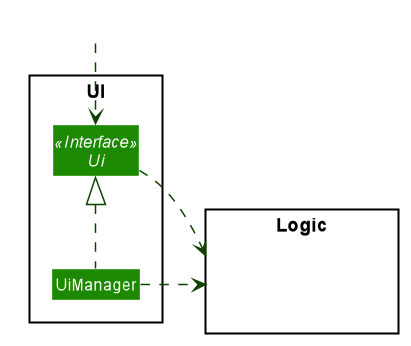
API : Ui.java
Th UI Component mainly deals with interactions with the user. It also plays a part in the initialisation of the program
printing the logo, welcome message and main menu page to user. This component only has 2 classes, Ui.java and UiManager.java.
The UI component,
-
Reading the user input.
-
Displaying the result messages to the user.
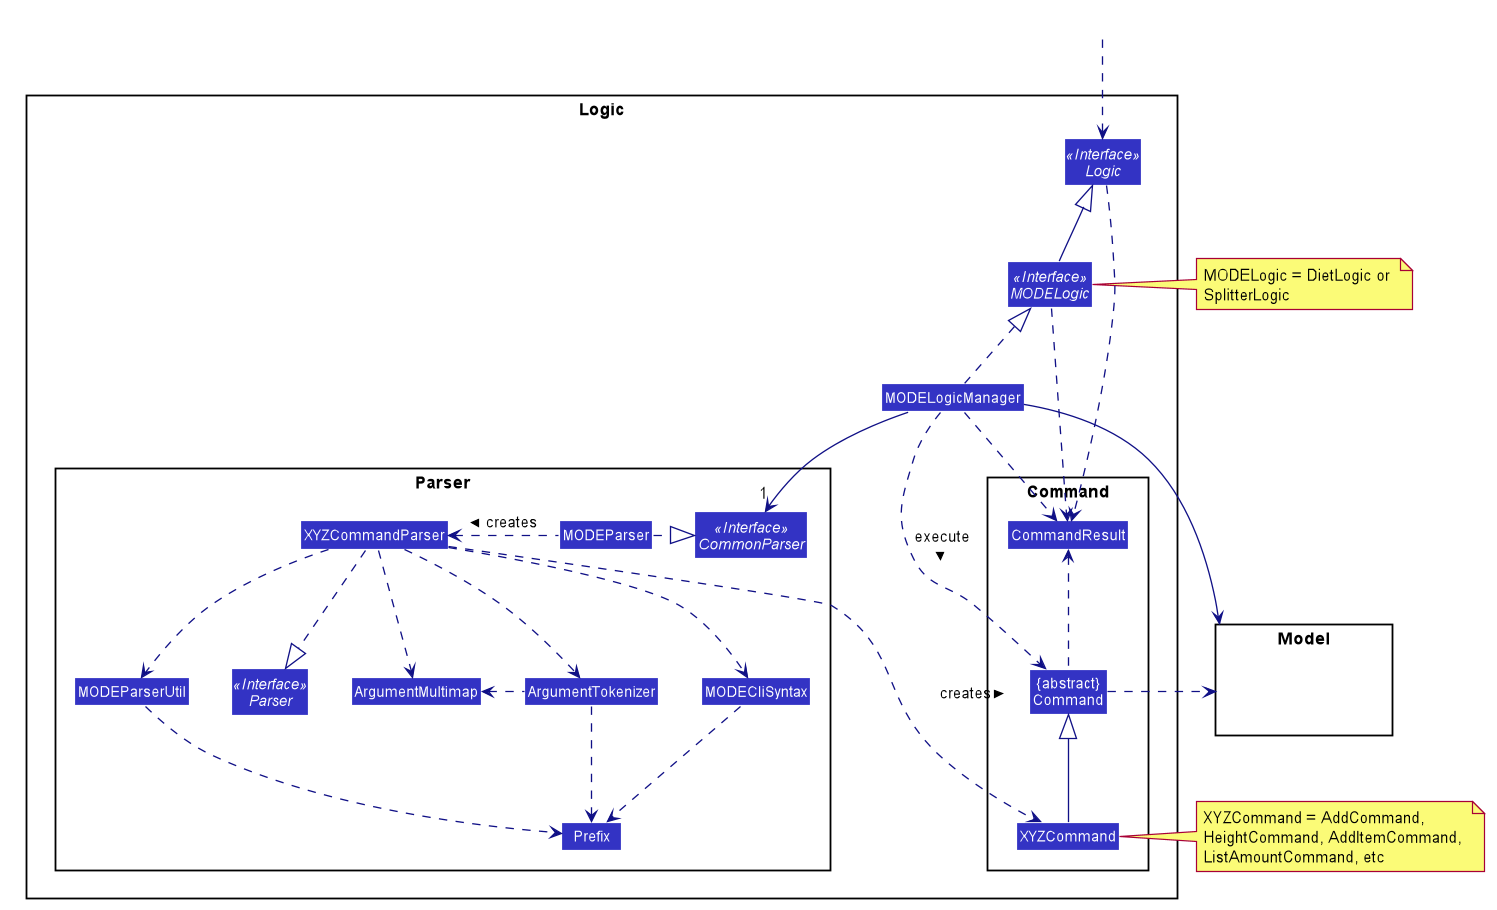
3.3. Logic component
The Logic Component deals with the logic flows of the App. In each feature mode, the components to deal with the logic
flow are different. In Diet Tracker mode, DietLogic.java and DietLogicManager.java are used to handle the logic operation of the APP.
In Expense Splitter mode, SplitterLogic.java and SplitterLogicManager.java are used to handle the logic operation.
|
-
MODELogicuses theMODEParserclass to parse the user command. -
This results in a
Commandobject which is executed by theMODELogicManager. -
The command execution can affect the
Model(e.g. deleting AN entry). -
The result of the command execution is encapsulated as a
CommandResultobject which is passed back to theUi. -
In addition, the
CommandResultobject can also instruct theEylah.javaapplication to perform certain actions, such as to go back to main menu or exit the App.
Given below is the Sequence Diagram for interactions within the Logic Component for the execute("deleteitem 1") API call.

deleteitem 1 Command in Expense Splitter mode
The lifeline for DeleteItemCommandParser should end at the destroy marker (X) but due to a limitation of PlantUML, the lifeline reaches the end of diagram.
|
3.4. Model component
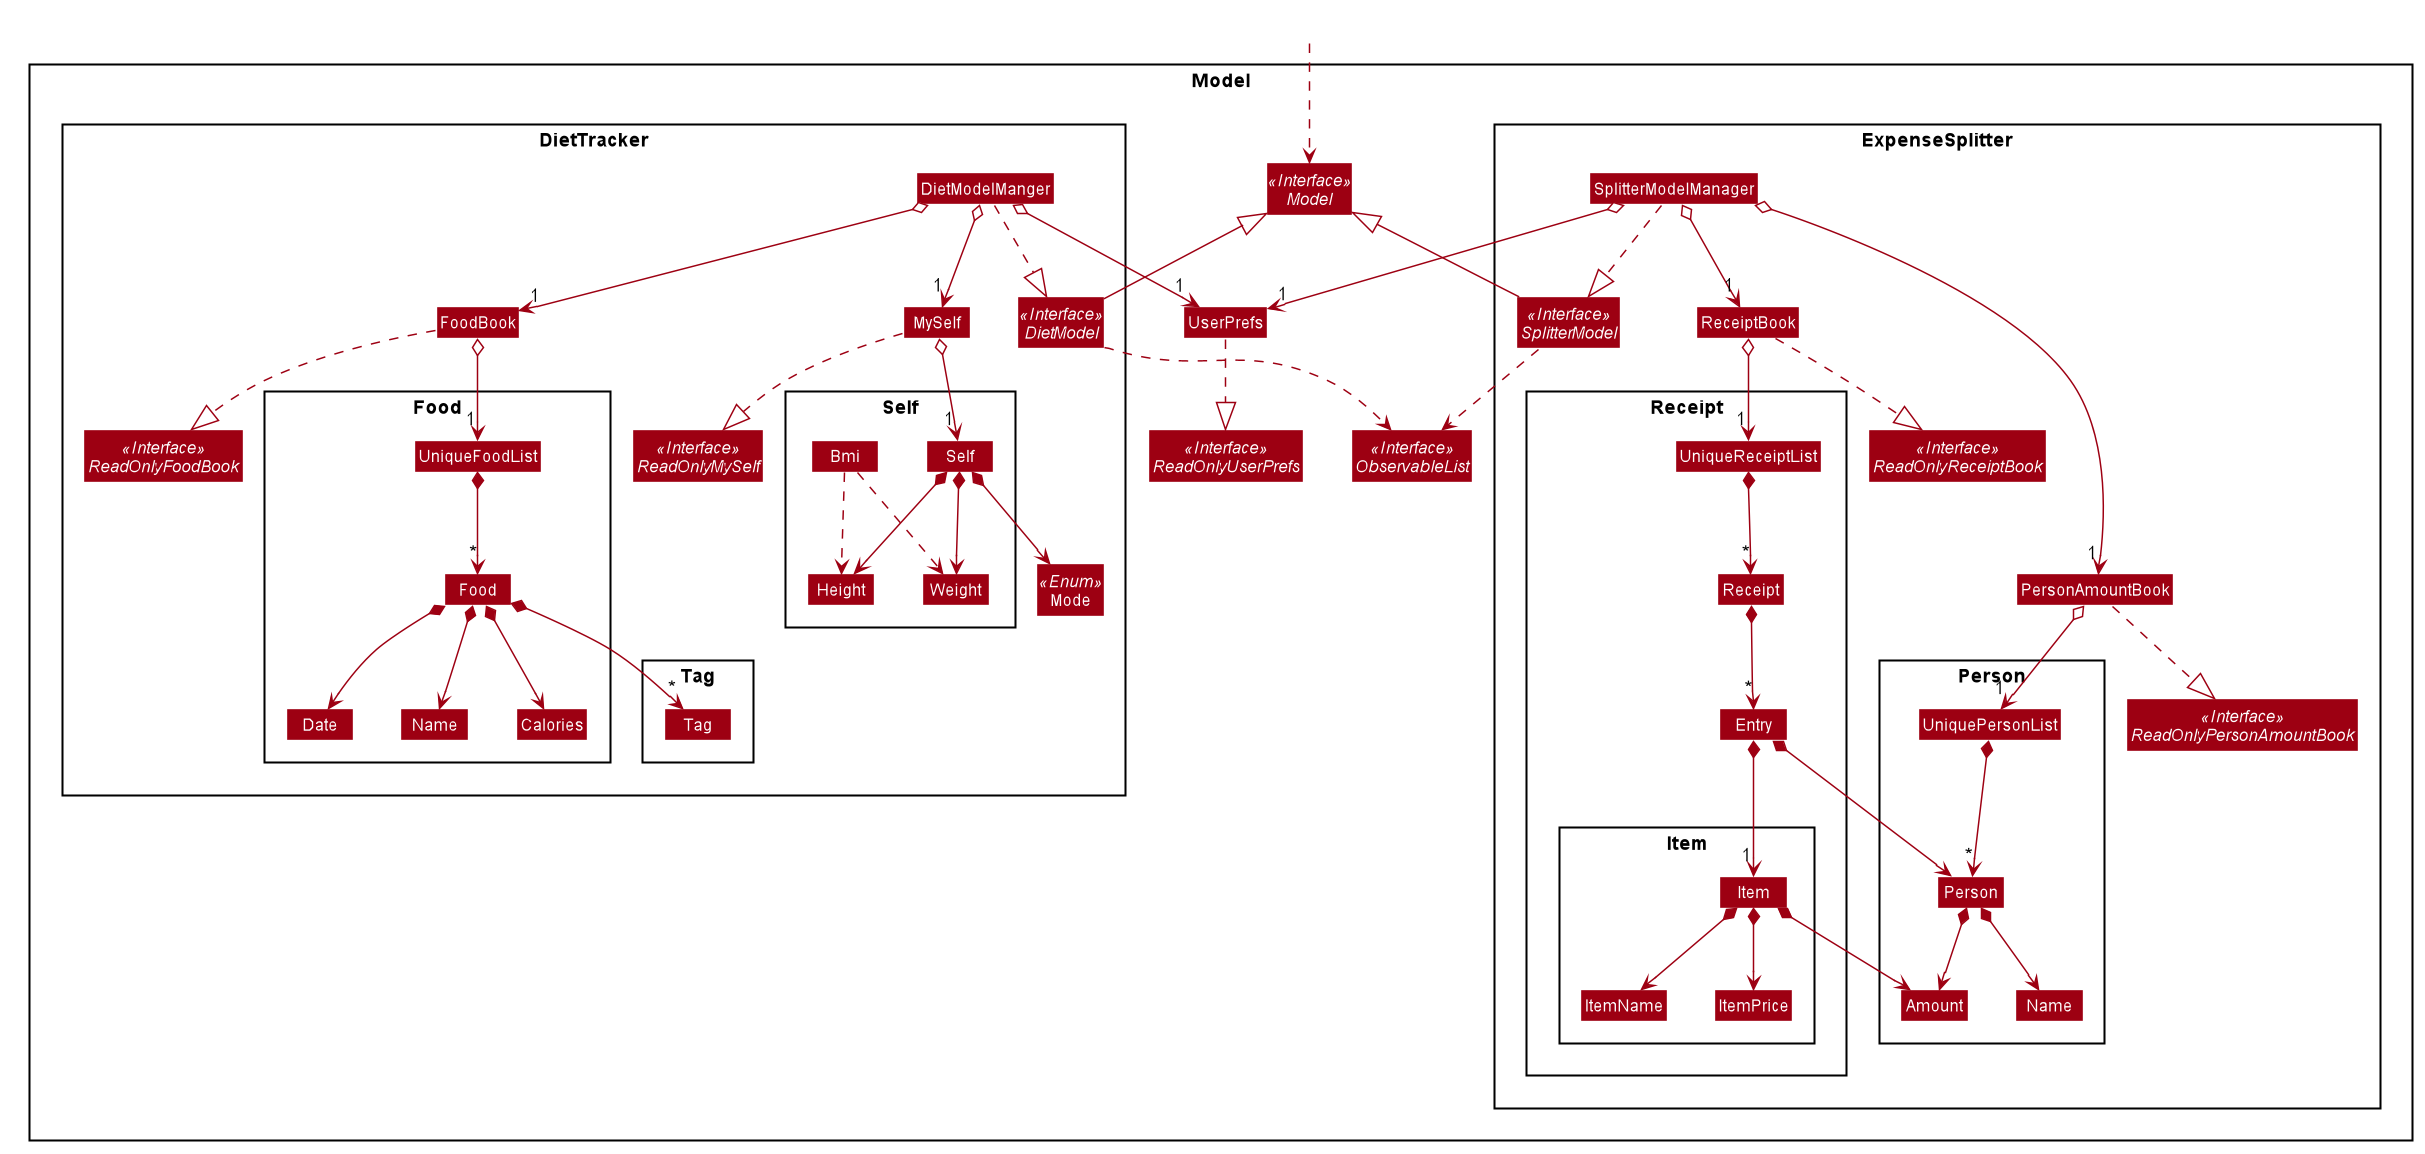
The Model Component deals with the modeling of the object.
|
|
The MODEModel,
-
stores a
UserPrefobject that represents the user’s preferences. -
stores the PersonAmountBook and ReceiptBook data in
Expense Splittermode. -
stores the FoodBook and Myself data in
Diet Trackermode. -
does not depend on any of the other three components.
3.5. Storage component

The Storage Component deals with the operations to write and read from the local files.
|
|
The MODEStorage component,
-
can save
UserPrefobjects in json format and read it back. -
can save the PersonAmountBook and ReceiptBook data in json format and read it back in
Expense Splittermode. -
can save the FoodBook and MySelf data in json format and read it back in
Diet Trackermode.
3.6. Common classes
Classes used by multiple components are in the seedu.eylah.commons package.
4. Implementation
This section describes some noteworthy details on how the features in EYLAH are implemented.
4.1. Diet Tracker feature
The Diet Tracker feature is designed to aid our users in maintaining a healthy lifestyle. The feature comprises of 10 Commands.
-
AddCommand- Creates a new Food object with its attributes (Name, Calories) and adds it to the FoodBook Storage. -
DeleteCommand- Deletes the Food specified by the input index from FoodBook Storage. -
ListCommand- Lists the Foods and its attributes (Name, Calories) for the timeframe specified by users based on their user input. -
EditCommand- Allows the user to edit an of the Food in Storage. -
HeightCommand- Allows users to log their Height in centimeters. -
WeightCommand- Allows users to log their Weight in kilograms. -
BmiCommand- Calculates the BMI. -
ModeCommand- Allows users to toggle between different modes of the diet tracker. -
MetricsCommand- Allows users to check their health metrics, like their Height, Weight and Dieting Mode.
Activity Diagram of Diet Tracker:
4.1.1. Add Command
In this section, we will learn more about how the add command is implemented.
What is the Add Command
The add command allows the user to add a Food into the FoodBook, along with the Name of the Food and the Calories of the Food.
The add command was implemented as AddCommand in the diettracker/logic/commands package.
The add command has the following input format:
add -n NAME -c CALORIES [-t TAG]…
|
The following activity diagram illustrates what happens when a user executes the add command:
Structure of Add Command
In this section, you will learn more about the relationships between objects related to the add command.
The above class diagram shows the structure of the AddCommand and its associated classes and
interfaces. Some methods and fields are left out because they are not of concern in AddCommand
Implementation of Add Command
The following is a detailed explanation of the operations AddCommand performs.
-
The
AddCommand#execute(Model dietModel)method is executed and it checks if the specified Name and Calories of a given Food to be added are valid. If valid, a new Food would be created with the specified Name and Calories. -
The Method
DietModel#addFood(Food food)would be called to add the food into theFoodBook#foods. -
If successful, a success message will be generated by
CommandResultand it will be returned with the generated success message. Otherwise, an error message showing the correct command syntax is thrown asCommandException. -
If the command syntax was valid and Food was added to the FoodBook,
LogicManagercallsFoodBookStorage#saveFoodBook(ReadOnlyFoodBook foodBook)which saves the new Food Amount into JSON format after serializing it usingJsonAdaptedFood.
Sequence diagram for Add Command
The following sequence diagram summarizes what happens during the execution of add command.
4.1.2. Delete Command
In this section, we will learn more about how the delete command is implemented.
What is the Delete Command
The delete command allows users to remove the Food from the FoodBook via the Index.
The delete command was implemented as DeleteCommand in the diettracker/logic/commands package.
The delete command has the following input format:
delete INDEX
|
The following activity diagram illustrates what happens when a user executes the delete command:
Structure of Delete Command
In this section, you will learn more about the relationships between objects related to the delete command.
The above class diagram shows the structure of the DeleteCommand and its associated classes and
interfaces. Some methods and fields are left out because they are not of concern in DeleteCommand
Implementation
The following is a detailed explanation of the operations DeleteCommand performs.
-
The
DeleteCommand#execute(Model dietModel)method is executed and it validates that the specified Index to delete is within range. If valid, the Food to be deleted will be retrieved from FoodBook using its Index. -
The method
DietModel#getFilteredFoodList()will then be called to retrieve the List of Foods from Storage.List#get(int Index)is then invoked which retrieves the specified Food to be deleted. -
The method
DietModel#deleteFood(Food food)will then be called to remove the Food from the FoodBook.FoodBook#remove(int Index)is invoked which makes a call to its internal list to remove the specified Food. -
If successful, a success message will be generated by
CommandResultand it will be returned with the generated success message. Otherwise, an error message showing the correct command syntax is thrown asCommandException. -
If the command syntax was valid and Food was removed from FoodBook,
LogicManagercallsFoodBookStorage#saveFoodBook(ReadOnlyFoodBook foodBook)which saves the new Foods into JSON format after serializing it usingJsonAdaptedFood.
Sequence Diagram for Delete Command
The following sequence diagram summarizes what happens during the execution of delete command.
4.1.3. List Command
In this section, we will learn more about how the list command is implemented.
What is the List Command
The list command allows users to find out the current Foods in the FoodBook over a period of time as specified by the flag,
or a list of foods with the specified tag.
The list command was implemented as a ListCommand in the diettracker/logic/commands package.
The list has the following input format:
list [-a] [-d DAYS] [-t TAGS]
|
Users must only enter at most ONE flag when using the list command. |
The following activity diagram illustrates what happens when a user executes list command:
Structure of List Command
In this section, you will learn more about the relationships between objects related to the list command.
The above class diagram shows the structure of the ListCommand and its associated classes and
interfaces. Some methods and fields are left out because they are not of concern in ListCommand
Implementation of List Command
The following is a detailed explanation of the operations ListCommand performs.
-
The
ListCommand#execute(DietModel dietModel)method is executed and it validates that the flag used to decide what Foods to list. If the flag is valid, the items to be listed will be retrieved from DietModel according to the input flag. -
The method
DietModel#updateFilteredFoodList() will then be called to filter the List of Foods in DietModel.
`FilteredList#setPredicate(Predicate<Food> predicate)
is then invoked which retrieves the specified Foods to be listed.Case No-Flag Input: The Predicate is any food with date within 1 day back from current time.
Case `-a`: The Predicate always returns true so the list is the entire FoodBook.
Case `-d`: The Predicate will be all food with date later than the specified date which is calculated by input number of days back from the current date.
Case `-t`: The Predicate will be any food with tags that matches given time.
-
If successful, a success message will be generated by
CommandResultand it will be returned with the generated success message. Otherwise, an error message showing the correct command syntax is thrown asCommandException.
Sequence Diagram for List Command
-a or No-Flag Input-d-t4.1.4. Edit Command
In this section, we will learn more about how the edit command is implemented.
What is the Edit Command
The edit command allows users to edit the Name of the Food or the Calories of the Food from the FoodBook via the Index.
The edit command was implemented as EditCommand in the diettracker/logic/commands package.
The edit command has the following input format:
edit -i INDEX [-n NAME] [-c CALORIES]
|
The following activity diagram illustrates what happens when a user executes the edit command:
Structure of Edit Command
In this section, you will learn more about the relationships between objects related to the edit command.
The above class diagram shows the structure of the EditCommand and its associated classes and
interfaces. Some methods and fields are left out because they are not of concern in EditCommand
Implementation
The following is a detailed explanation of the operations EditCommand performs.
-
The
EditCommand#execute(DietModel dietModel)method is executed and it validates that the specifiedINDEXto edit is within range. If valid, the item to be edited will be retrieved from Storage using itsIndex. -
The method
DietModel#getFilteredFoodList() will then be called to retrieve the List of Foods from Storage.
`List#get(int Index)
is then invoked which retrieves the specified Food to be edited. -
The method
DietModel#setFood(Food toBeEdited, Food editedFood)will then be called to replace the Food toBeEdited with the Food editedFood in the List of Foods. -
If successful, a success message will be generated by
CommandResultand it will be returned with the generated success message. Otherwise, an error message showing the correct command syntax is thrown asCommandException. -
If the command syntax was valid and Food was edited in FoodBook,
LogicManagercallsFoodBookStorage#saveFoodBook(ReadOnlyFoodBook foodBook)which saves the new Foods into JSON format after serializing it usingJsonAdaptedFood.
Sequence Diagram for Edit Command
The following sequence diagram summarizes what happens during the execution of edit command.
4.1.5. Bmi Command
In this section, we will learn more about how the bmi command is implemented.
What is the Bmi Command
The bmi command allows the user to calculate their Body Mass Index (BMI).
The bmi command was implemented as BmiCommand in the diettracker/logic/commands package.
The bmi command has the following input format:
bmi [-h HEIGHT] [-w WEIGHT]
|
The following activity diagram illustrates what happens when a user executes the bmi command:
Structure of Bmi Command
In this section, you will learn more about the relationships between objects related to the bmi command.
The above class diagram shows the structure of the BmiCommand and its associated classes and
interfaces. Some methods and fields are left out because they are not of concern in BmiCommand
Implementation of Bmi Command
The following is a detailed explanation of the operations BmiCommand performs. BmiCommand has two different usages
depending on the user input.
-
The
BmiCommand#execute(Model dietModel)method is executed and it will return the output of the calculated BMI based on user arguments. -
If successful, a success message will be generated by
CommandResultand it will be returned with the generated success message. Otherwise, an error message showing the correct command syntax is thrown asCommandException.
Sequence diagram for Bmi Command
Given below are 2 example usages of BmiCommand based on different user input.
Usage 1: No Height and Weight input
-
User launches application and enters
Dietmode. The user then entersbmias the command. -
The FoodBook parser validates this command and sets up the
BmiCommandParser, which checks for the input. -
Since there are no arguments, the
BmiCommandParserwill call the empty constructorBmiCommand(). -
BmiCommandwould then refer to the internal state of the splitterModel under Self, and retrieve the values stored in Self’s Height and Weight attributes. -
BmiCommand()will then proceed to calculate the BMI based on the current values of height and weight.
The following is a sample sequence diagram of the BmiCommand with no additional user input.
There is a need to ensure that there are stored values in Height and Weight attributes in the Self class.
|
Usage 2: With Height and Weight input
-
User launches application and enters
Dietmode. The user then entersbmias the command. -
The FoodBook parser validates this command and sets up the
BmiCommandParser, which checks for the input. -
Since there are no arguments, the
BmiCommandParserwill call the empty constructorBmiCommand(). -
BmiCommandwould then refer to the internal state of the splitterModel under Self, and retrieve the values stored in Self’s Height and Weight attributes. -
BmiCommand()will then proceed to calculate the BMI based on the current values of height and weight.
The following is a sample sequence diagram of the BmiCommand with additional user input.
Design Considerations
Aspect: How BmiCommand executes
-
Alternative 1 (current choice): Executes with other without arguments
-
Pros: More flexible use of the Command, better user experience overall.
-
Cons: Harder to implement, as there needs to be multiple BmiCommand constructors.
-
-
Alternative 2: Executes separately with arguments input and without arguments input
-
Pros: Easier to implement, less potential bugs as Command uses a single constructor.
-
Cons: We must ensure that the implementation of each individual command are correct.
-
Aspect: Storage of BMI
-
Alternative 1 (current choice): No splitterStorage of BMI value, simply prints when user requests.
-
Pros: Less memory used; reduces complexity of the Command and objects involved.
-
Cons: Users may want to access it elsewhere from Self.
-
-
Alternative 2: Storage of BMI value in Self class in Model.
-
Pros: Users have access to it anytime.
-
Cons: Coding complexity.
-
4.1.6. Height Command
In this section, we will learn more about how the height command is implemented.
What is the Height Command
The height command allows the user to store their Height into the Diet Tracker.
The height command was implemented as HeightCommand in the diettracker/logic/commands package.
The height command has the following input format:
height HEIGHT
|
The following activity diagram illustrates what happens when a user executes the height command:
Structure of Height Command
In this section, you will learn more about the relationships between objects related to the height command.
The above class diagram shows the structure of the HeightCommand and its associated classes and
interfaces. Some methods and fields are left out because they are not of concern in HeightCommand
Implementation of Height Command
The following is a detailed explanation of the operations HeightCommand performs.
-
The
HeightCommand#execute(DietModel dietModel)method is executed and it validates that the specifiedHEIGHTto store is a valid Height. If valid, the height will be stored in theSelfclass. -
The method
DietModel#setHeight(Height height)will then be called to set the Height of theSelfclass.Self#setHeight(Height height)is invoked which makes a call to its internal Height to replace the value stored. -
If successful, a success message will be generated by
CommandResultand it will be returned with the generated success message. Otherwise, an error message showing the correct command syntax is thrown asCommandException.
Sequence diagram for Height Command
The following sequence diagram summarizes what happens during the execution of height command.
4.1.7. Weight Command
In this section, we will learn more about how the weight command is implemented.
What is the Weight Command
The weight command allows the user to store their Weight into the Diet Tracker.
The weight command was implemented as WeightCommand in the diettracker/logic/commands package.
The weight command has the following input format:
weight WEIGHT
|
The following activity diagram illustrates what happens when a user executes the weight command:
Structure of Weight Command
In this section, you will learn more about the relationships between objects related to the weight command.
The above class diagram shows the structure of the WeightCommand and its associated classes and
interfaces. Some methods and fields are left out because they are not of concern in WeightCommand
Implementation of Weight Command
The following is a detailed explanation of the operations WeightCommand performs.
-
The
WeightCommand#execute(DietModel dietModel)method is executed and it validates that the specifiedWEIGHTto store is a valid Weight. If valid, the Weight will be stored in theSelfclass. -
The method
DietModel#setWeight(Weight weight)will then be called to set the Weight of theSelfclass.Self#setWeight(Weight weight)is invoked which makes a call to its internal Height to replace the value stored. -
If successful, a success message will be generated by
CommandResultand it will be returned with the generated success message. Otherwise, an error message showing the correct command syntax is thrown asCommandException.
Sequence diagram for Weight Command
The following sequence diagram summarizes what happens during the execution of weight command.
4.1.8. Mode Command
In this section, we will learn more about how the mode command is implemented.
What is the Mode Command
The mode command allows the user to store their Dieting Mode into the Diet Tracker.
The mode command was implemented as ModeCommand in the diettracker/logic/commands package.
The mode command has the following input format:
mode [-l] [-g] [-m]
|
Users must only enter EXACTLY ONE of the given flags for the mode. |
The following activity diagram illustrates what happens when a user executes the mode command:
Structure of Mode Command
In this section, you will learn more about the relationships between objects related to the mode command.
The above class diagram shows the structure of the ModeCommand and its associated classes and
interfaces. Some methods and fields are left out because they are not of concern in ModeCommand
Implementation of Mode Command
The following is a detailed explanation of the operations ModeCommand performs.
-
The
ModeCommand#execute(DietModel dietModel)method is executed and it validates that the specifiedMODE(based on the input flag) to store is a valid flag. If valid, the corresponding mode to the flag will be stored in theSelfclass. -
The method
DietModel#setMode(Mode mode) will then be called to set the Mode of the `Selfclass.Self#setMode(Mode mode)is invoked which makes a call to its internal Mode to replace the value stored. -
If successful, a success message will be generated by
CommandResultand it will be returned with the generated success message. Otherwise, an error message showing the correct command syntax is thrown asCommandException.
Sequence diagram for Mode Command
The following sequence diagram summarizes what happens during the execution of mode command.
4.1.9. Metrics Command
In this section, we will learn more about how the metrics command is implemented.
What is the Metrics Command
The metrics command allows the user to check their health metrics. These include their Height, Weight and Dieting Mode.
The metrics command was implemented as MetricsCommand in the diettracker/logic/commands package.
The metrics command has the following input format:
metrics
The following activity diagram illustrates what happens when a user executes the metrics command:
Structure of Metrics Command
In this section, you will learn more about the relationships between objects related to the metrics command.
The above class diagram shows the structure of the MetricsCommand and its associated classes and
interfaces. Some methods and fields are left out because they are not of concern in MetricsCommand
Implementation of Metrics Command
The following is a detailed explanation of the operations MetricsCommand performs.
-
The
MetricsCommand#execute(DietModel dietModel)method is executed. -
The
DietModel#printMetrics()method would then be called to print the User’s Metrics. -
If successful, a success message will be generated by
CommandResultand it will be returned with the generated success message. Otherwise, an error message showing the correct command syntax is thrown asCommandException.
Sequence diagram for Metrics Command
The following sequence diagram summarizes what happens during the execution of metrics command.
4.2. Expense Splitter feature
The Expense Splitter feature is designed to aid our users with the splitting of large bills that involves meany people. The feature comprises of six commands namely.
-
AddItemCommand- Creates an Item with its ItemPrice, Person(s) involved in splitting that Item and adds it to Receipt. -
DeleteItemCommand- Deletes an Item from the current Receipt and reduces the Person’s amount accordingly. -
ListReceiptCommand- Lists the Item(s) in the current Receipt, its ItemPrice and Person(s) involved in splitting that Item. -
ListAmountCommand- Lists the Person(s) Name and Amount they owe the user. -
DoneReceiptCommand- Finalize the receipt, after which the Receipt will be immutable. -
PaidCommand- Reduces the Amount a Person owes. -
ClearReceipt- Clear the current Receipt to start a new Receipt.
Below is the activity diagram of the entire Expense Splitter.
Activity Diagram of Expense Splitter:
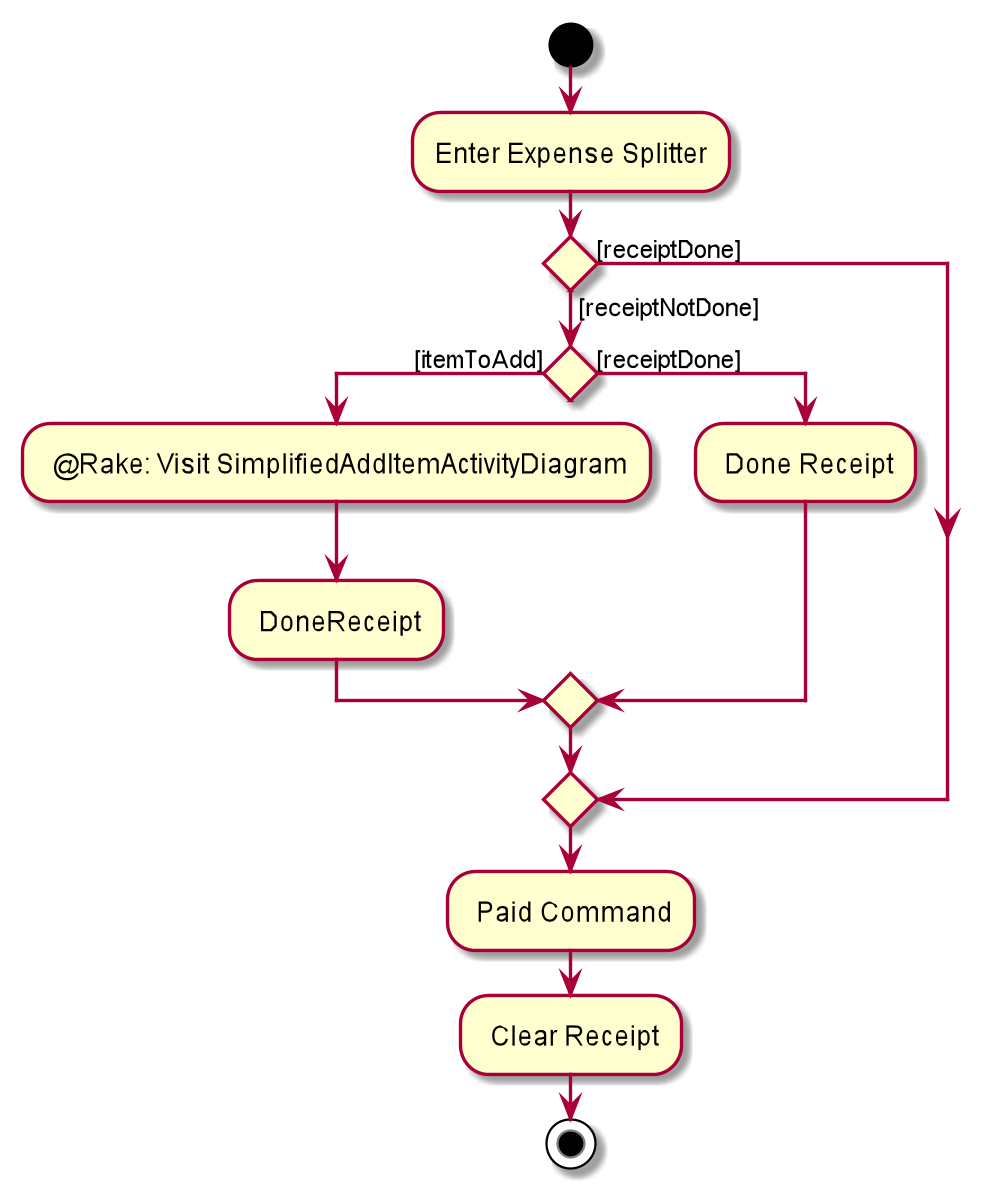
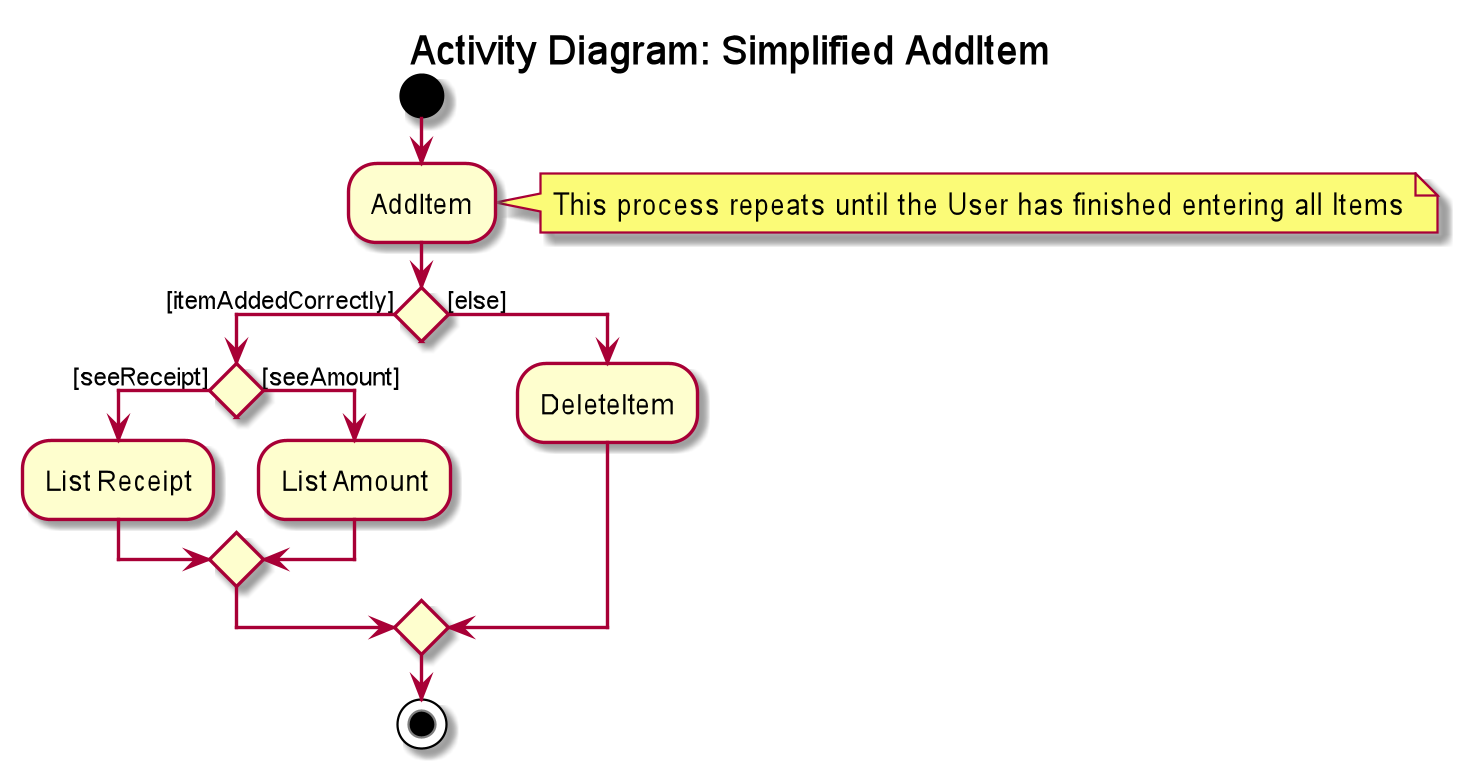
| SimplifiedAddItemActivityDiagram is not the actual AddItem Activity Diagram. It has been simplified to provide just enough information for the user to know about the rough workflow of Expense Splitter. A more detailed diagram of Add Item can be found in AddItemCommand. |
4.2.1. Add Item Command
In this section, we will learn more about how the additem command is implemented.
What is the Add Item Command
The additem command allows the user to add an Item into the Receipt, along with the ItemPrice of the Item and the Persons
involved in splitting the cost of that Item.
The additem command was implemented as AddItemCommand in the expensesplitter/logic/commands package.
The additem command has the following input format:
additem -i ITEMNAME -p ITEMPRICE -n NAME [-n NAME]…
|
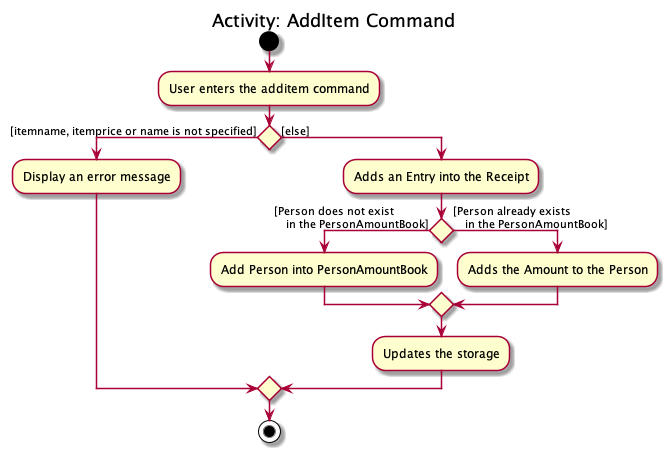
The following activity diagram illustrates what happens when a user executes the additem command:
Structure of Add Item Command
In this section, you will learn more about the relationships between objects related to the AddItemCommand.
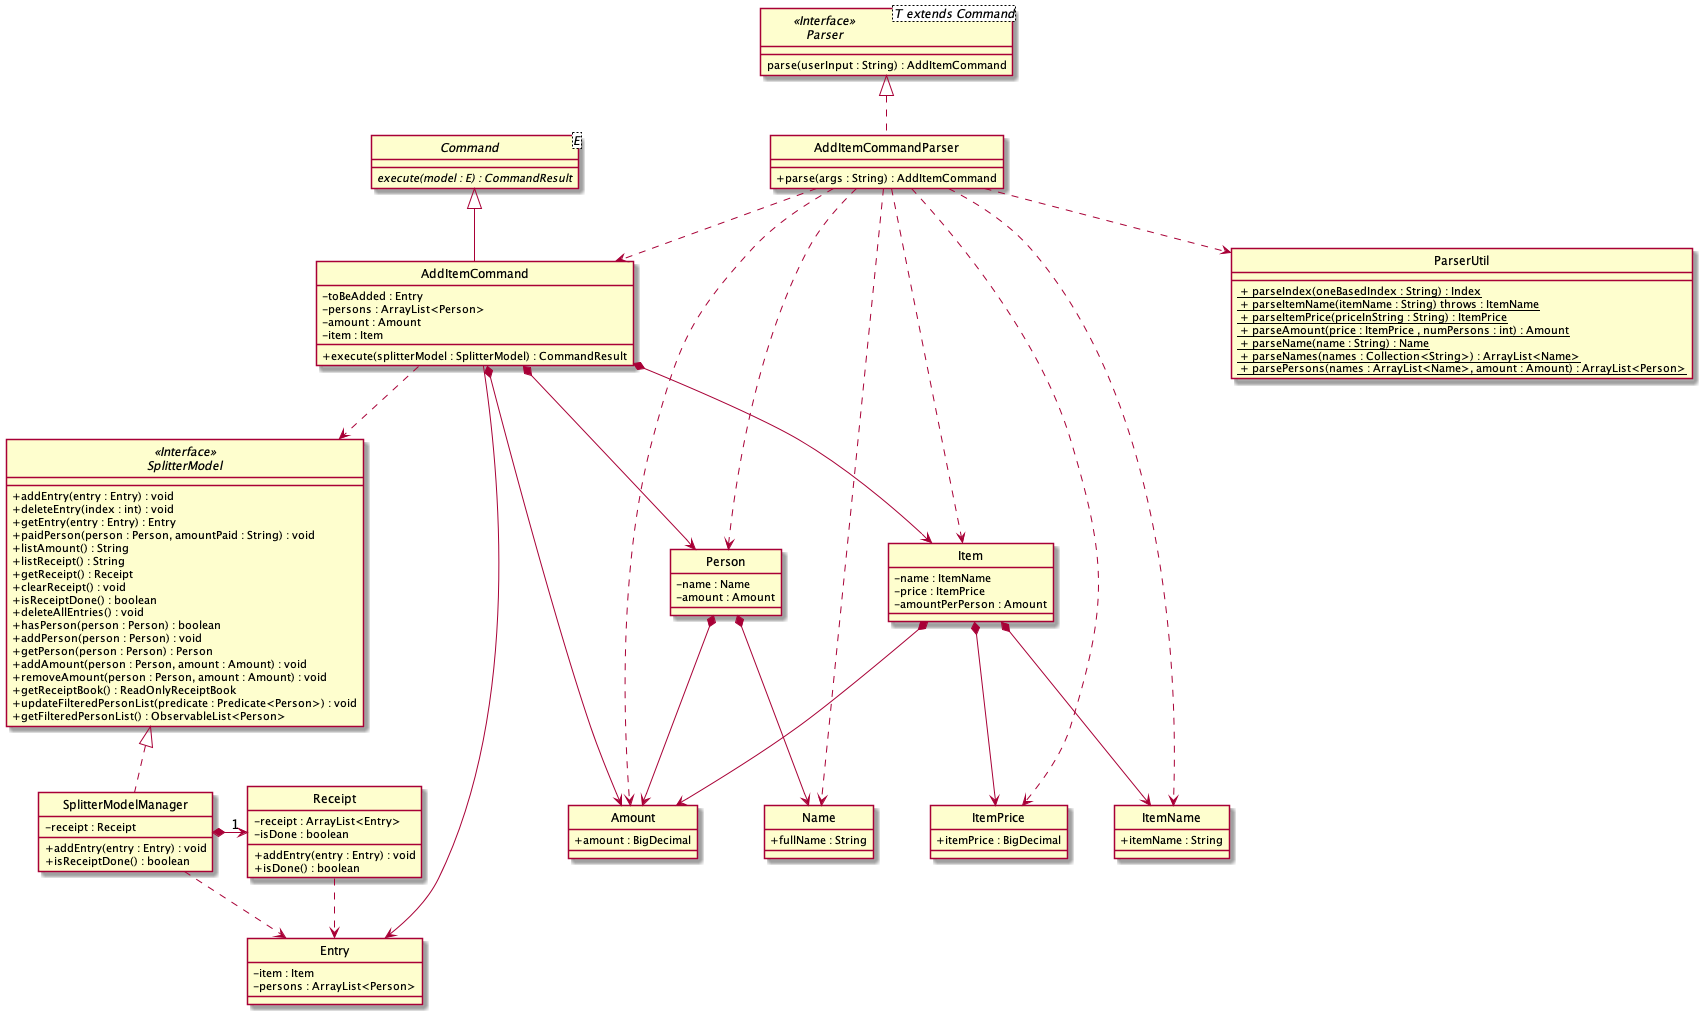
The above class diagram shows the structure of the AddItemCommand and it’s associated classes and interfaces. Some
methods and fields have been left out because they are not of concern in the AddItemCommand.
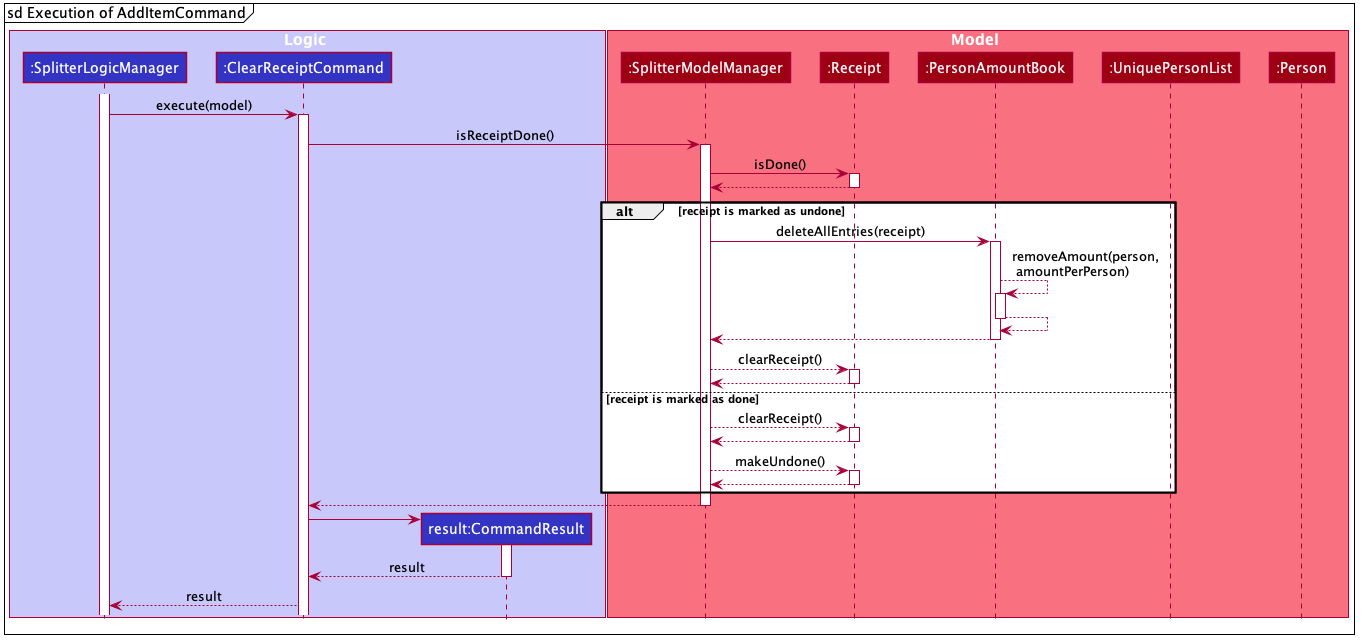
Implementation of Add Item Command
The following is a detailed explanation of the operations AddItemCommand performs.
-
The
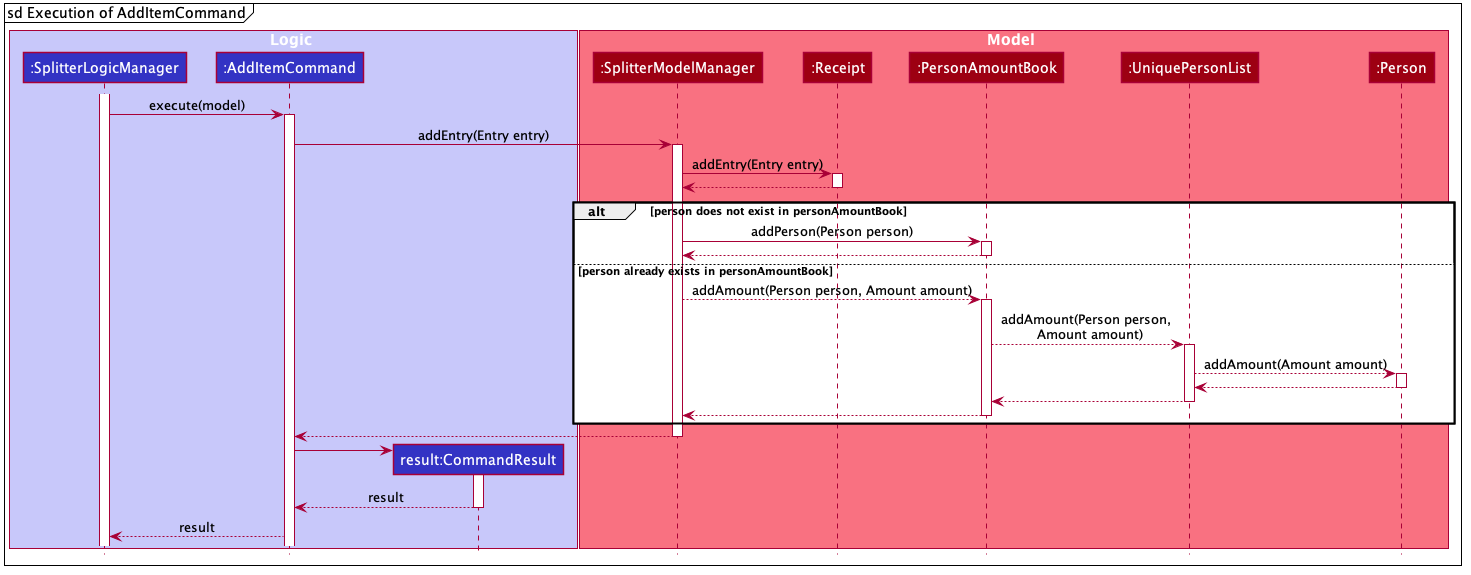
AddItemCommand#execute(SplitterModel splitterModel)method is executed and it checks if the specified Item and list of Persons to be added are valid. If valid, a new Entry would be created with the specified Item and list of Persons. -
The
SplitterModel#addEntry(Entry entry)method would then be called to add the Entry into the Receipt. -
For each Person in the list of Persons, the Person is first checked through the
PersonAmountBook#personsusing theSplitterModel#hasPerson(Person person)method to check if the person already exists. -
If the person does not already exist, the method
SplitterModel#addPerson(Person person)would be called to add the person, together with the amount, into thePersonAmountBook#persons. -
If the Person exists, the Person would be retrieved from the
PersonAmountBook#personsusing theSplitterModel#getPerson(Person person)method, and then the amount would be added to that person using theSplitterModel#addAmount(Person person, Amount amount)method.
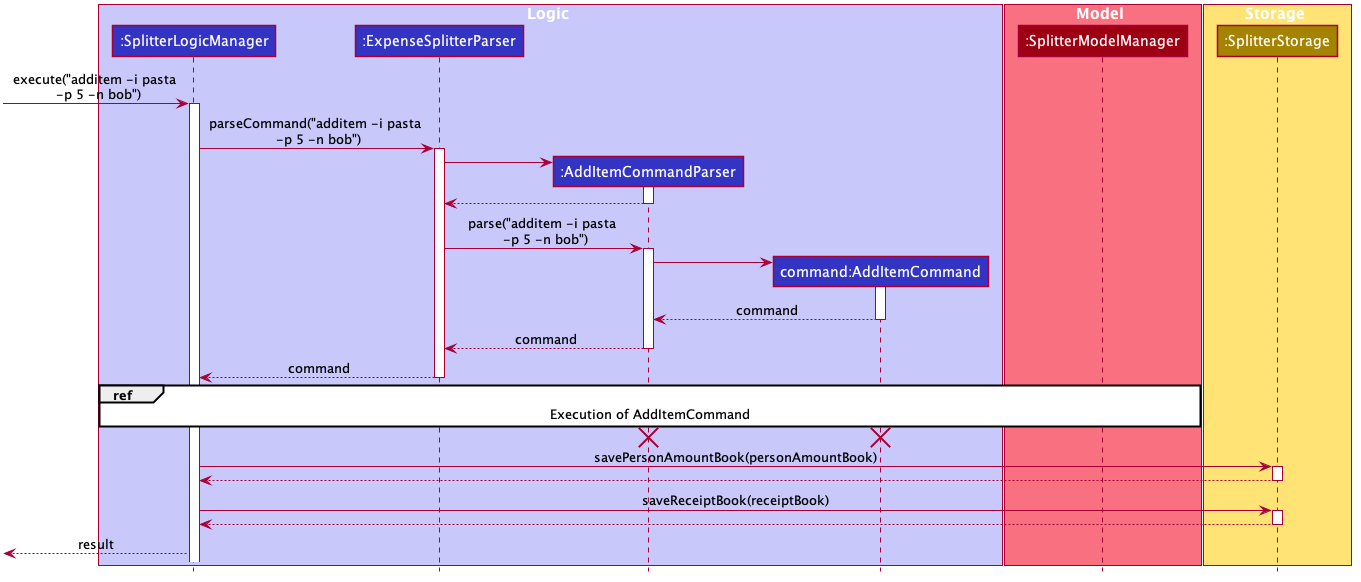
Sequence diagram for Add Item Command
The following sequence diagram summarizes what happens during the execution of additem command.
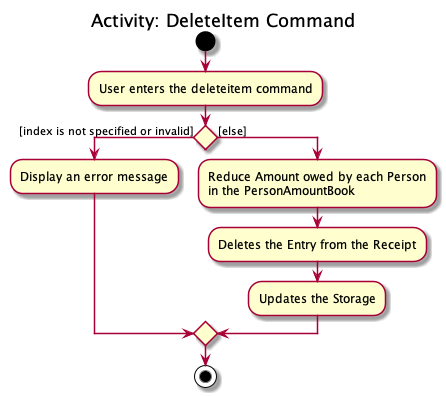
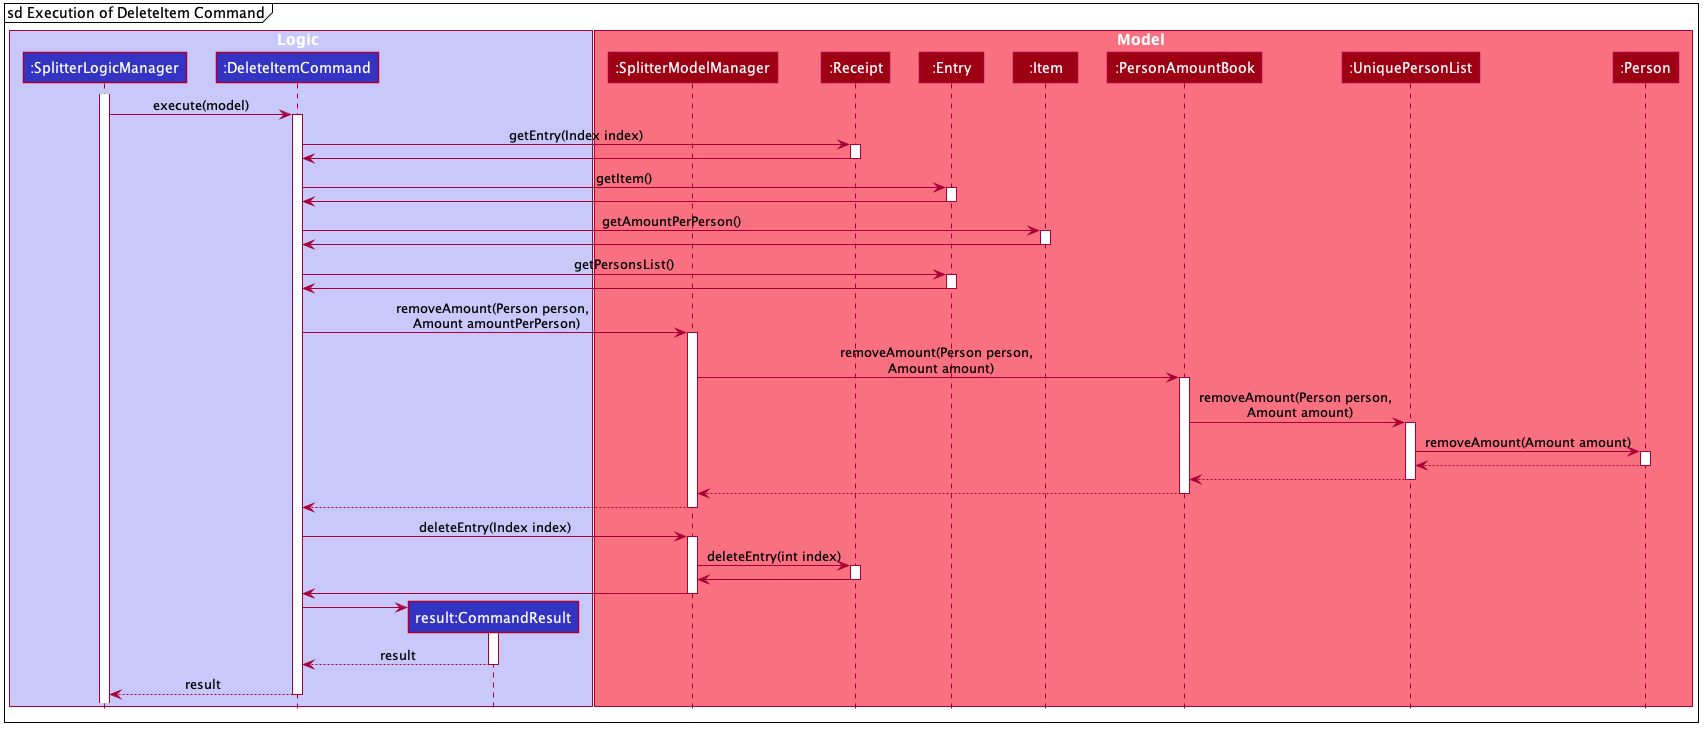
4.2.2. Delete Item Command
In this section, we will learn more about how the deleteitem command is implemented.
What is the Delete Item Command
The deleteitem command allows users to remove the Item from the Receipt via the Index.
The deleteitem command was implemented as DeleteItemCommand in the expensesplitter/logic/commands package.
The deleteitem command has the following input format:
deleteitem INDEX
|
The following activity diagram illustrates what happens when a user executes the deleteitem command:
Structure of Delete Item Command
In this section, you will learn more about the relationships between objects related to the DeleteItemCommand.
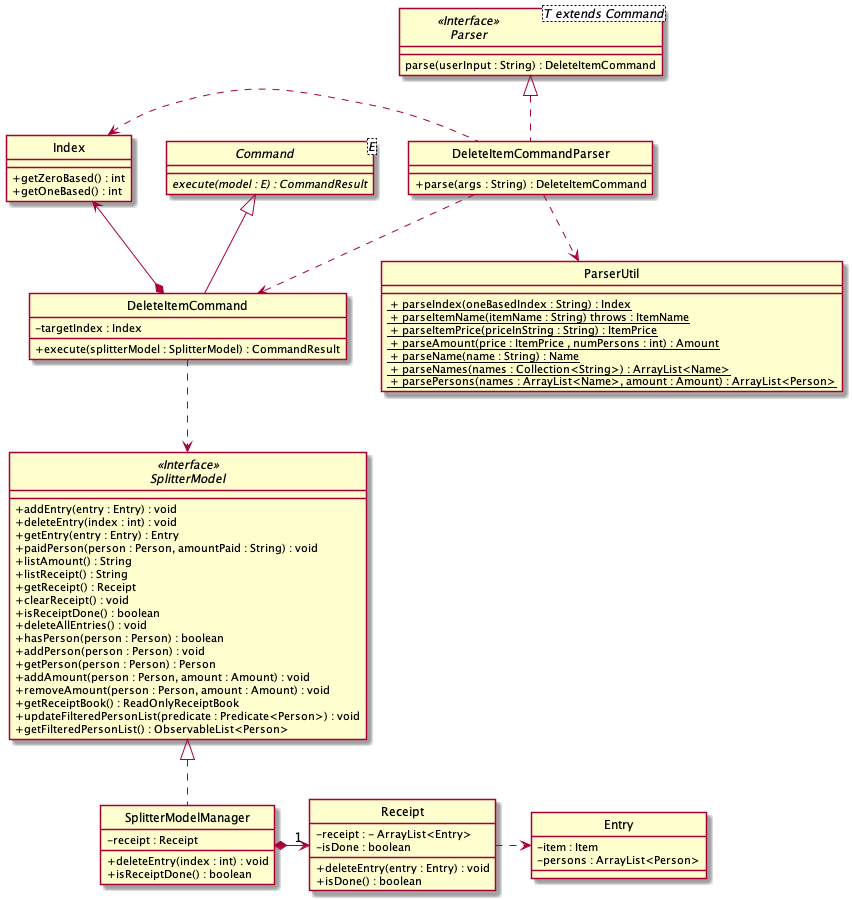
The above class diagram shows the structure of the DeleteItemCommand and it’s associated classes and interfaces. Some
methods and fields have been left out because they are not of concern in the DeleteItemCommand.
Implementation
The following is a detailed explanation of the operations DeleteItemCommand performs.
-
The
DeleteItemCommand#execute(SplitterModel splitterModel)method is executed and it validates that the specified Index to delete is within range. If valid, the Entry to be deleted will be retrieved from Receipt using its Index. -
The method
SplitterModel#getEntry(Index index)is called to retrieve the current Entry, which subsequently retrieves the current Item using theEntry#getItem()method and the amountPerPerson associated with it via theItem#getAmountPerPerson()method. The list of Persons are also retrieved via theEntry#getPersonsList()method. -
For each Person in the list of Persons, the amount is subtracted from the current amount owed by the Person.
-
The method
SplitterModel#deleteEntry(int index)will then be called to remove the Item from the Receipt.Receipt#deleteEntry(int index)is invoked which makes a call to its internal list to remove the specified Item.
Sequence Diagram for Delete Item Command
The following sequence diagram summarizes what happens during the execution of deleteitem command.
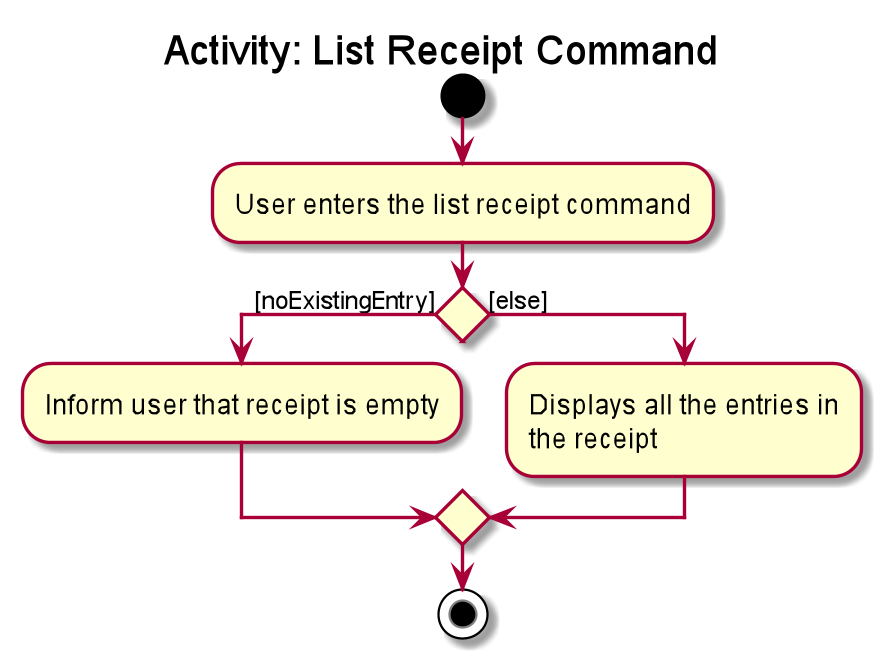
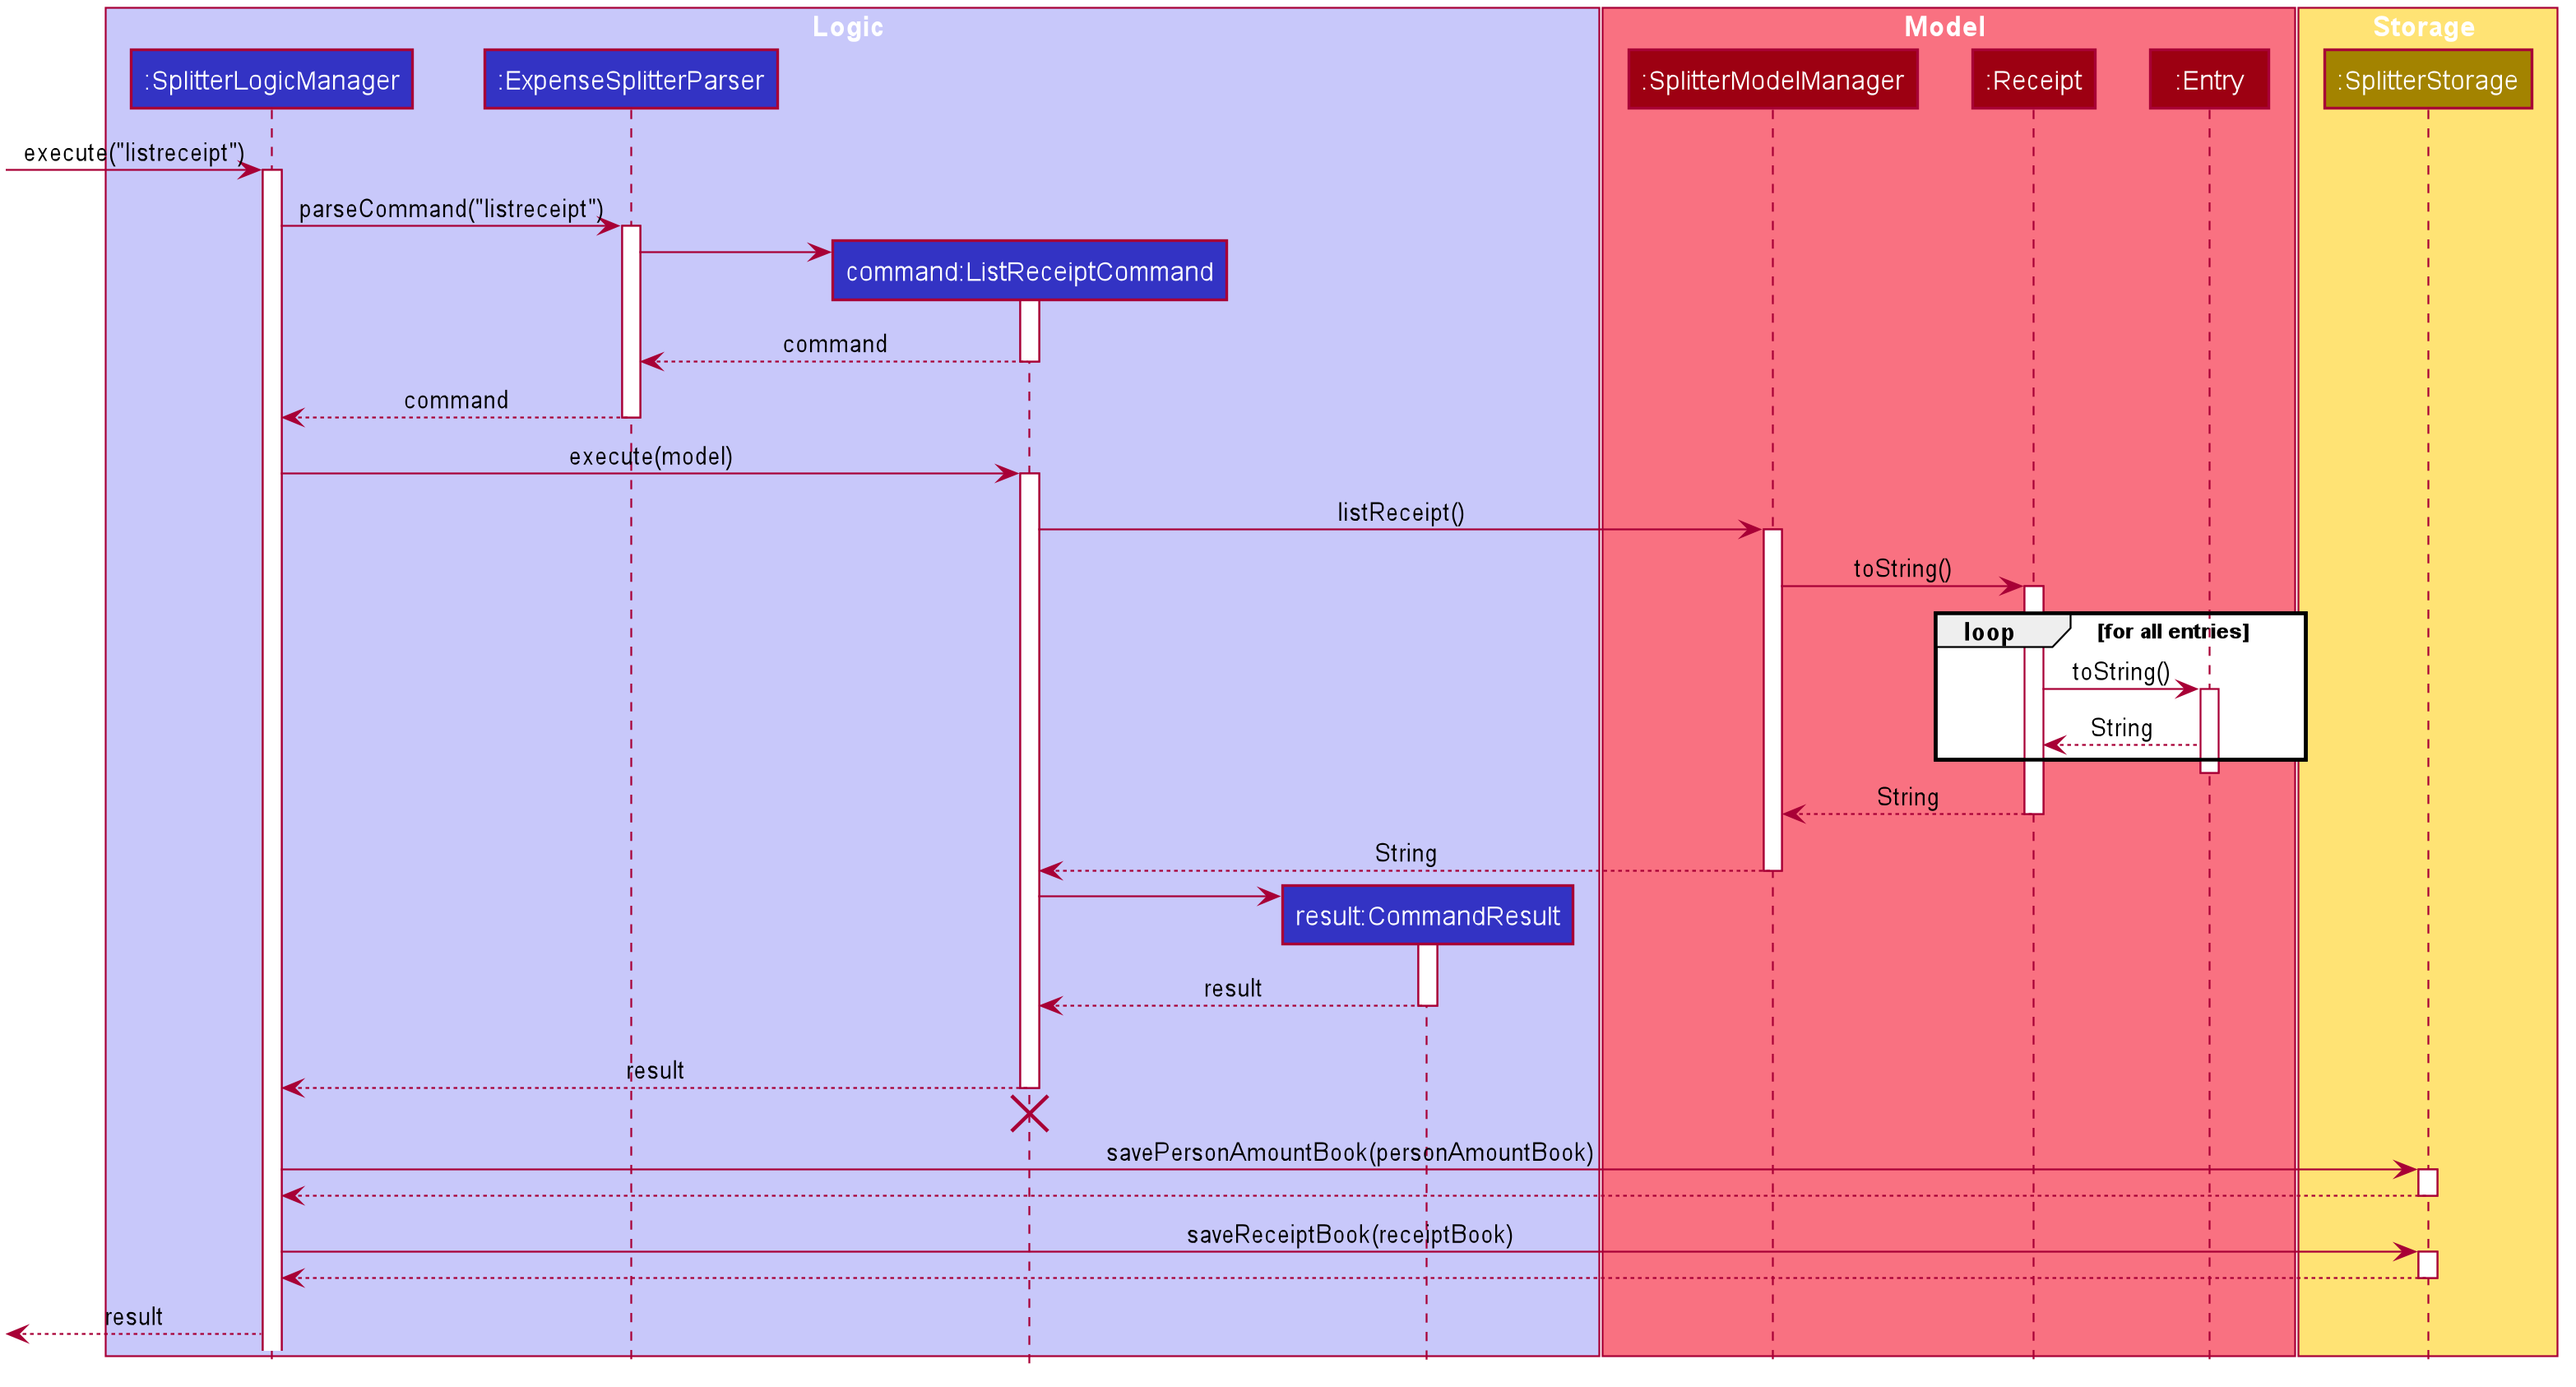
4.2.3. List Receipt Command
In this section, we will learn more about how the listreceipt command is implemented.
What is the List Receipt Command
The listreceipt command allows user to find out the current Items in the receipt.
The listreceipt command was implemented as a ListReceiptCommand in the expensesplitter/logic/commands package.
The listreceipt has the following input format:
listreceipt
|
The following activity diagram illustrates what happens when a user executes listreceipt command:
Structure of List Receipt Command
In this section, you will learn more about the relationships between objects related to the ListReceiptCommand.
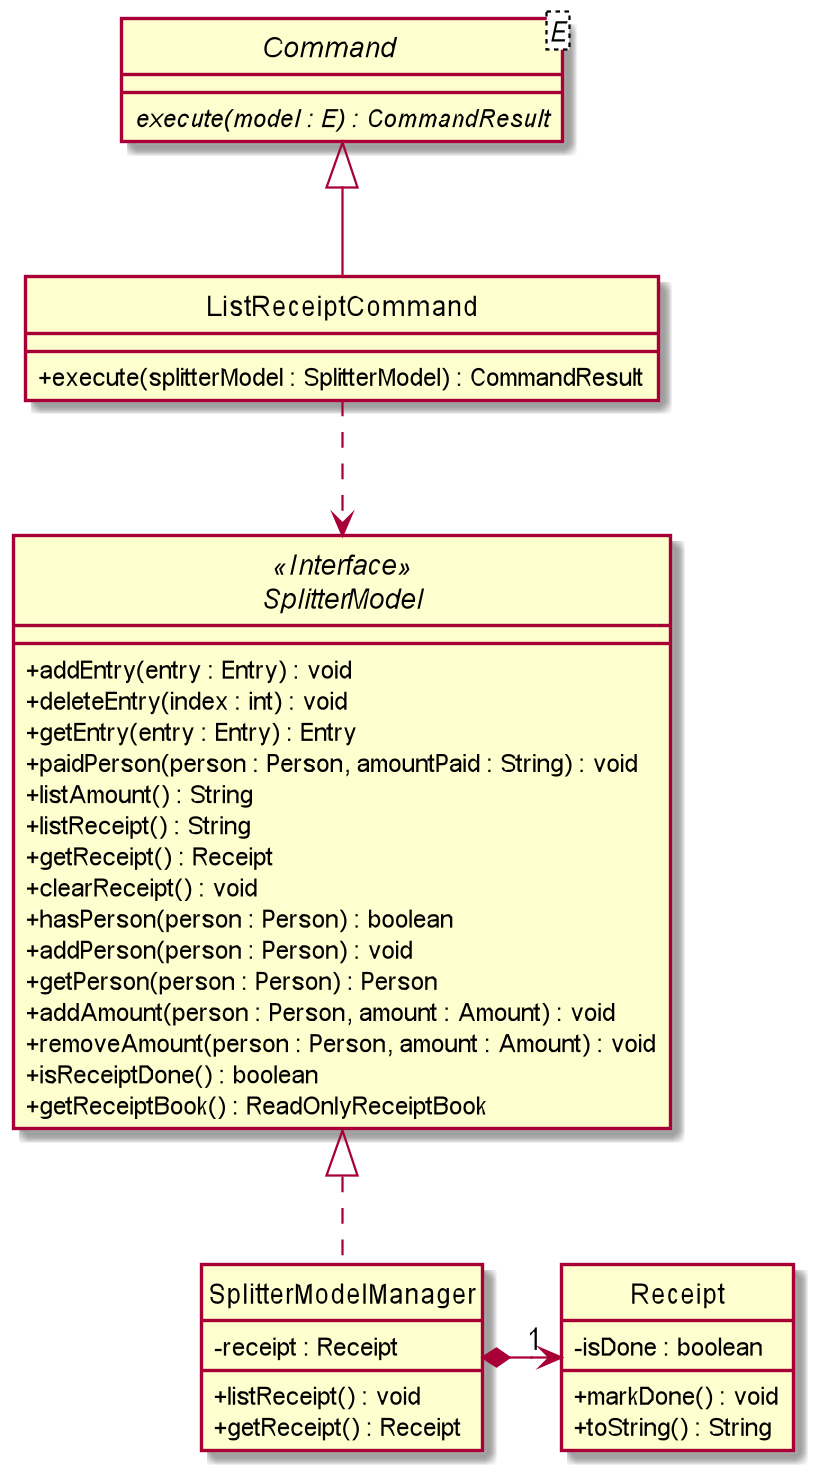
The above class diagram shows the structure of the ListReceiptCommand and its associated classes and
interfaces. Some methods and fields are left out because they are not of concern in ListReceiptCommand
Implementation of List Receipt Command
The following is a detailed explanation of the operations ListReceiptCommand performs.
-
The
ListReceiptCommand#execute(SplitterModel splitterModel)method is executed. -
The method
SplitterModel#listReceipt()will then be called to return the list of entries currently in that Receipt. -
The method
Receipt#toString()will use StringBuilder to build the string of the Items(s) currently in Receipt by callingEntry.toString()for entry. After all entries are done,Receipt#toString()would have finish building the string and will return to SplitterModelManager. -
4. SplitterModelManager will then pass the String into CommandResult where it will be printed under the UI component.
Sequence Diagram for List Receipt Command
The following sequence diagram summarizes what happens during the execution of listreceipt command.
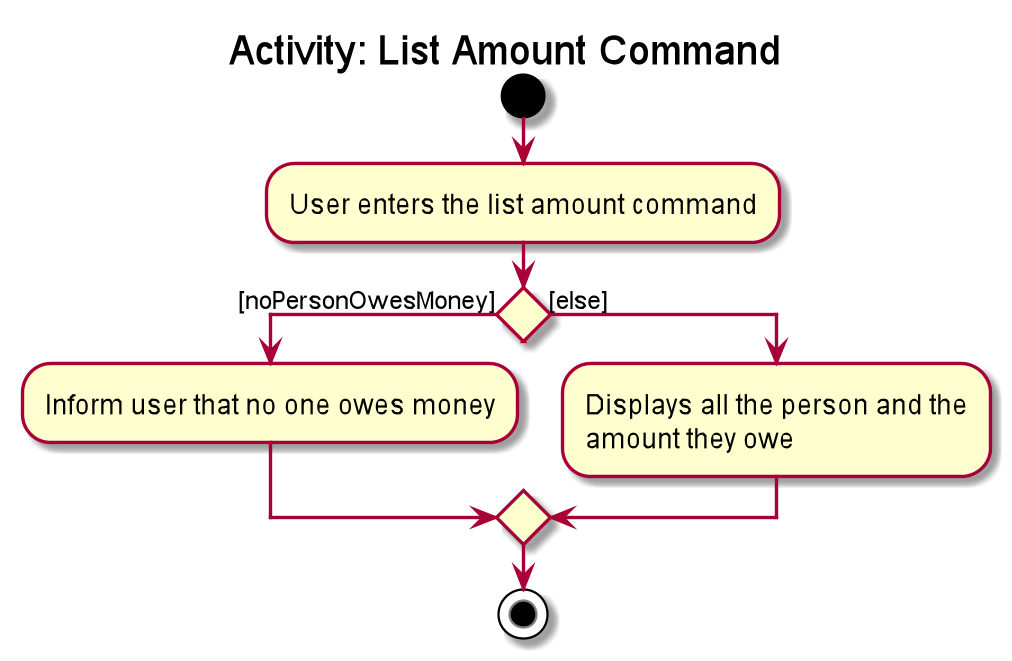
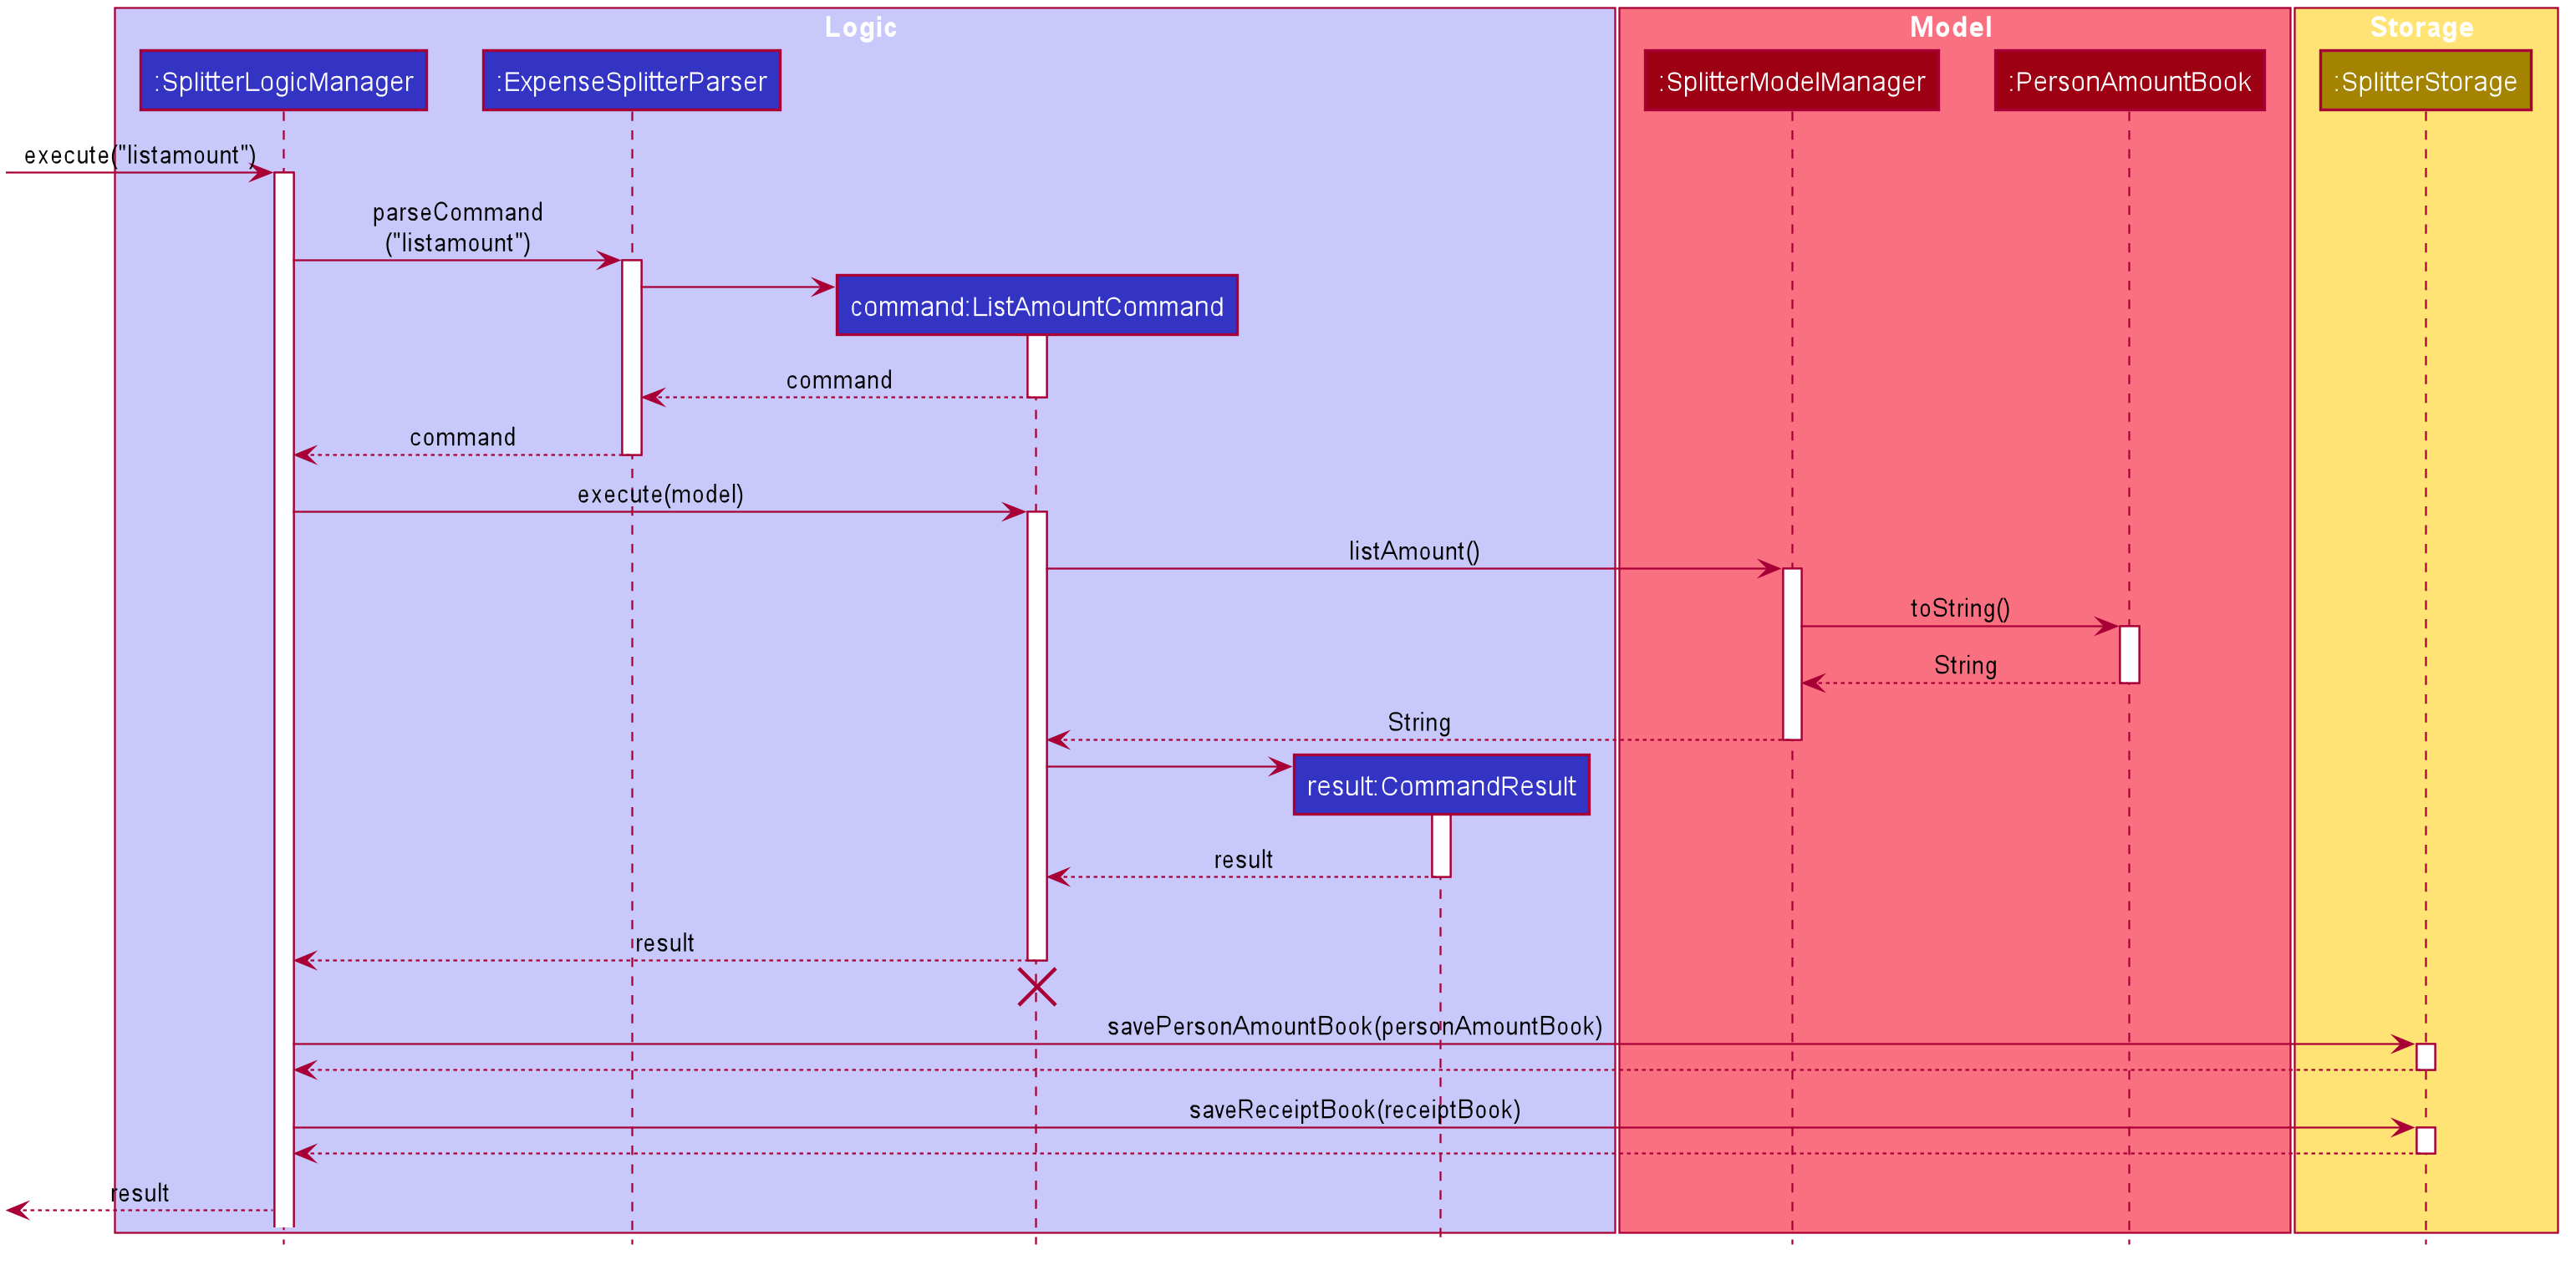
4.2.4. List Amount Command
In this section, we will learn more about how the listamount command is implemented.
What is the List Amount Command
The listamount command allows users to find out how much each Person owes them.
The listamount command was implemented as a ListAmountCommand in the expensesplitter/logic/commands package.
The listamount command has the following input format:
listamount
|
The following activity diagram illustrates what happens when a user executes listamount command.
Structure of List Amount Command
In this section, you will learn more about the relationships between objects related to the ListAmountCommand.
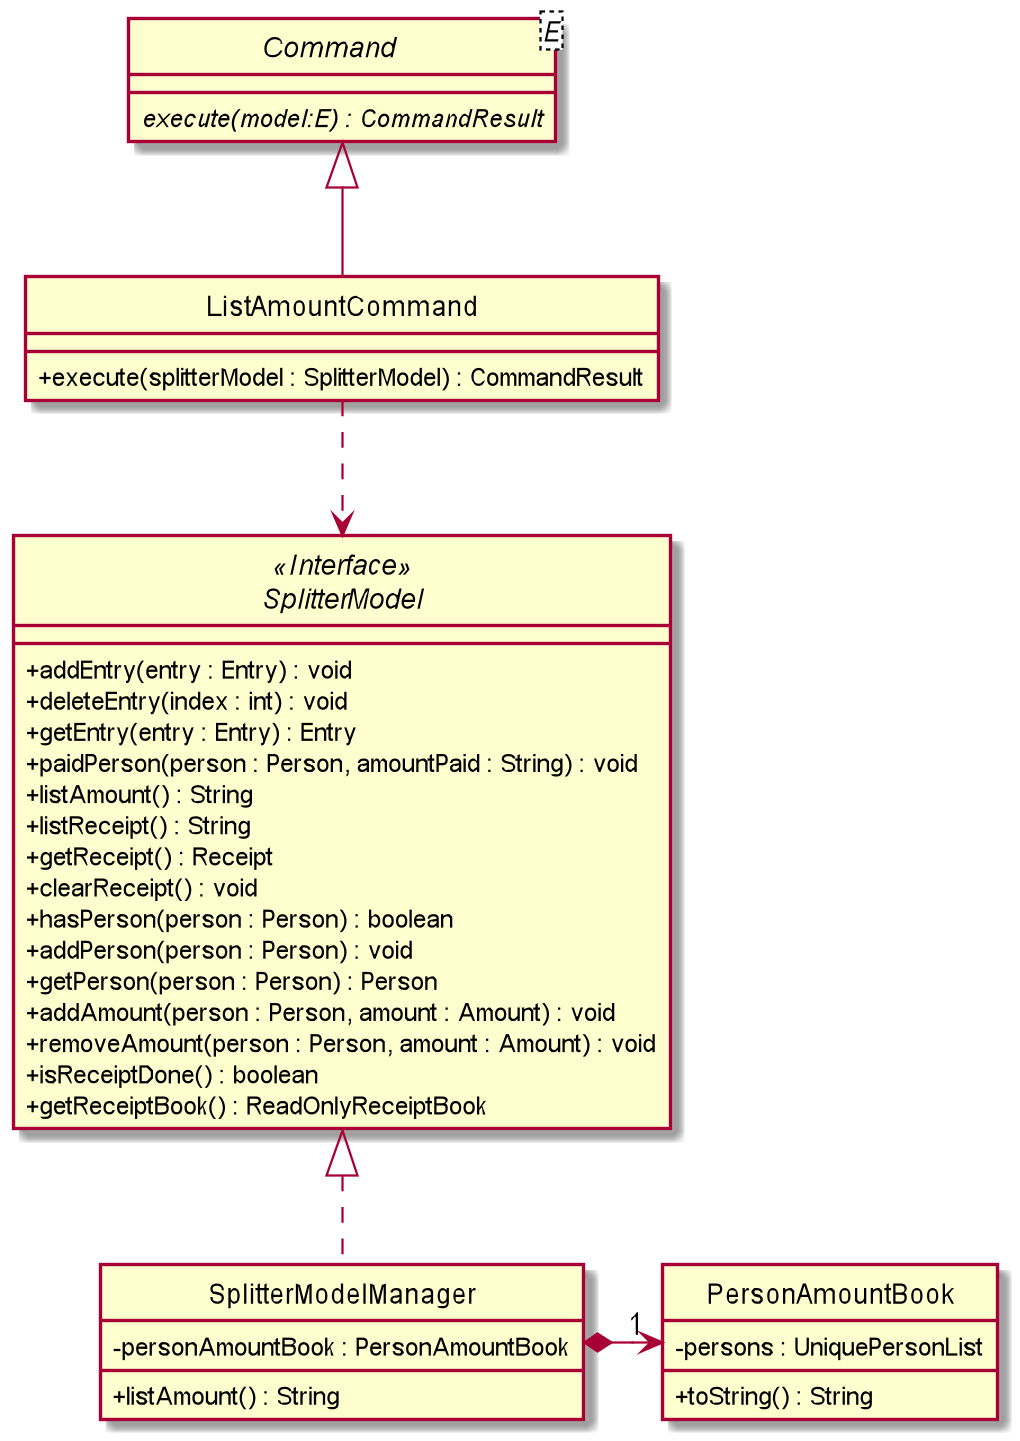
The above class diagram shows the structure of the ListAmountCommand and its associated classes and
interfaces. Some methods and fields are left out because they are not of concern in ListAmountCommand
Implementation of List Amount Command
The following is a detailed explanation of the operations ListAmountCommand performs.
-
The
ListAmountCommand#execute(SplitterModel splitterModel)method is executed. -
The method
SplitterModel#listAmount()will then be called to return the list of Person(s) with their amount. -
PersonAmountBook#toString()will convert list of person in the list to the expected format and return it to SplitterModelManager. -
SplitterModelManager will then pass the String into CommandResult where it will be printed under the UI component.
Sequence Diagram for List Amount Command
The following sequence diagram summarizes what happens during the execution of listamount command.
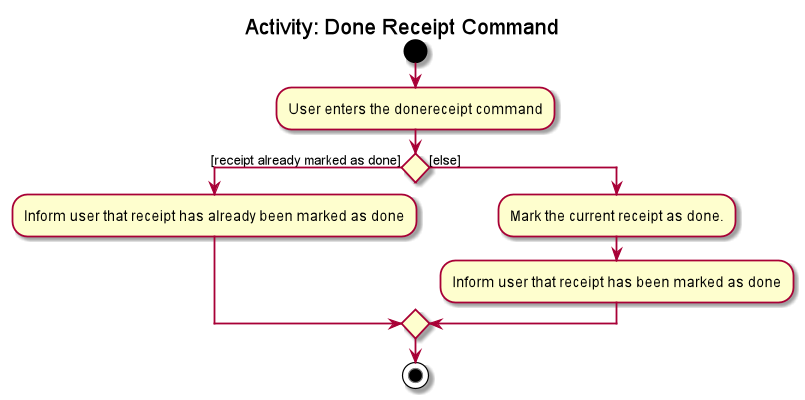
4.2.5. Done Receipt Command
In this section, we will learn more about how the donereceipt command is implemented.
What is the Done Receipt Command
The donereceipt command allows user to finalize the entries in the receipt. After this command is executed, the
entries in the receipt are immutable.
The donereceipt command was implemented as a DoneReceiptCommand in the expensespliter/logic package.
The donereceipt has the following input format:
donereceipt
|
The receipt will not be editable after this command is executed thus ensuring all entries are inputted correctly.
The User can use |
The following activity diagram illustrates what happens when a user executes donereceipt command:
Structure of Done Receipt Command
In this section, you will learn more about the relationships between objects related to the donereceipt command.
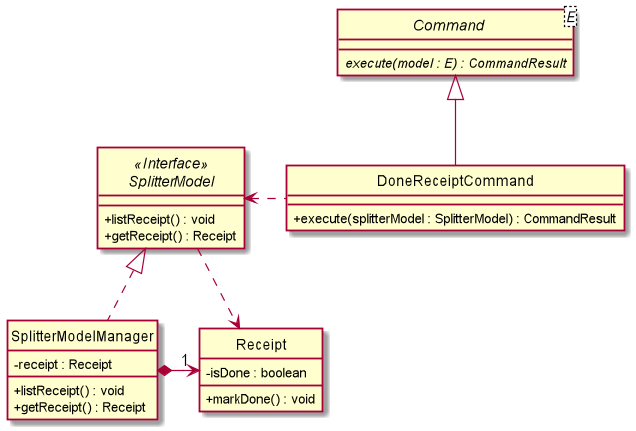
The above class diagram shows the structure of the DoneReceiptCommand and its associated classes and
interfaces. Some methods and fields are left out because they are not of concern in DoneReceiptCommand.
Implementation of Done Receipt Command
The following is a detailed explanation of the operations DoneReceiptCommand performs.
-
The
DoneReceiptCommand#execute(SplitterModel splitterModel)method is executed. -
The
SplitterModel#getReceipt()method is executed and get the currentReceipt. -
Then
Receipt#markDone()method is called. -
This will invoke the boolean
Receipt#isDonevariable changed to true.
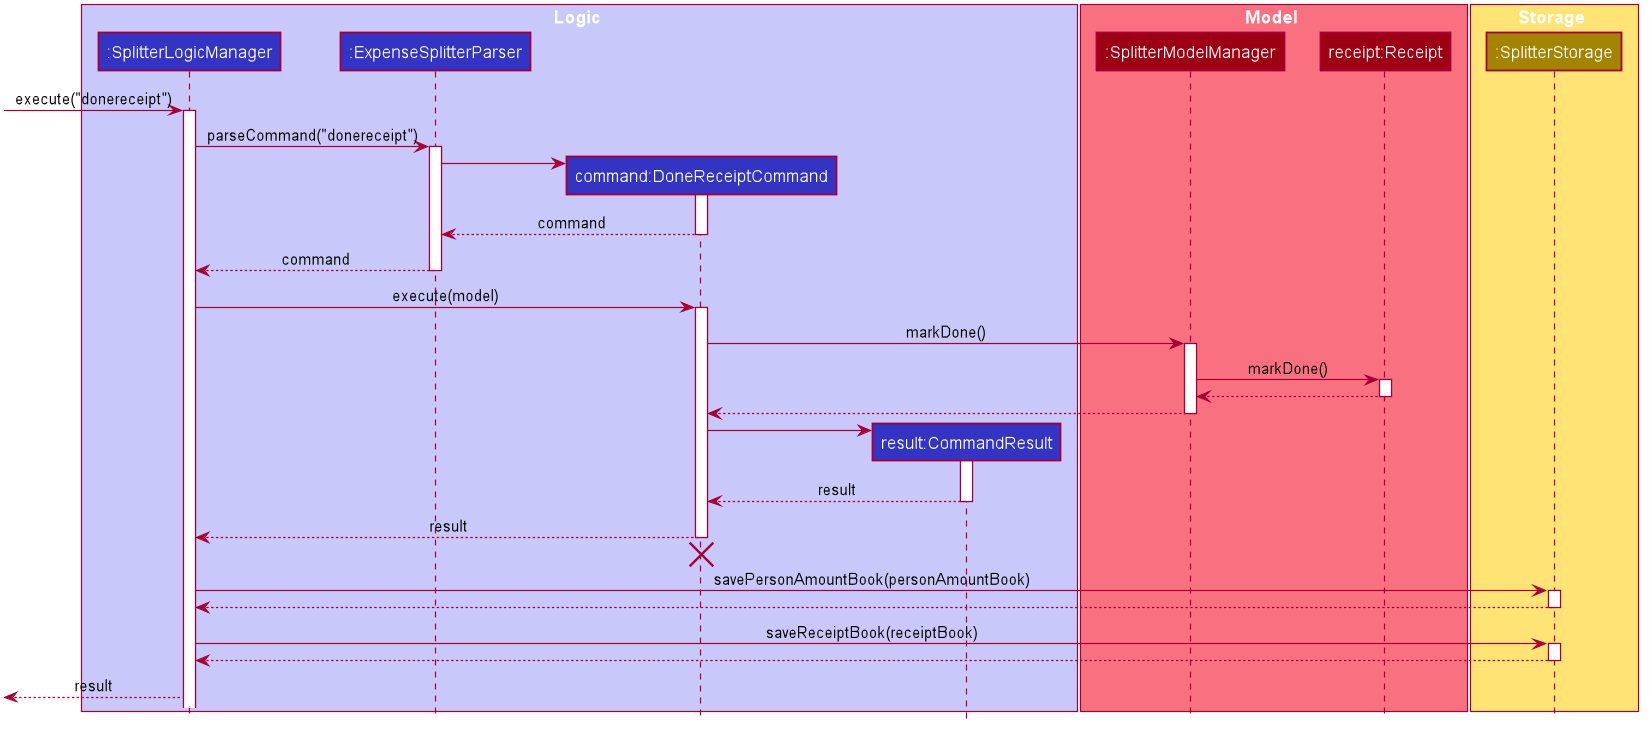
Sequence Diagram for Done Receipt Command
The following sequence diagram summarizes what happens during the execution of donereceipt command.
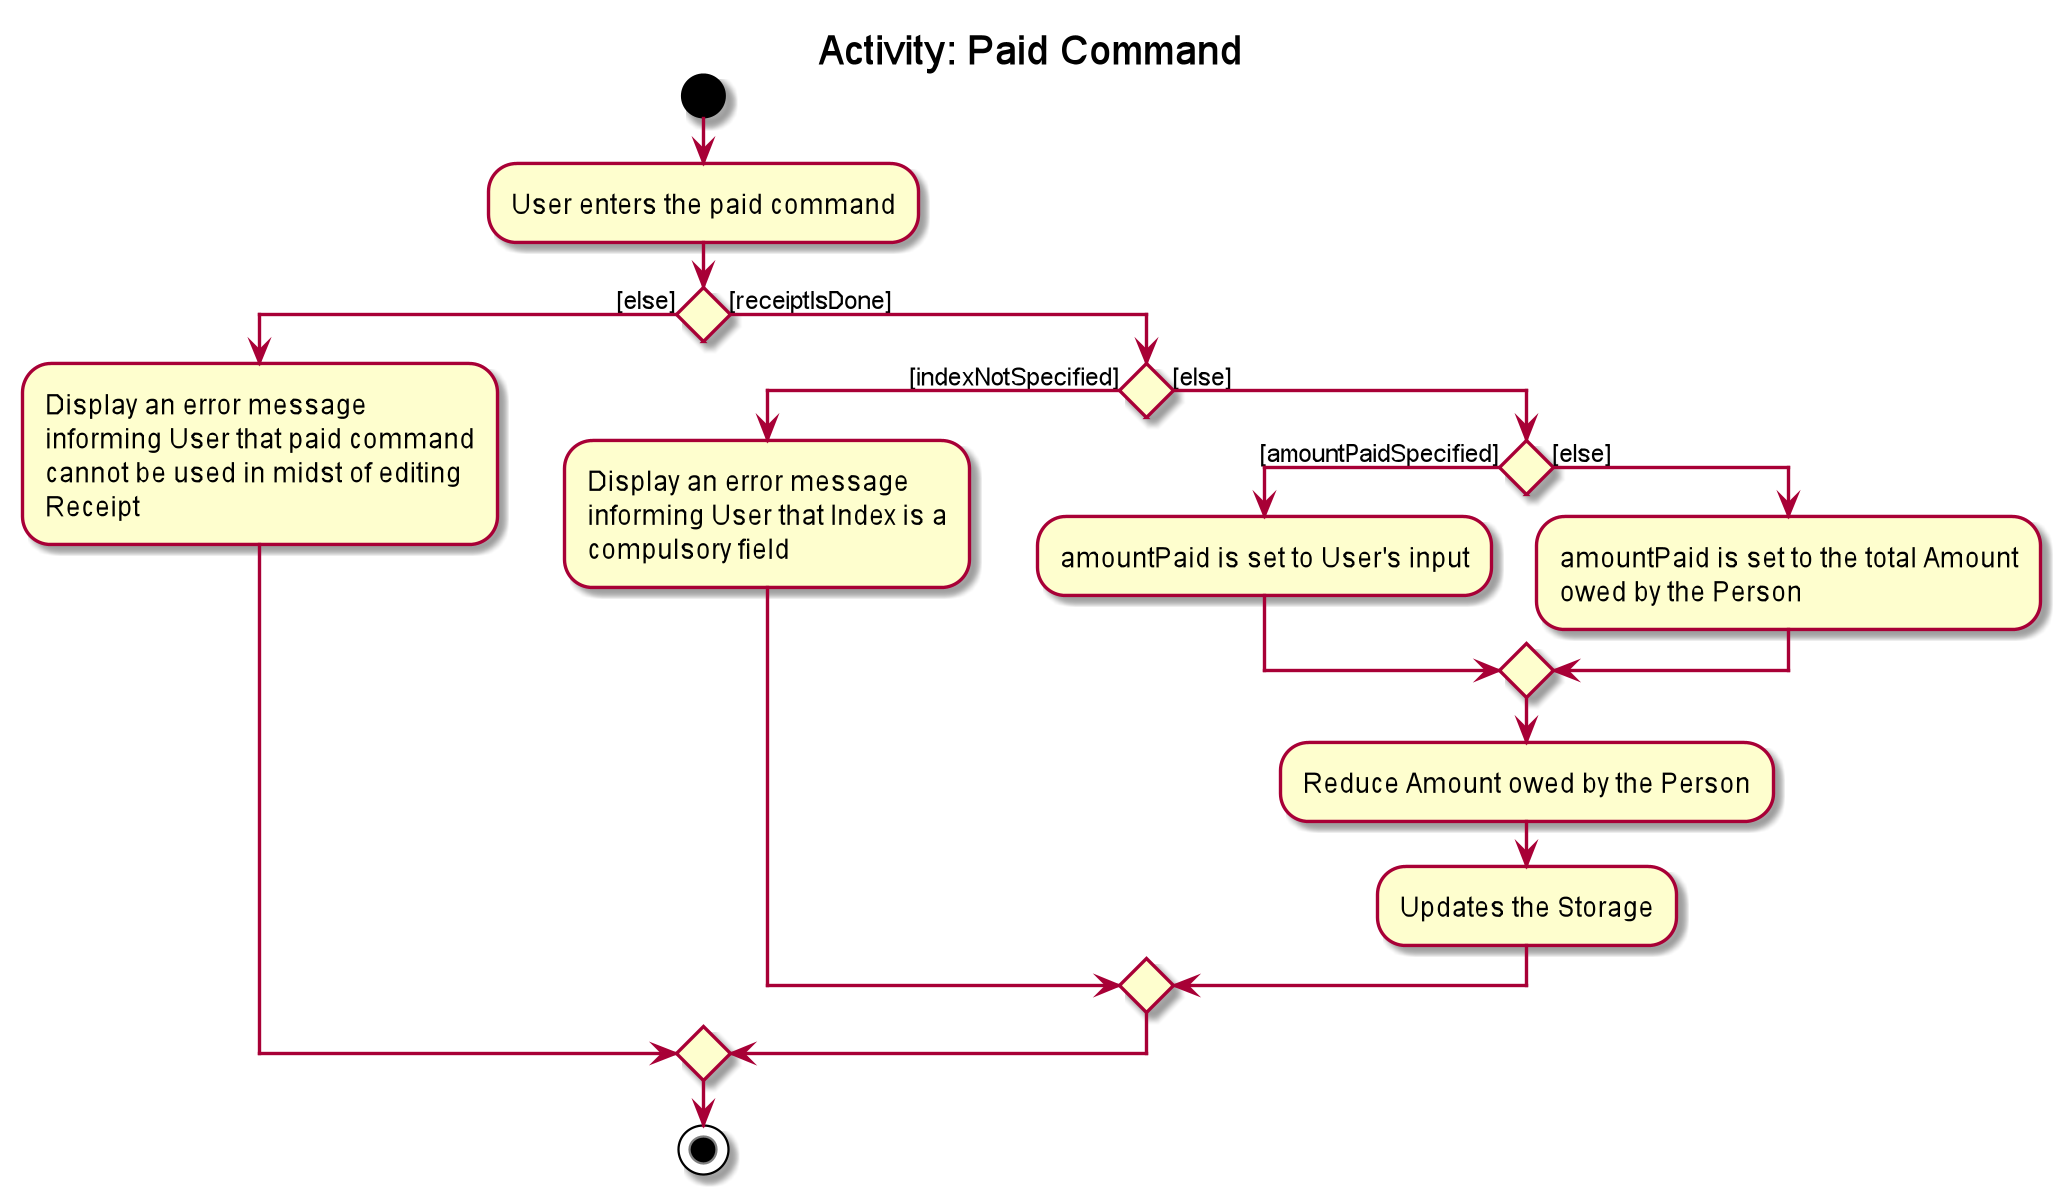
4.2.6. Paid Command
In this section, we will learn more about how the paid command is implemented.
What is the Paid Command
The paid command allows user to reduce the amount of money owed by a Person after they
have paid.
The paid command was implemented as a PaidCommand in the expensesplitter/logic package.
The paid command has the following input format:
paid INDEX [AMOUNT]
|
The following activity diagram illustrates what happens when a user executes paid command:
Structure of Paid Command
In this section, you will learn more about the relationships between objects related to the PaidCommand.
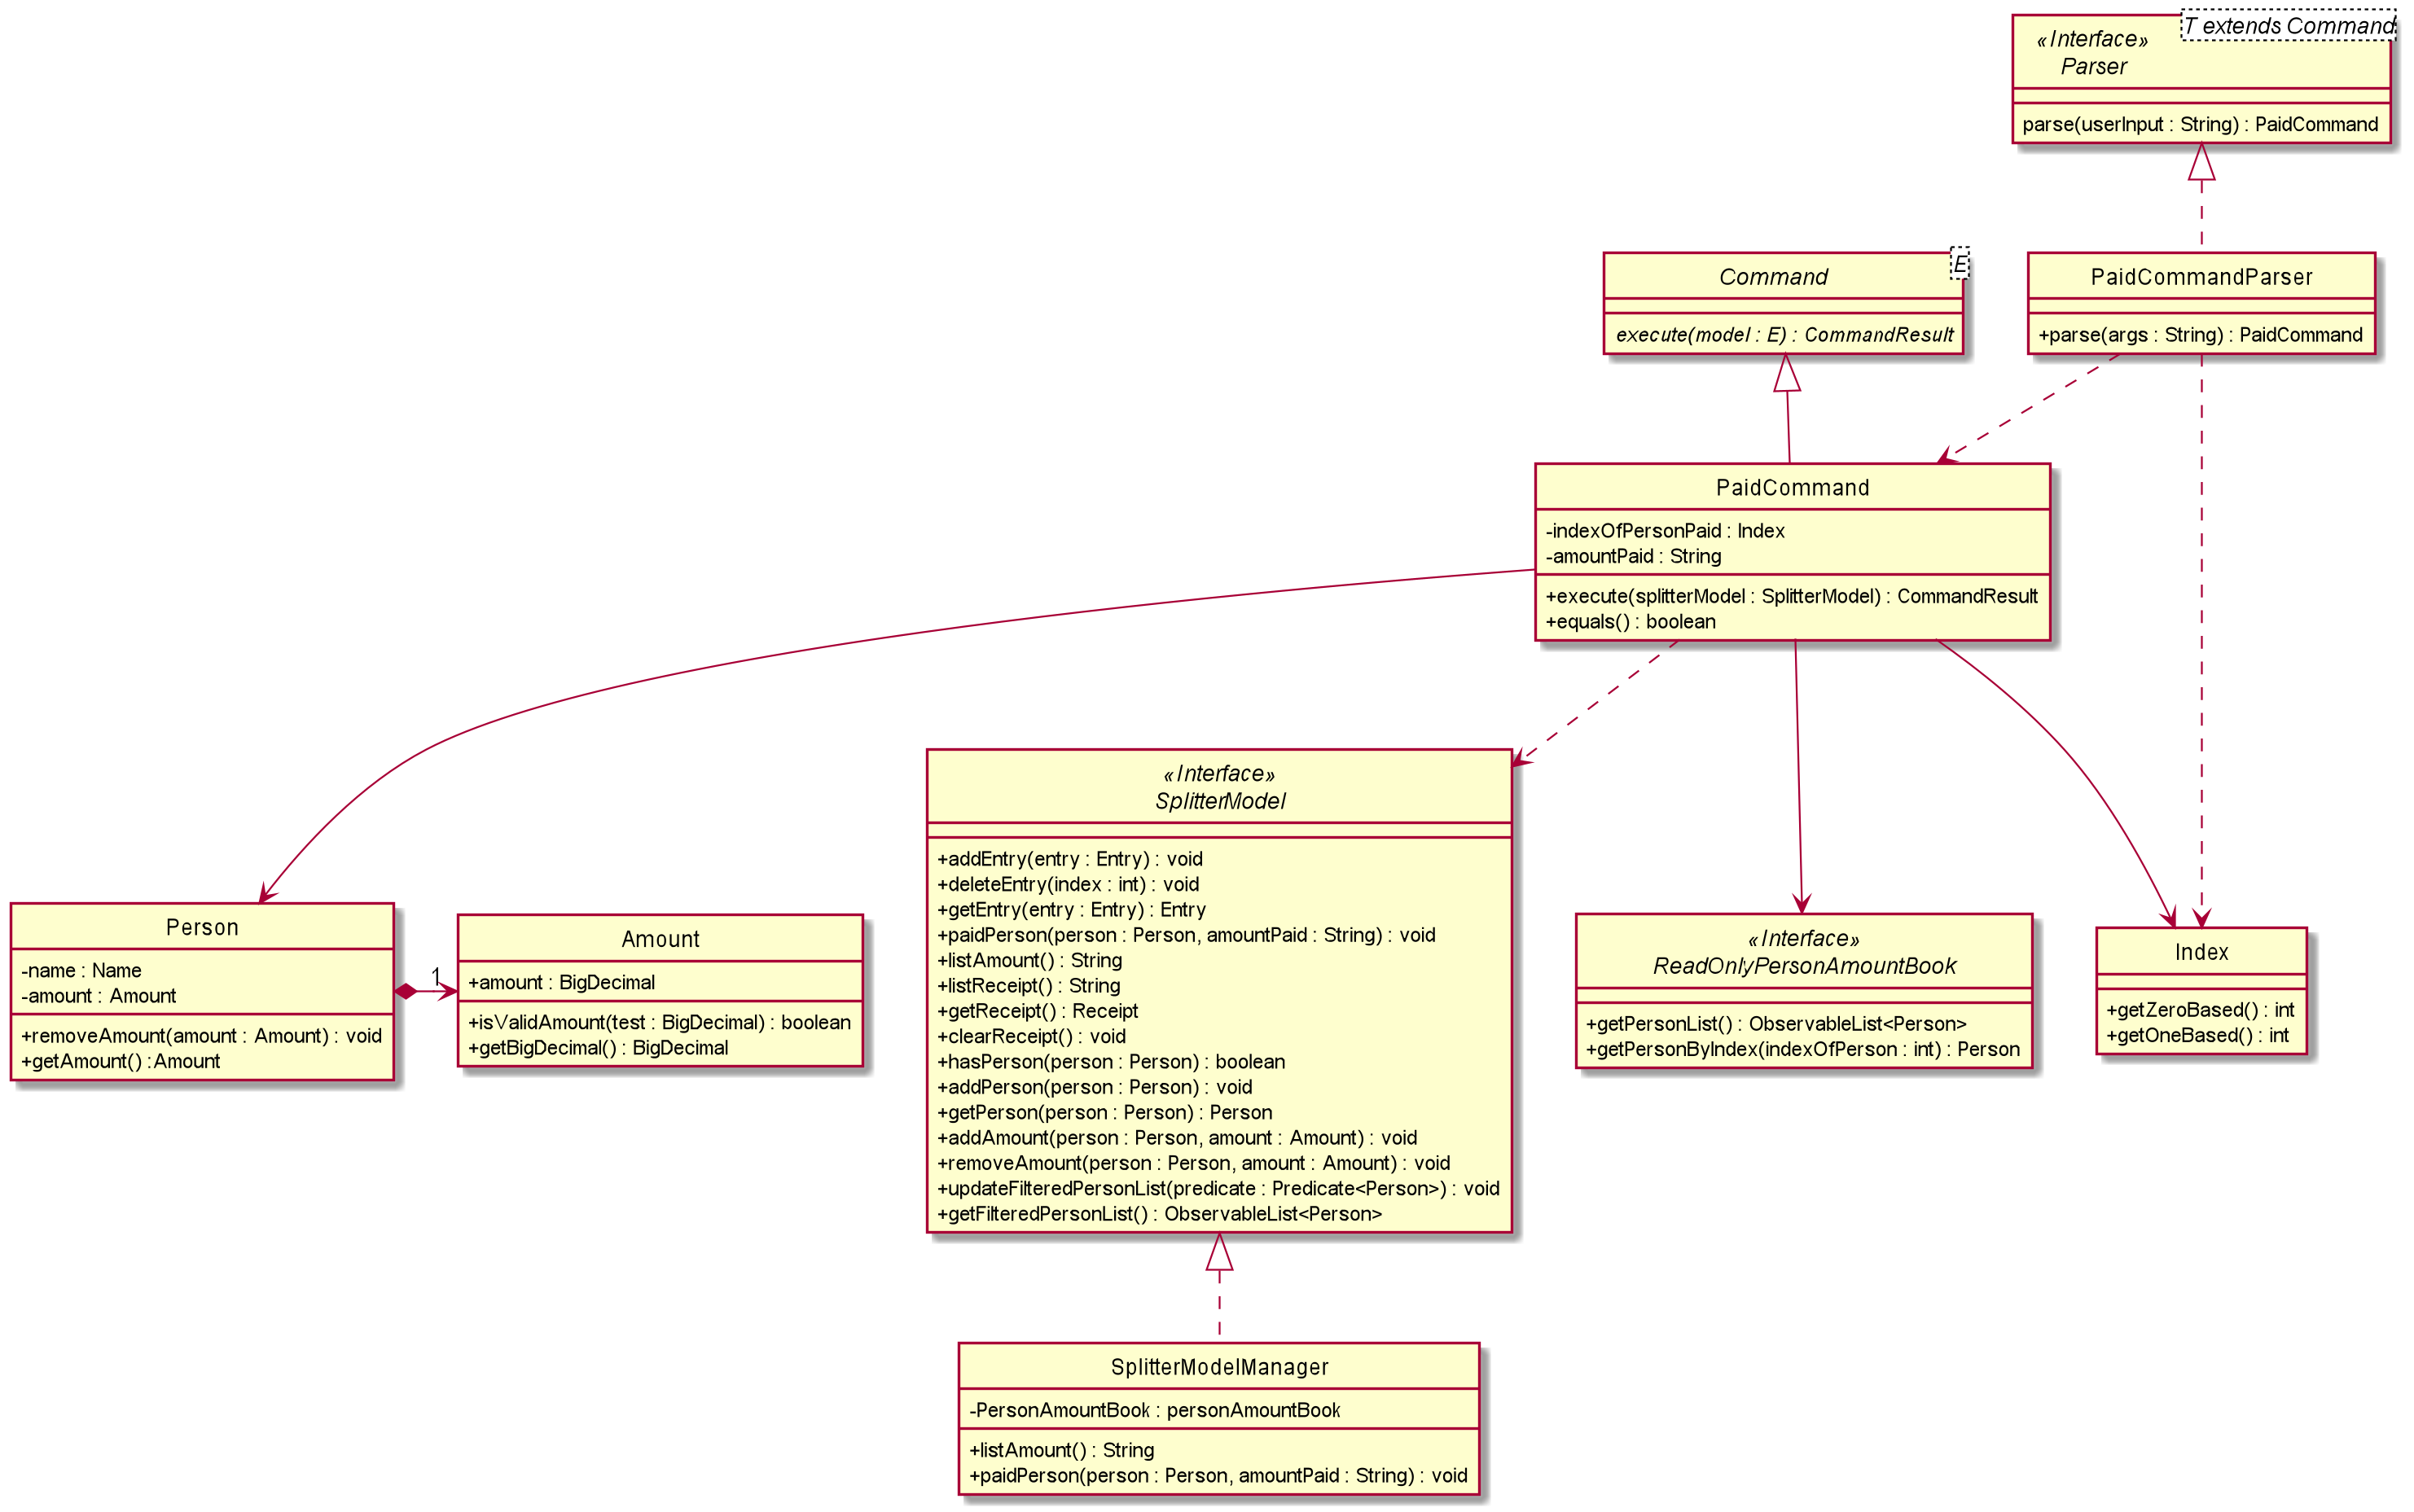
The above class diagram shows the structure of the PaidCommand and its associated classes and
interfaces. Some methods and fields are left out because they are not of concern in PaidCommand
Implementation of Paid Command
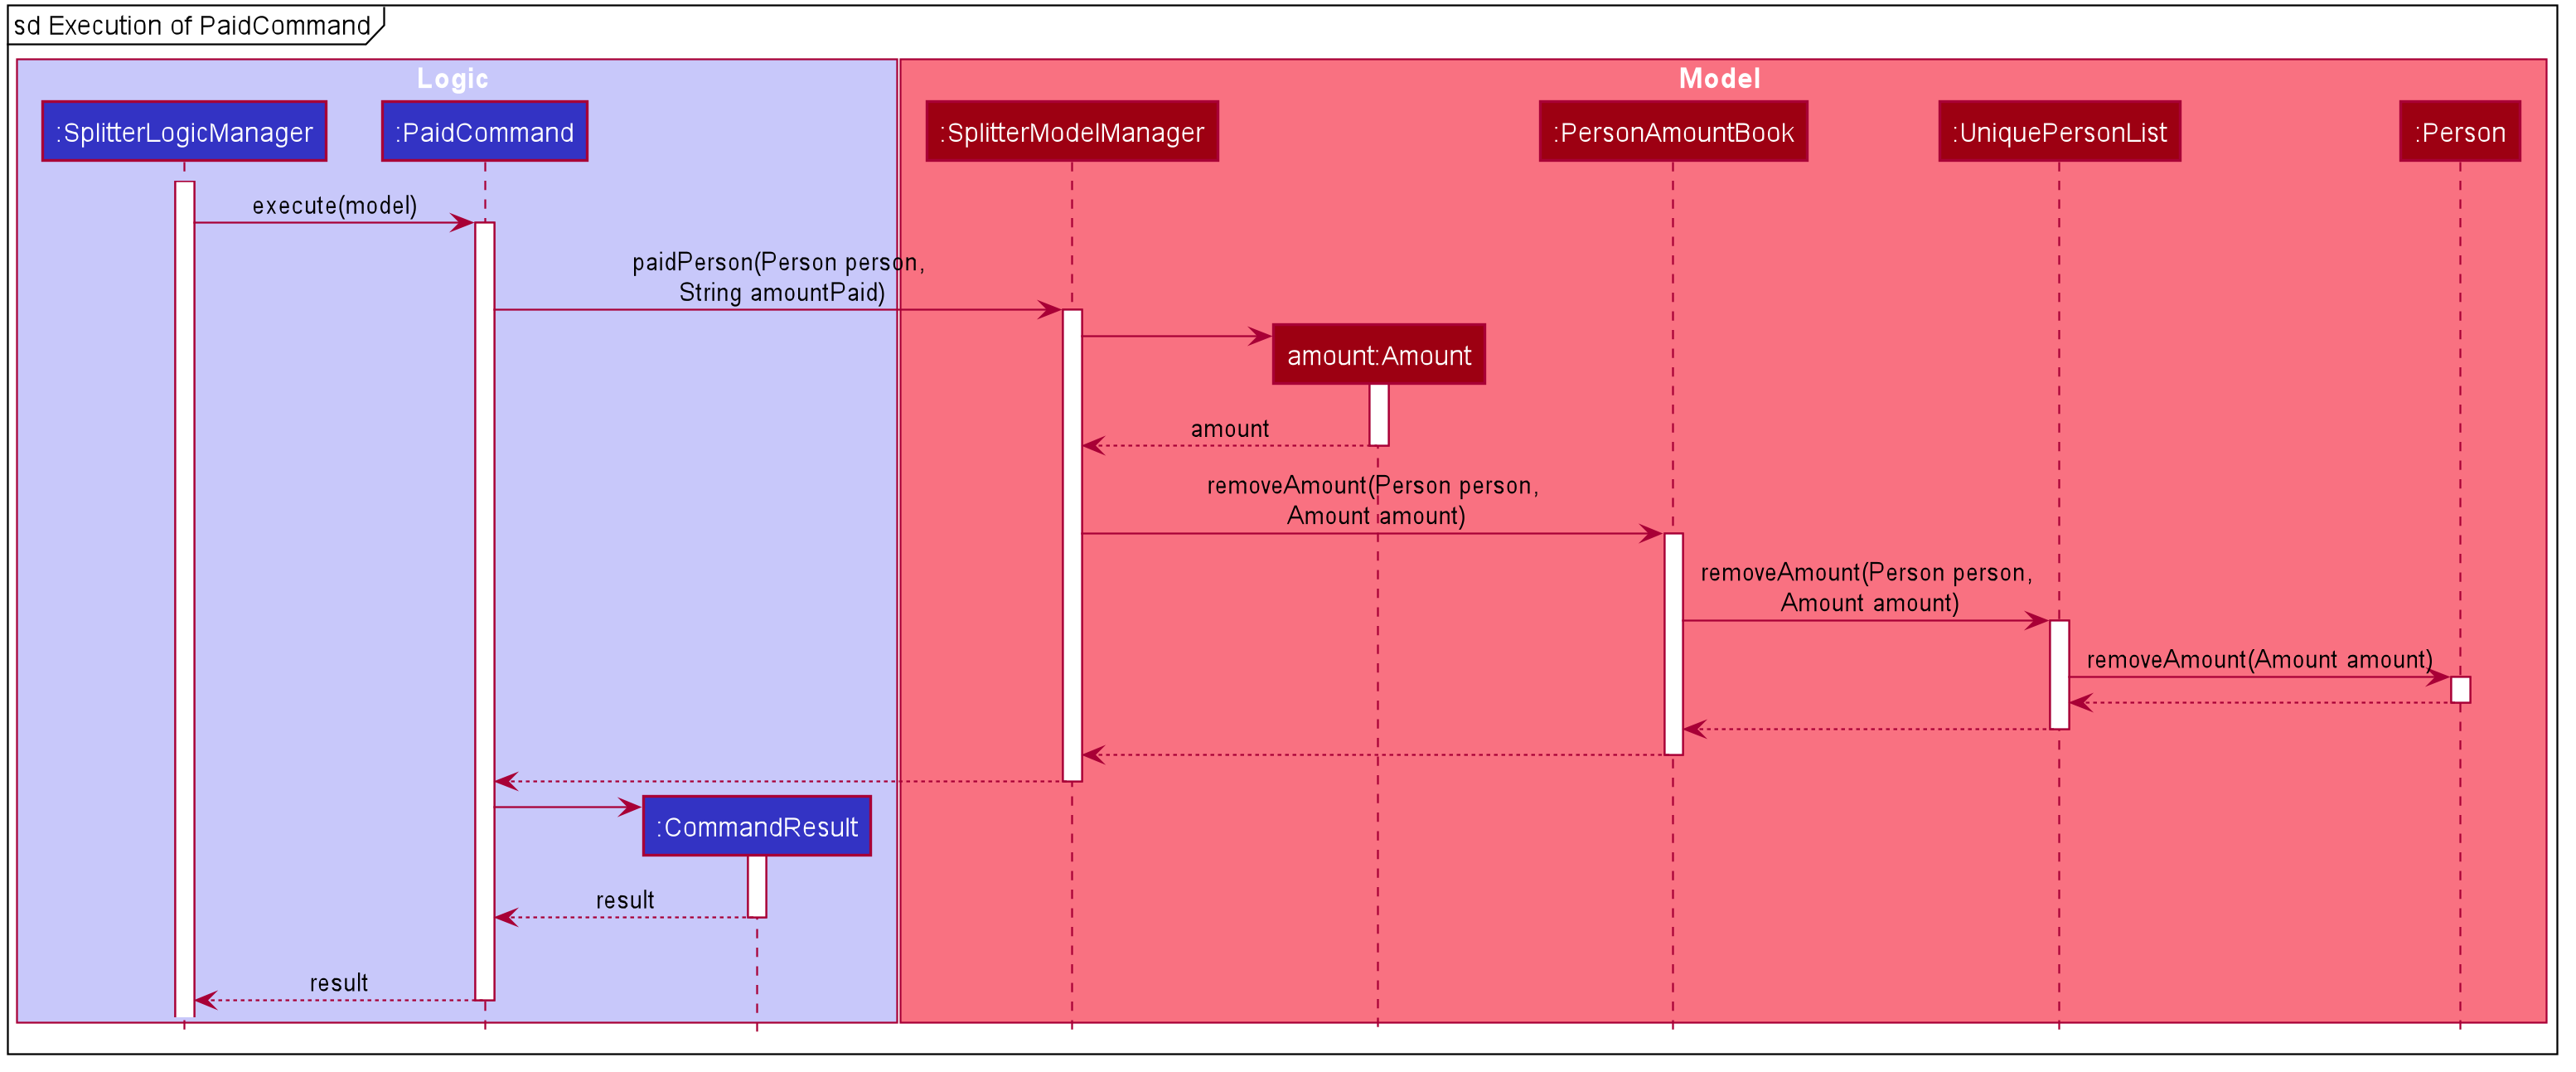
The following is a detailed explanation of the operations PaidCommand performs.
-
The
PaidCommand#execute(SplitterModel splitterModel)method is executed. -
The
SplitterModel#paidPerson(Person person, String amountPaid)will be called. String amountPaid will be converted into an Amount by instantiating a new instance of Amount. -
The
PersonAmountBook#removeAmount(Person person, Amount amount)is then called to remove Amount from Person. -
This in turns calls
UniquePersonList#removeAmount(Person person, Amount amount). -
Lastly,
Person#removeAmount(Amount amount)is called to subtract the amount from the person.
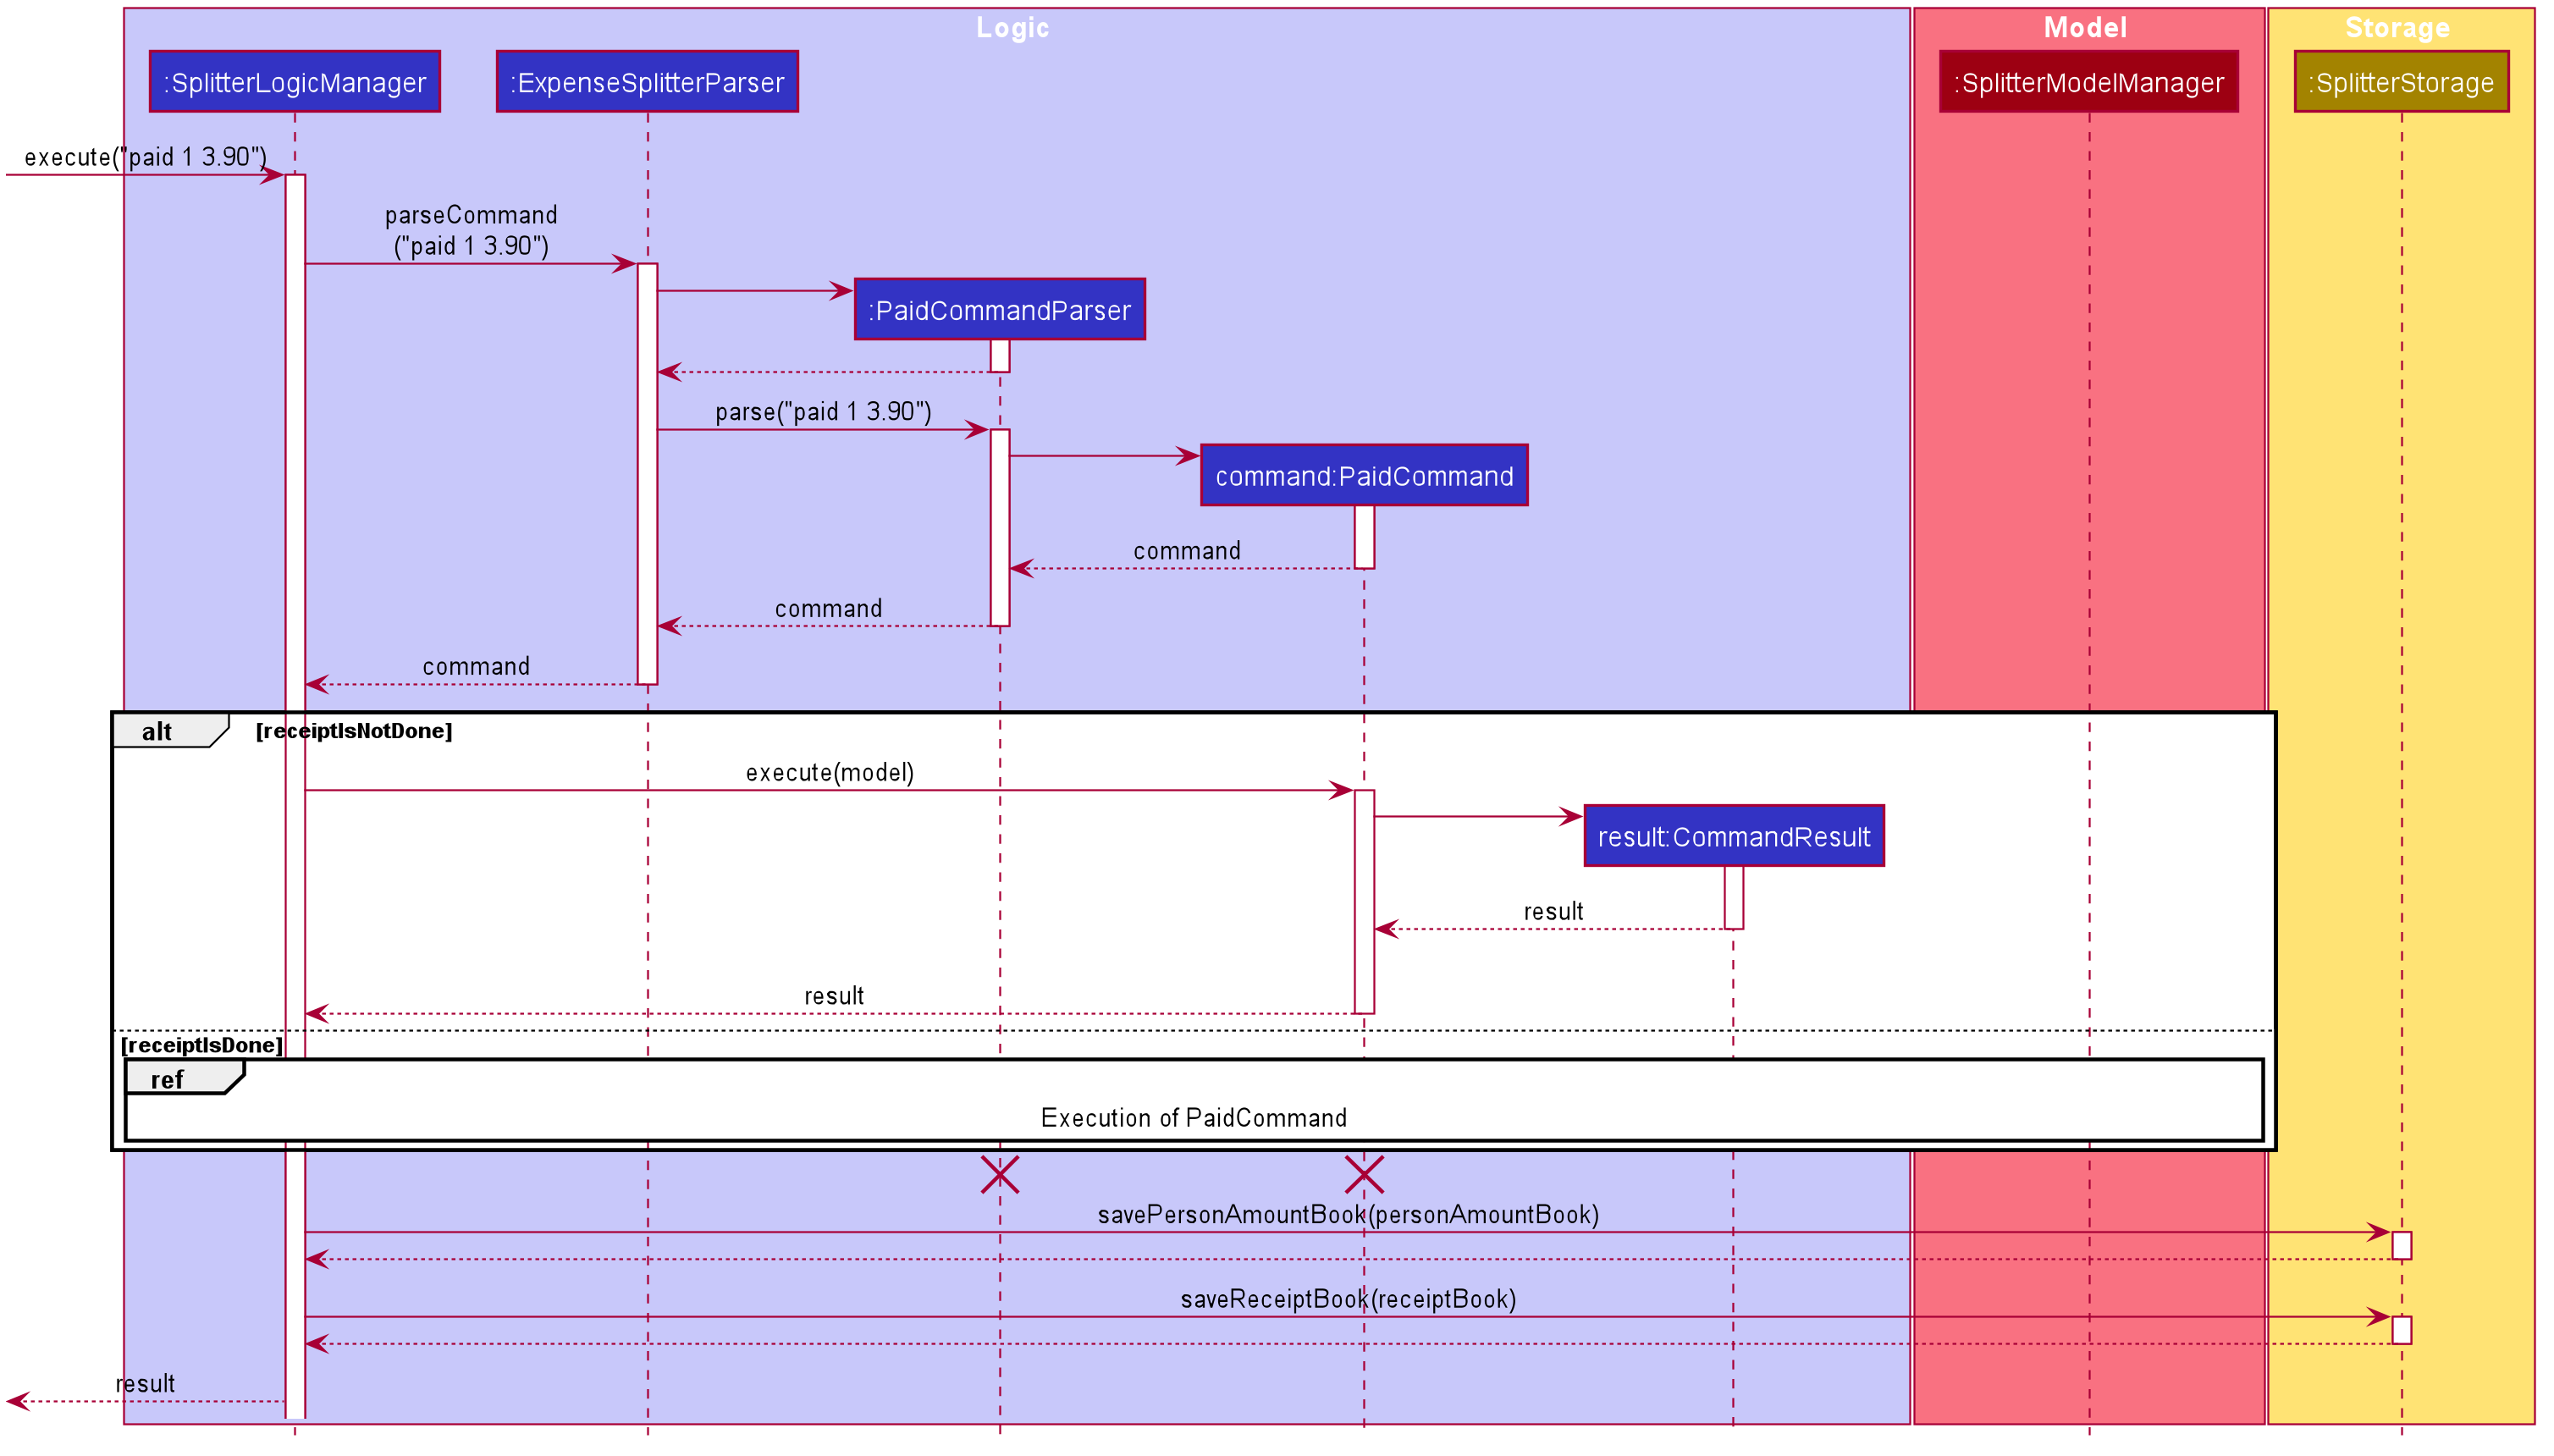
Sequence Diagram for Paid Command
The following sequence diagram summarizes what happens during the execution of paid command.
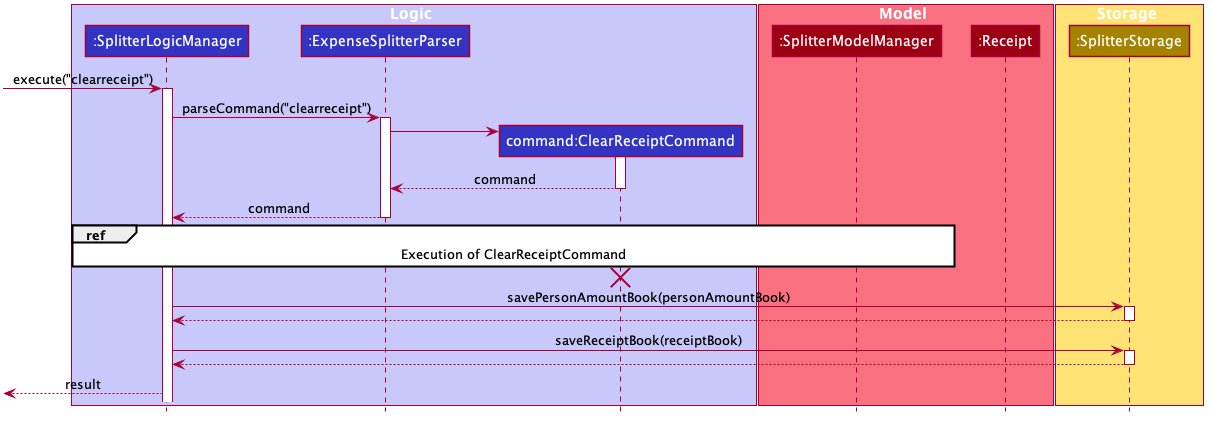
4.2.7. Clear Receipt Command
In this section, we will learn more about how the clearreceipt command is implemented.
What is the Clear Receipt Command
The clearreceipt command essentially deletes all the Entries in the Receipt and allows the user to input new Entries
into a clean receipt.
The clearreceipt command was implemented as ClearReceiptCommand in the expensesplitter/logic/commands package.
The clearreceipt command has the following input format:
clearreceipt
|
The following activity diagram illustrates what happens when a user executes the clearreceipt command:

Structure of Clear Receipt Command
In this section, you will learn more about the relationships between objects related to the ClearReceiptCommand.
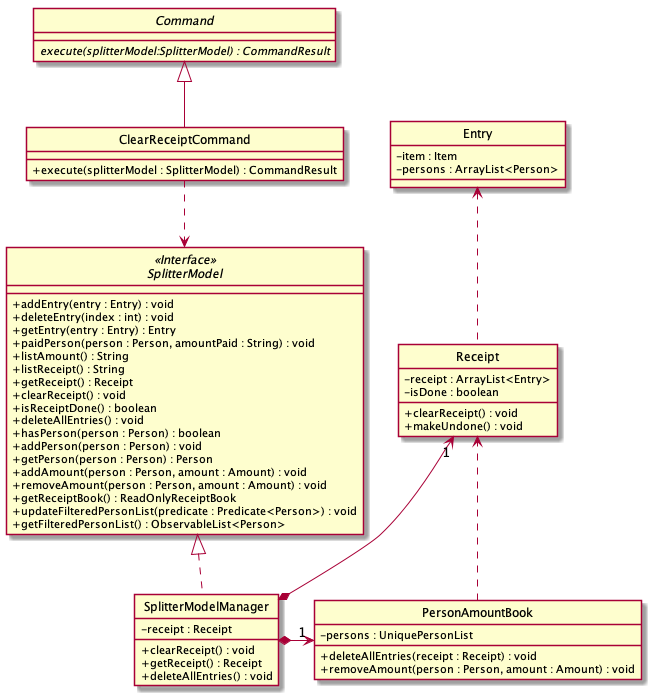
The above class diagram shows the structure of the ClearReceiptCommand and it’s associated classes and interfaces. Some
methods and fields have been left out because they are not of concern in the ClearReceiptCommand.
Implementation of Clear Receipt Command
The following is a detailed explanation of the operations ClearReceiptCommand performs.
-
The
ClearReceiptCommand#execute(SplitterModel splitterModel)method is executed. -
If the Receipt is marked as undone via the
SplitterModel#isReceiptDone()method, theSplitterModel#deleteAllEntires()method is called, which calls thePersonAmountBook#deleteAllEntries()method. What does method does is that it first retrieves the ArrayList<Entry> from the Receipt via theReceipt#getReceipt()method, then for each Entry, it gets the Item and the Amount owed my each person via theEntry#getItem()andItem#getAmountPerPerson()methods respectively. The Amount is then removed from each Person in the Entry via theEntry#getPersonsList()method. After which, thesplitterModel#clearReceipt()method will then be called. This will invoke theReceipt#clearReceipt()method which creates a new ArrayList and assigns it to the Receipt. At the same time, the booleanReceipt#isDoneis assigned tofalse. -
If the Receipt is marked as done, the
splitterModel#clearReceipt()method will then be called. This will invoke theReceipt#clearReceipt()method which creates a new ArrayList and assigns it to the Receipt. At the same time, the booleanReceipt#isDoneis assigned tofalse.
Sequence Diagram for Clear Receipt Command
The following sequence diagram summarizes what happens during the execution of the clearreceipt command.
4.3. Logging
We are using java.util.logging package for logging. The LogsCenter class is used to manage the logging levels and logging destinations.
-
The logging level can be controlled using the
logLevelsetting in the configuration file (See Section 4.4, “Configuration”) -
The
Loggerfor a class can be obtained usingLogsCenter.getLogger(Class)which will log messages according to the specified logging level -
Currently log messages are output to a
.logfile.
Logging Levels
-
SEVERE: Critical problem detected which may possibly cause the termination of the application -
WARNING: Can continue, but with caution -
INFO: Information showing the noteworthy actions by the App -
FINE: Details that is not usually noteworthy but may be useful in debugging e.g. print the actual list instead of just its size
4.4. Configuration
Certain properties of the application can be controlled (e.g user prefs file location, logging level) through the configuration file (default: config.json).
5. Documentation
Refer to the guide here.
6. Testing
Refer to the guide here.
7. Dev Ops
Refer to the guide here.
Appendix A: Product Scope
Target user profile:
-
Temasek Hall residents
-
Diet-conscious residents
-
Residents who frequently pays on behalf of a group
-
Residents who prefer desktop applications
-
Residents who can type fast
-
Residents who prefer typing over using the mouse
-
Residents who are reasonably comfortable using CLI applications
Value proposition: manage diet and expenses faster than a typical mouse/GUI driven app
Appendix B: User Stories
Priorities: High (must have) - * * *, Medium (nice to have) - * *, Low (unlikely to have) - *
| Priority | As a … | I want to … | So that I can… |
|---|---|---|---|
|
Temasek Hall resident |
want to keep track of my expenses accurately |
calculate the exact amount I should collect from my friends after each time we split a meal |
|
healthy hall resident who is trying to lose weight |
check how many calories I took today |
keep track of my calories intake and weight |
|
Temasek hall resident who frequents supper food spots |
split the bill easily with fellow mates |
ensure that the amount is correctly accounted for |
|
Temasek Hall resident who wants to stay healthy |
keep track of my calories |
more accurately watch my weight |
|
Temasek Hall leader |
keep track of my committee events |
know if things are going according to schedule |
|
Temasek Hall exchange student |
have a translation for Singaporean lingo |
better understand the language my friends speak in hall |
|
Temasek Hall sports captain |
keep track of the various attendances for my training |
know who usually attends training and who does not |
|
Temasek Hall leader |
keep track of my committee events |
ensure things run smoothly |
|
Temasek Hall resident who actively participates in hall events |
check the upcoming events |
keep myself up-to-date |
|
Temasek Hall leader |
keep track of when my meetings are |
ensure I do not keep my teammates or committee member waiting |
|
forgetful Temasek Hall resident |
keep track of the myriad of hall activities |
attend all the fun and exciting events at hall |
|
organised resident of Teamsek Hall |
remind myself for the tasks i have |
meet all deadlines |
|
main person in-charge of fixing faults in Temasek Hall |
keep track of all different faults that have been reported |
fix is as soon as possible to reduce the disruptions to my fellow hall mates |
|
international student who is new to Singapore’s culture |
keep track of upcoming hall events |
join all the fun activities in hall |
|
hardworking Temasek Hall resident who wants to manage his schedule |
to check module prerequisites |
plan my modules |
|
attentive resident who notices that the gym has many users |
log the entry of users |
track the entry and exit timings of all gym users |
|
food-loving Temasek Hall resident who frequently uses Grab Food |
keep track of my expenses |
calculate my savings every month |
|
Temasek Hall resident who has many hall friends |
keep track of my friends’s particulars, especially their room number |
find them easily in case I need help |
|
Temasek Hall resident who has to pay hall fees |
record down my school payments |
inform my parents about the necessary expenditures in school |
|
swimming captain of Temasek Hall |
plan my training sets |
better prepare my team for the upcoming competition |
|
Temasek hall exchange student |
have a translation for Singaporean lingo |
better understand the language my friends speak in hall |
|
Temasek Hall Block Head who wants to remember all my block residents |
keep a list of all residents and their particulars |
contact their next of kin in the case of an emergency |
Appendix C: Use Cases
(For all use cases below, the System is the EYLAH and the Actor is the user, unless specified otherwise)
Diet Tracker Use Cases
Use case: UC01 Update User Profile
Actor: User
User’s Height, Weight and Mode will be updated in Self.
MSS
-
User chooses dieting mode (i.e. Weight Loss, Weight Gain, Maintain)
-
EYLAH updates users' dieting mode
-
User updates height
-
EYLAH updates height of user
-
User updates weight
-
EYLAH updates weight of user
Use case ends.
Extensions
-
1a. The flag field for dieting mode is empty or flag is invalid.
-
1a1. EYLAH requests user to re-enter command with flag
-
1a2. User enters command with flag
Steps 1a1-1a2 are repeated until the correct entered is correct.
Use case resumes from step 2.
-
-
3a. Height field is empty or in invalid format.
-
3a1. EYLAH requests user to re-enter height in correct format
-
3a2. User enters command with height in correct format
Steps 3a1-3a2 are repeated until the correct entered is correct.
Use case resumes from step 4.
-
-
3b. Height value is too large and beyond the limit.
-
3b1. EYLAH tells user the limit for the height value and prompts to re-enter command.
-
3b2. User will input values within the specified range.
Steps 3b1-3b2 are repeated until the command entered is correct.
Use case resumes from step 4.
-
-
5a. Weight field is empty or in invalid format.
-
5a1. EYLAH requests user to re-enter weight in correct format
-
5a2. User enters command with weight in correct format
Steps 5a1-5a2 are repeated until the correct entered is correct.
Use case resumes from step 6.
-
-
5b. Weight value is too large and beyond the limit.
-
5b1. EYLAH tells user the limit for the weight value and prompts to re-enter command.
-
5b2. User will input values within the specified range.
Steps 5b1-5b2 are repeated until the command entered is correct.
Use case resumes from step 6.
-
-
*a. At any time, User chooses to not proceed after inputting in invalid command.
-
*a1. EYLAH will not make any changes
Use case ends.
-
Use case: UC02 Add Food Item
Actor: User
Food will be added into FoodBook.
MSS
-
User adds food item
-
EYLAH adds food item to user’s log
Use case ends.
Extensions
-
1a. The food item is added in an invalid format or certain fields are missing.
-
1a1. EYLAH requests user to re-enter food item in valid format.
-
1a2. User enters command in the correct format as requested by EYLAH
Steps 1a1-1a2 are repeated until the correct entered is correct.
Use case resumes from step 2.
-
-
*a. At any time, User chooses to not proceed after inputting in invalid command.
-
*a1. EYLAH will not make any changes
Use case ends.
-
Use case: UC03 Delete Food Item
Actor: User
Food will be deleted from FoodBook.
MSS
-
User lists out existing items
-
EYLAH shows the list based on flags entered
-
User deletes item by index
-
EYLAH deletes item tagged to specified index
Use case ends.
Extensions
-
1a. List command contains invalid flag.
-
1a1. EYLAH will show proper usage of the command and the valid flags.
-
1a2. User will re-enter the command with a valid flag.
Steps 1a1-1a2 are repeated until the command entered is correct. Use case resumes from step 2.
-
-
3a. Invalid or empty index keyed into command.
-
3a1. EYLAH requests user to re-enter index in correct format
-
3a2. User enters edit in correct format
Steps 3a1-3a2 are repeated until the command entered is correct.
Use case ends. Use case resumes from step 4.
-
-
*a. At any time, User chooses to not proceed after inputting in invalid command.
-
*a1. EYLAH will not make any changes
Use case ends.
-
Use case: UC04 Edit Food Item
Actor: User
Food in FoodBook will be edited.
MSS
-
User lists out existing items
-
EYLAH shows the list based on flags entered
-
User edits item by index
-
EYLAH edits the data of the item stored at the index.
Use case ends.
Extensions
-
1a. List command contains invalid flag.
-
1a1. EYLAH will show proper usage of the command and the valid flags.
-
1a2. User will re-enter the command with a valid flag.
Steps 1a1-1a2 are repeated until the command entered is correct. Use case resumes from step 2.
-
-
3a. Invalid or empty index keyed into command.
-
3a1. EYLAH requests user to re-enter index in correct format
-
3a2. User enters edit in correct format
Steps 3a1-3a2 are repeated until the command entered is correct.
Use case resumes from step 4.
-
-
3b. No additional tags and data keyed in as flags to replace existing data.
-
3b1. EYLAH requests user to re-enter command with at least one flag
-
3b2. User enters command with flag and data
Steps 3b1-3b2 are repeated until the command entered is correct.
Use case resumes from step 4.
-
-
*a. At any time, User chooses to not proceed after inputting in invalid command.
-
*a1. EYLAH will not make any changes
Use case ends.
-
Use case: UC05 List Food Items
Actor: User
List food in FoodBook filtered by tags.
MSS
-
User lists out existing items
-
EYLAH shows the list based on flags entered
Use case ends.
Extensions
-
1a. Invalid flag or additional arguments are entered into the command.
-
1a1. EYLAH will show proper usage of the command and the valid flags.
-
1a2. User will re-enter the command with a valid flag.
Steps 1a1-1a2 are repeated until the command entered is correct. Use case resumes from step 2.
-
-
*a. At any time, User chooses to not proceed after inputting in invalid command.
-
*a1. EYLAH will not make any changes
Use case ends.
-
Use case: UC06 Track Daily Calories
Actor: User
Show user daily food and calorie intake.
MSS
-
User calls
listcommand -
EYLAH shows food intake for the day, calories intake for the day, and calories left to consume
Use case ends.
Extensions
-
1a. Additional valid flags entered with the list command.
-
1a1. EYLAH would generate and display the appropriate list according to the flag
User case ends.
-
-
*a. At any time, User chooses to not proceed after inputting in invalid command.
-
*a1. EYLAH will not make any changes
Use case ends.
-
Use case: UC07 Calculate BMI
Actor: User
Calculate BMI for user.
MSS
-
User calls
bmicommand, with optional height and weight entered -
EYLAH calculates and shows user’s BMI based on the height and weight
Use case ends.
Extensions
-
1a. BMI command contains invalid flags.
-
1a1. EYLAH suggests to user the correct format to use
-
1a2. User will key in the correct format
Steps 1a1-1a2 are repeated until the command entered is correct.
Use case resumes from step 2.
-
-
1b. Both height and weight are not provided as input and there is no stored height and weight.
-
1b1. EYLAH tells user to provide both height and weight as there are no stored values
-
1b2. User will input both height and weight values.
Steps 1b1-1b2 are repeated until the command entered is correct.
Use case resumes from step 2.
-
-
1c. Height is not provided as input and there is no stored height.
-
1c1. EYLAH tells user to provide height as there are no stored value.
-
1c2. User will input height value with the bmi command.
Steps 1c1-1c2 are repeated until the command entered is correct.
Use case resumes from step 2.
-
-
1d. Weight is not provided as input and there is no stored weight.
-
1d1. EYLAH tells user to provide weight as there are no stored value.
-
1d2. User will input Weight value with the bmi command.
Steps 1d1-1d2 are repeated until the command entered is correct.
Use case resumes from step 2.
-
-
1e. Height and weight values are extremely large and beyond the limit.
-
1e1. EYLAH tells user the limit for the values and prompts to re-enter command.
-
1e2. User will input values within the specified range.
Steps 1e1-1e2 are repeated until the command entered is correct.
Use case resumes from step 2.
-
-
*a. At any time, User chooses to not proceed after inputting in invalid command.
-
*a1. EYLAH will not make any changes
Use case ends.
-
Expense Splitter Use Cases
Use case: UC08 - Adding an Item
Actor: User
Guarantees:
Item will be added into the Receipt.
MSS
-
User keys in the ItemName, it’s ItemPrice and Person(s) involved in the splitting of the Item.
-
EYLAH adds the Item and Persons into a Entry.
-
EYLAH adds the Entry into a Receipt.
-
EYLAH displays the Item and Person(s) involved in the splitting of the item, as well as the Amount owed per Person.
Use case ends.
Extensions
-
1a. EYLAH detects empty ItemName, ItemPrice or Person(s)
-
1a1. EYLAH displays an error message and displays an example of a correct
additemfunction.Use case ends.
-
-
1b. Eylah detects invalid syntax.
-
1b1. EYLAH displays an error message and displays an example of a correct
additemfunction.Use case ends.
-
Use case: UC09 - Deleting an Item
Actor: User
Preconditions: Item user wants to delete is present in the Receipt.
Guarantees:
Item will be deleted from Receipt.
MSS
-
User keys in request to delete an Item in the current Receipt via it’s Index.
-
EYLAH deletes that Item and deducts the appropriate amount associated with each Person(s) involved in splitting that Item.
-
EYLAH displays a MESSAGE_SUCCESS informing the user that Item has been successfully deleted.
Use case ends.
Extensions
-
1a. User did not input the Index of the Item. (Inserting
deleteiteminstead ofdeleteitem 1)-
1a1. EYLAH displays an error message and displays an example of a correct
deleteitemfunction.Use case ends.
-
Use case: UC10 - Listing Receipt
Actor: User
Guarantees: All Items in the current Receipt will be listed out.
MSS
-
User requests to list receipt containing Item(s) in the current Receipt.
-
EYLAH displays the list of Item(s) in the current Receipt, its ItemPrice and Person(s) involved in splitting that Item.
Use case ends.
Extensions
-
1a. EYLAH detects an empty Receipt.
-
1a1. EYLAH displays an error message, saying that the Receipt has 0 Item.
Use case ends.
-
Use case: UC11 - Listing Person(s) and the Amount they owe
Actor: User
Guarantees: All Person(s) and the amount they owe will be listed.
MSS
-
User requests to list all the Person(s) and the Amount they owe the user.
-
EYLAH displays the list of Person(s) and the associated Amount they owe they user.
Use case ends.
Extensions
-
1a. EYLAH detects an empty Person list.
-
1a1. EYLAH displays an error message, informing user that there are no Person in the list.
Use case ends.
-
Use case: UC12 - Paying money
Actor: User
Guarantees: Reduces the Amount a Person owes and if they owe $0 the Person
is automatically deleted.
MSS
-
User requests to reduce the Person’s Amount when he/she has paid the user.
-
EYLAH searches for the Person and reduces the Amount they owe the user, if after paying the Person does not owe anything, they are deleted.
-
EYLAH then displays the new Amount owed by the Person.
Use case ends.
Extensions
-
1a. EYLAH detects that the Person has paid more than what he owes.
-
1a1. EYLAH displays an error message, informing the user to key in an Amount lesser or equal to the amount the Person owes.
Use case ends.
-
-
2a. EYLAH detects an empty PersonList.
-
2a1. EYLAH displays an error message, saying that there is no Person in the list.
Use case ends.
-
-
2b. EYLAH detects invalid IndexOfPersonPaid.
-
2b1. EYLAH displays an error message and informs User to key in the correct Index of the person who paid. EYLAH will prompt the user to use
listamountto find the Index of Person who paid.Use case ends.
-
-
2c. EYLAH detects that the Person does not exist in the list.
-
2c1. EYLAH displays an error message, informing the user to key in the correct index of the Person. EYLAH will prompt the user to use
listamountto find the Index of Person who paid.Use case ends.
-
Use case: UC13 - Clearing the Receipt when Receipt is done
Actor: User
Preconditions: Receipt is marked as done.
Guarantees:
Deletes all the Entries in the Receipt. It also marks the Receipt as undone.
MSS
-
User requests to clear the receipt after he/she decides to start a clean Receipt.
-
EYLAH removes all the Entries from the Receipt.
-
EYLAH marks the Receipt as undone.
-
EYLAH display a MESSAGE_SUCCESS informing the user that the Receipt has been successfully cleared.
Use case ends.
C.1. Use case: UC14 - Clearing the Receipt when Receipt is undone
Actor: User
Preconditions: Receipt is marked as undone.
Guarantees:
Deletes all the Entries in the Receipt. It also marks the Receipt as undone.
MSS
-
User requests to clear the receipt after he/she decides to start a clean Receipt.
-
EYLAH removes Amount owed per Person from the PersonAmountBook.
-
EYLAH removes all the Entries from the Receipt.
-
EYLAH display a MESSAGE_SUCCESS informing the user that the Receipt has been successfully cleared.
Use case ends.
Use case: UC15 - Back to Main Menu
MSS
-
User requests to exit Expense Splitter and go back to Main Menu of EYLAH.
-
EYLAH exits Expense Splitter and goes back to Main Menu
Use case ends.
Extensions
Use case: UC16 - Completing the receipt
Actor: User
Guarantees:
Displays the confirmation message to user. It also marks the Receipt as done.
MSS
-
User requests to mark the Receipt as done after he/she finish adding the items.
-
EYLAH marks the current Receipt as done.
-
EYLAH display a MESSAGE_SUCCESS informing the user that the Receipt has been marked as completed.
Use case ends.
Extensions
-
2a. EYLAH detects that the Receipt has already been marked as done.
-
2a1. EYLAH displays an error message, informing the user that current Receipt already been marked as completed.
Use case ends.
-
Appendix D: Non Functional Requirements
-
Should work on any mainstream OS as long as it has
Java 11or above installed. -
Should be able to hold up to 1000 persons without a noticeable sluggishness in performance for typical usage.
-
Should be able to hold up to 1000 food items without a noticeable sluggishness in performance for typical usage.
-
Should have a pre-loaded list of commonly consumed food items in database.
-
Should be able to work without internet access.
-
A user should be able to use EYLAH easily and intuitively.
-
A user with above average typing speed for regular English text (i.e. not code, not system admin commands) should be able to accomplish most of the tasks faster using commands than using the mouse.
-
An Item should not have a Item Price more than $10,000.
Appendix E: Glossary
- Temasek Hall
-
A Hall of Residences in National University of Singapore
- CLI
-
Command Line Interface
- Syntax
-
The structure of statements in the command
- Mainstream OS
-
Windows, Linux, Unix, OS-X
- Private contact detail
-
A contact detail that is not meant to be shared with others
- Body-Mass Index (BMI)
-
The BMI is a convenient rule of thumb used to broadly categorize a person as underweight, normal weight, overweight, or obese based on tissue mass (muscle, fat, and bone) and height
Table 1. Diet Tracker Command Prefix
Prefix |
Description |
Used in Following Commands |
-n |
Name of Food |
|
-c |
Calories |
|
-i |
Index |
|
-g |
Gain |
|
-m |
Maintain |
|
-l |
Lose |
|
-a |
All |
|
-d |
By Past Num of Days |
|
-t |
By Tag |
|
-h |
Height |
|
-w |
Weight |
Table 2. Expense Splitter Command Prefix
Prefix |
Description |
Used in Following Commands |
-i |
Item Name |
|
-p |
Item Price |
|
-n |
Name of Person |
Appendix F: Product Survey
Pros:
-
Customizable according to the User’s demands.
-
Able to monitor the User’s exercise and movement.
Cons:
-
Application was hacked and data was leaked.
-
Unable to use it offline.
Pros:
-
Very user friendly.
-
Easy track of expenses.
Cons:
-
Has a tendency of complicating splitting bills.
-
Unable to use it offline.
Appendix G: Instructions for Manual Testing
Given below are instructions to test the app manually.
| These instructions only provide a starting point for testers to work on; testers are expected to do more exploratory testing. |
G.1. Launch and Shutdown
-
Initial launch
-
Download the jar file and copy into an empty folder
-
Navigate to that folder using Terminal and type
java -jar EYLAH.jar
Expected: Shows the CLI interface with welcome message. The window size may not be optimum.
-
G.2. Adding a Food in Diet Tracker
-
Adding a Food
-
Test case:
add -n burger -c 170
Expected: Food is added to FoodBook. Details of the added Food are shown in the status message. Timestamp in the status bar is updated. -
Test case:
add burger
Expected: No Food is added. Error details and the correct format to input will be shown to the user. -
Other incorrect add commands to try:
add,addwith no flags-nand-cappended to the command.
Expected: Similar to previous.
-
G.3. Deleting a Food in Diet Tracker
-
Deleting a Food while all Foods are listed
-
Prerequisites: List all Foods using the
listcommand. Multiple Foods in the list. -
Test case:
delete 1
Expected: First Food is deleted from the list. Details of the deleted Food shown in the status message. Timestamp in the status bar is updated. -
Test case:
delete 0
Expected: No Food is deleted. Error details shown in the status message. Status bar remains the same. -
Other incorrect delete commands to try:
delete,delete x(where x is larger than the list size)
Expected: Similar to previous.
-
G.4. Editing a Food in Diet Tracker
-
Editing a Food while all Foods are listed
-
Edit Command format:
edit -i INDEX [-n NAME] [-c CALORIES] -
Prerequisites: List all Foods using the
listcommand. Multiple Foods in the list. -
Test case:
edit -i 1 -n Pasta
Expected: First Food is edited. Details of the edited Food shown in the status message. Timestamp in the status bar is updated. Food is edited and then restored. -
Test case:
edit -i 1
Expected: No Food is edited. Error details shown in the status message. Status bar remains the same. -
Other incorrect delete commands to try:
edit,edit -i x(where x is larger than the list size)
Expected: Similar to previous.
-
G.5. Set Dieting Mode In Diet Tracker
-
Setting a Dieting Mode for Diet Tracker.
-
Mode Command format:
mode [-l] [-g] [-m] -
Test case:
mode -l
Expected: Sets the Dieting Mode for the Diet Tracker and stores it. -
Test case:
mode
Expected: No Dieting Mode will be set. Error details shown in the response message.
-
G.6. Check User Metrics In Diet Tracker
-
Checking a Users own health metrics (Height, Weight and Dieting Mode).
-
Metrics Command format:
metrics -
Test case:
metrics
Expected: The User’s own metrics will be printed out. -
Test case:
metrics -h
Expected: No metrics will be shown. Error details shown in the response message.
-
G.7. Calculate BMI In Diet Tracker
-
Calculating BMI for the User or for others.
-
Bmi Command format:
bmi [-h HEIGHT] [-w WEIGHT] -
Test case:
bmi -h 170.2 -w 65.7
Expected: BMI will be calculated with the Height of 170.2cm and Weight of 65.7kg, and will be printed and shown to the user. The BMI category will also be displayed to the User. -
Test case:
bmi -h 170.2
Prerequisites: Must have stored Weight usingweight WEIGHT. Expected: BMI will be calculated with the Height of 170.2cm and the User’s stored Weight, and will be printed and shown to the user. The BMI category will also be displayed to the User. -
Test case:
bmi -w 65.7
Prerequisites: Must have stored Weight usingheight HEIGHT. Expected: BMI will be calculated with the User’s stored Height and the Weight of 65.7kg, and will be printed and shown to the user. The BMI category will also be displayed to the User. -
Test case:
bmi
Prerequisites: Must have stored Height usingheight HEIGHTand Weight usingweight WEIGHT. Expected: BMI will be calculated with the User’s stored Height and Weight, and will be printed and shown to the user. The BMI category will also be displayed to the User. -
Test case:
bmi -h 10000000000000000 -w 10000000000000000
Expected: Input height and weight are above the acceptable range. Error details shown in the response message. -
Other incorrect edit commands to try:
bmi -h -1,bmi -h 137(without storing Weight),bmi -w 67(without storing Height)
Expected: BMI will not be calculated. Error Message will be shown with details.
-
G.8. Store Height In Diet Tracker
-
Storing Height into the Diet Tracker.
-
Height Command format:
height HEIGHT -
Test case:
height 170.2
Expected: Stores a Height of 170.2cm into Diet Tracker. Details of the height stored are shown in success message. -
Test case:
height -1
Expected: Height will not be stored. Error details shown in the response message. -
Other incorrect height commands to try:
height 0,height 1000000000000001
Expected: Height will not be stored. Expected: Error message shown with details.
-
G.9. Store Weight In Diet Tracker
-
Storing Weight into the Diet Tracker.
-
Height Command format:
weight WEIGHT -
Test case:
weight 65.7
Expected: Stores a Weight of 65.7kg into Diet Tracker. Details of the weight stored are shown in success message. -
Test case:
weight -1
Expected: Weight will not be stored. Error details shown in the response message. -
Other incorrect weight commands to try:
weight 0,weight 1000000000000001
Expected: Weight will not be stored. Error message shown with details.
-
G.10. Add Item In Expense Splitter
-
Adding an Item into the current Receipt.
-
Add Item Command format:
additem -i ITEMNAME -p ITEMPRICE -n PERSON [-n PERSON]… -
Test case:
additem -i pasta -p 33.50 -n John -n Bob
Expected: Adds an item with the above details to current receipt and increase the person amount equal to dividing the price with the number of person splitting that item. -
Test case:
Invalid Syntax
Expected: No item is added to the current receipt and no change to person amount. An error message will be displayed.
-
G.11. Delete Item In Expense Splitter
-
Deleting an Item from the current Receipt.
-
Delete Item Command format:
deleteitem INDEX -
Test case:
delete 1
Expected: Removes the item of the specified index from the receipt. -
Test case:
Invalid Syntax
Expected: No item will be deleted from the current receipt. An error message will be displayed.
-
G.12. List Receipt in Expense Splitter
-
Listing the items contained in the current receipt. The order of items listed depends on the order of items added by the user.
-
ListReceipt Command format:
listreceipt -
Prerequisites: NIL.
-
Test case:
listreceipt
Expected: If there are items in the receipt: List all items in the current receipt, its price and amount associated with each person involved in splitting that item -
Test case:
listreceipt
Expected: If there are no items in the receipt: EYLAH will inform user that there is no items currently in the receipt.
-
G.13. List Amount In Expense Splitter
-
List all the Person(s) and the amount they owe.
-
List Receipt command format:
listamount -
Test case:
listamount
Expected: If there are Person in the list: List all Person that currently owe the User money. There should not be anyone with $0 as those who do not owe any money will be deleted from the PersonList. -
Test case:
listamount
Expected: If there are no Person in the list: EYLAH will inform user that there no one owes money.
-
G.14. Done Receipt In Expense Splitter
-
Marks the current receipt as done.
-
Done Receipt Command format:
donereceipt -
Test case:
donereceipt
Expected: The receipt is marked as done. A success message will be displayed.
-
G.15. Paid Command In Expense Splitter
-
Reduces the amount of money a Person owes.
-
Paid command format:
paidINDEX[AMOUNT] -
Test case:
paid 1 1.10
Expected: Reduces the amount of money the Person at Index 1 owes by $1.10. -
Test case:
paid 1
Expected: Reduces the entire amount of money the Person at Index 1 owes. -
Test case:
paid -1
Expected: EYLAH will inform the user that INDEX is incorrect.
-
G.16. Clear Receipt In Expense Splitter
-
Clears the receipt and marks the receipt as undone.
-
Clear Receipt Command format:
clearreceipt -
Test case:
clearreceipt
Expected: The receipt is cleared and is marked as undone. A success message will be displayed.
-
G.17. Saving data
-
Manual saving is not required as data is already saved in the hard disk after any commands that changes the data.
Appendix H: Effort
Overview
As residents of Temasek Hall, members of our group frequents the supper area rather often and we have come to realise
two problems that we face:
1. Splitting bills with multiple people can be a headache, especially if some of the food items are shared amongst
different groups of residents.
2. There was no way of tracking our diet with the numerous suppers that we had.
In order to dive deeper into this problem, our group asked around to see if similar problems were faced by other residents. What we found was that many residents faced the same problems. One of the residents even conducted a survey before. As such, after studying the survey, our team wanted realised that we could make an application to help residents with problems we all face while staying in Temasek Hall.
Hence, we decided to build EYLAH, a super application that has both a diet tracker and a expense splitter functionality. EYLAH is significantly different from Address Book 3 (AB3) in many aspects. We needed to add audience-specific features to satisfy the needs of our target audience-residents staying in Temasek Hall.
Challenges
The team encountered a few issues during the development process of EYLAH. The more notable ones are:
-
Project Ideation
At the very beginning of our project, we came up with many different ideas that could potentially solve the various problems Temasek Hall residents face. After many discussions, we finally boiled it down to 2 ideas. Moving on, we realised that each of us had our own idea of how to implement each feature and we even had some arguments regarding this. However, we sat down and sorted out the uncertainties and clarified with each other what the best approach would be to tackle the implementation of these ideas. At the end of the day, we not only came up with the solution but also the roadmap to our project. -
Representation of Currency
When we first started building our application. We were met with our first roadblock. How should we represent our currency? We knew that usingdoublewas out of the question as there were issues with it overflowing. Not only that, floating point values cannot be stored exactly in memory. There was also the issue of loss of significance. (Explained here: htts://dzone.com/articles/never-use-float-and-double-for-monetary-calculatio) As such, Willy did a bit of research and discovered that using Java’sBigDecimalwas the way to go.BigDecimaldoes not allow negative values and allows for precision formatting. -
Deleting an Item after Paid
Whenever a user adds an Item, the Amount owed by someone is stored in a PersonAmountBook. When a Item is deleted, the Amount is also removed from the PersonAmountBook. The problem we faced here is when the user decides to use thepaidcommand to reduce the Amount owed by someone before using thedeleteitemcommand. This meant that the Amount owed by someone might potentially go to negative, which is not allowed by nature ofBigDecimal. As such, our group decided to include a boolean flag in the Receipt to ensure that thepaidcommand can only be used after the Receipt has been marked as completed. Similarly, theadditemanddeleteitemcommands can only be used if the Receipt is marked as incomplete. -
Integer Overflow
In many of our intra-group bug testing sessions, we would often encounter problems with regards to integer overflow, whereby we would enter an incredibly large number as the price of an Item or the Calories of a Food. This would cause Exceptions to be thrown, causing our application to crash. To fix such problems, we made a cap on the values that can be inputted by the user.
Conclusion
In conclusion, our team had a terrific time working with each another and we hope our application, EYLAH, will indeed
help to ease the lives of the residents at Temasek Hall.
Overall, we believe that EYLAH is a good testament to our hard work and the time spent on perfecting it.